Hello! Welcome back to our work on figure illustration.
In the last lesson, we established the crucial first step for drawing any figure: capturing its energy with the line of action and blocking in the main masses (head, ribcage, pelvis) with their correct tilts and relationships. This gave us a dynamic blueprint for the pose.
Today, we're going to build upon that blueprint. Our goal is to construct a proportionally correct mannequin figure over a gesture sketch. We'll move from the simple masses of the torso to a complete, articulated figure with limbs. Think of this as building the structural scaffolding for your character. A solid mannequin ensures that when you start adding complex muscles later, every part will be in the right place and the right size.
1. The Proportional Blueprint: The 8-Head Rule
To build a believable figure, we need a consistent system of measurement. The most common method in figure drawing is using the head as a unit of measurement. An "ideal" figure is said to be about eight heads tall. While real people vary, this system provides an excellent starting point for learning proportions.
Let's dive into the specifics of this system.
Human Anatomy Fundamentals: Basic Body Proportions
The article 'Human Anatomy Fundamentals: Basic Body Proportions' on Tutsplus provides a clear, step-by-step guide to the 8-head proportion system.
Please read the first major section, '1. How to Draw a Body: The Basic Figure'. Focus on the step-by-step breakdown (Steps 1-6) and the key landmarks that align with each head measurement. You can skim or skip the section on the profile view for now.
Here are the key takeaways from that reading, which form the foundation of our mannequin's proportions:
- Head 1: The head itself.
- Head 2: The nipples.
- Head 3: The navel and the elbows.
- Head 4: The bottom of the pelvis and the wrists.
- Head 5: The fingertips.
- Head 6: The bottom of the kneecaps.
- Heads 7-8: The lower legs and feet.
Memorizing these landmarks will be immensely helpful. It's a system of checks and balances you can use to verify your drawing as you construct it.
2. Mannequinization: Building 3D Form
With our proportional map established, the next step is to translate that 2D guide into a 3D structure. This process is often called "mannequinization"—simplifying the body's complex forms into a collection of basic 3D shapes like boxes, cylinders, and spheres.
This is the intermediate step between your initial loose gesture and the final detailed anatomy.

Let's watch a quick demonstration of this concept in action.
Follow Along Figure Drawing “Mannequinization” // Sketch With Me
The video 'Follow Along Figure Drawing “Mannequinization”' by Kj_sketchbook provides a great visual demonstration of how to simplify the body into basic forms.
Watch the quick demo from the beginning until 02:06. Pay close attention to how the artist uses landmarks like the collarbones and iliac crest to construct the boxes for the chest and hips, and how cylinders are used for the limbs.
The key idea is to think in three dimensions. Using simple boxes for the ribcage and pelvis helps you define their orientation in space, and cylinders help you represent the volume and direction of the limbs, which is crucial for tackling foreshortening.
3. A Systematic Approach to Construction
Now let's combine the proportional rules with the mannequinization method. The following video provides a very methodical, step-by-step process that builds the figure from the inside out, which may resonate with your background in building systems.
Step by Step Figure Construction
In 'Step by Step Figure Construction,' instructor S. Michael Hampton breaks down the process into clear, manageable stages.
Please watch the following segments in order: 01:15 - 02:36: Focus on how he establishes the ribcage and pelvis as shapes, using head units as a proportional guide (e.g., 'pelvis one head tall by two wide'). This connects directly to our 8-head system. 04:43 - 08:37: This is the core segment. Observe how he uses anatomical landmarks to place the limbs. He checks that the elbow lines up with the bottom of the rib cage (Head 3) and that the wrist lines up with the start of the femur. This is the practical application of our proportional blueprint. 11:54 - 13:41: Finally, see how he transforms the simple lines for the limbs into 3D cylinders, considering their direction in space (moving towards or away from the viewer).
By following this layered approach—gesture, then proportional masses, then limbs—you create a figure that is not only dynamic but also structurally sound.
4. Practice Exercise: Build Your Mannequin (25 minutes)
It's time to put this all together in Procreate. You will build a complete mannequin figure on top of a gesture sketch.
Your Task:
- Find a clear, full-body reference photo of a person in a standing or simple action pose. Pinterest or a stock photo site are good sources. Import it into your Procreate canvas.
- Follow this layered process:
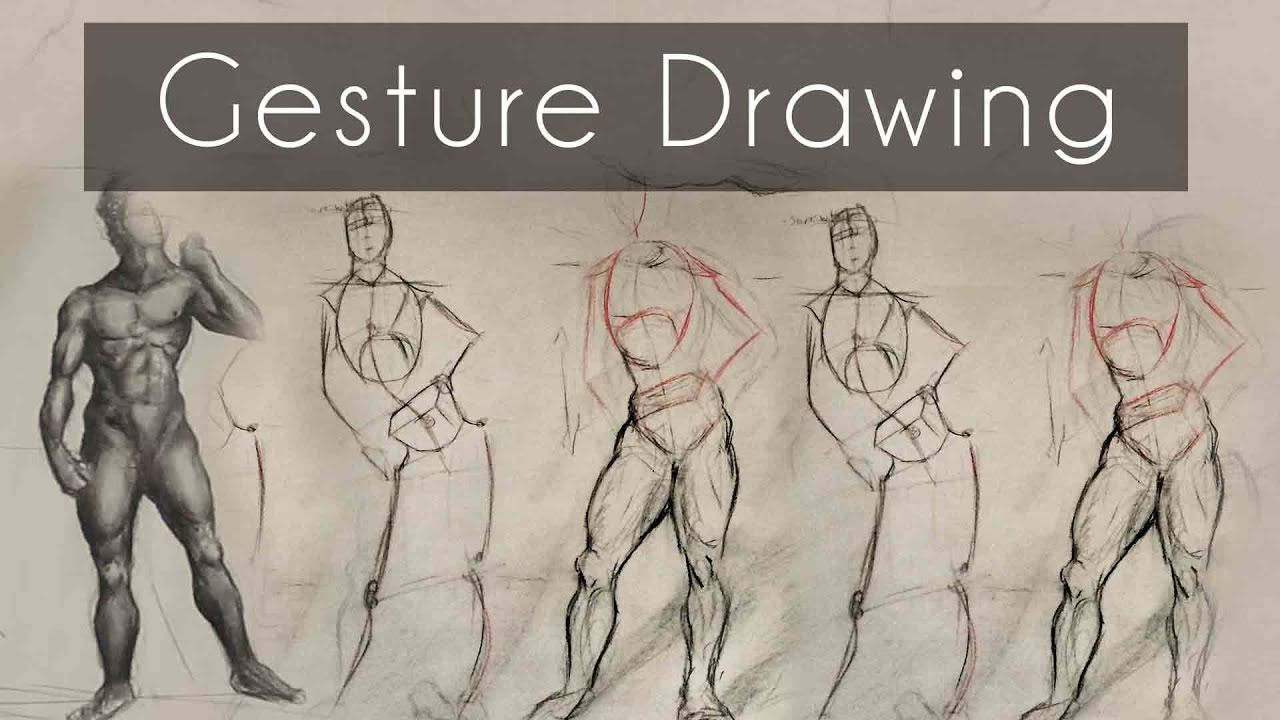
- Layer 1 (Gesture - Red): On a new layer, quickly sketch the line of action. Then, block in the head, rib cage, and pelvis, focusing on their tilts and relationship as we did in the last lesson.
- Layer 2 (Mannequin - Black): Create a new layer on top. Using your gesture as a guide, construct the mannequin.
- Refine the rib cage and pelvis into clear box-like forms.
- Draw the spine connecting them.
- Add the shoulder and hip joints as simple circles.
- Draw the limbs as cylinders, using the 8-head rule to check your proportions. Make sure the elbows, wrists, and knees are landing in the right zones.
- Simplify the hands into mitten or block shapes, and the feet into simple wedges.
- Feel free to create a third layer between these two to lightly sketch the 8-head grid over your gesture if it helps you place the joints accurately.
Your goal is to create a drawing that clearly shows a structured, 3D mannequin built over a fluid gesture, similar to the process shown in this image:
Conclusion
Excellent work. Today you've bridged the gap between a simple gesture and a fully realized figure. By learning to construct a proportionally correct mannequin, you've created a reliable framework to support all the anatomical detail you're eager to learn.
Key Takeaways:
- The 8-head rule provides a reliable blueprint for placing the key joints and masses of the body.
- Mannequinization is the process of translating that 2D blueprint into simple, 3D forms (boxes and cylinders) that have volume and orientation.
- A successful figure drawing workflow layers these concepts: start with gesture, overlay proportions, and then build the mannequin structure.
In our next lesson, we will start putting real anatomy onto this scaffolding. We'll begin our deep dive into the skeleton, starting with the major components of the axial skeleton: the skull, spine, ribcage, and pelvis. You'll learn to draw these not just as simple blocks, but as the true foundational forms they are.