Hello! Welcome to your final lesson in our module on the muscles of the torso.
Over the last few lessons, you've done a great job dissecting the individual muscle groups: the pectorals, the abdominals, the major back muscles, and most recently, the deltoids. You've learned their names, locations, and basic forms. Now, it's time to put all those pieces together.
Today's lesson is a capstone for this module. Our goal is to draw the torso from front, back, and side views, showing correct simplified muscle placement. Think of this as an assembly phase. We've built the individual components; now we'll integrate them into a complete, cohesive structure.
1. The Foundation: Ribcage and Pelvis
Before we can place any muscles, we need a solid foundation. As we've seen before, the key to a believable torso is to start with its two primary masses: the ribcage and the pelvis. These are the unchanging, rigid blocks that the flexible, muscular parts connect to.
A clear, step-by-step method for building this foundation is always helpful.
How to Draw the Torso with Simplified Anatomy
Let's review a structured approach to building the torso's foundation. The article 'How to Draw the Torso with Simplified Anatomy' by Ram Studios Comics breaks this down into a logical sequence.
Read through 'Step 1 – Understanding the Spine', 'Step 2 – Drawing the Torso with Primitives', and 'Step 3 – Drawing the Organic Base Forms'. Focus on the progression: starting with the simple curve of the spine, moving to blocky primitives to establish perspective, and then refining those into more organic barrel and 'underwear' shapes. This is the scaffold upon which we'll build.
This process of starting with simple primitives and progressively adding organic form is an efficient way to manage complexity, much like wireframing before building out a full UI. To see this in motion, let's watch a quick demonstration.
In this clip from his video 'How To Draw Male Torsos,' comic artist David Finch quickly shows how to sketch these foundational chest and pelvis shapes from various angles.
Watch from 00:53 to 02:48. Notice how he establishes the simple, broad shape of the ribcage and the 'underwear' shape of the pelvis from the front, side, and back. This reinforces the method from the article.
2. The Assembly: Placing Simplified Muscle Blocks
With our foundation established, we can now "attach" the muscles we've studied. The goal here isn't to draw every single muscle fiber, but to block in the major muscle groups as simple, understandable shapes.
This is where visual maps are invaluable. The following images provide a clear blueprint for the simplified placement of each muscle group.
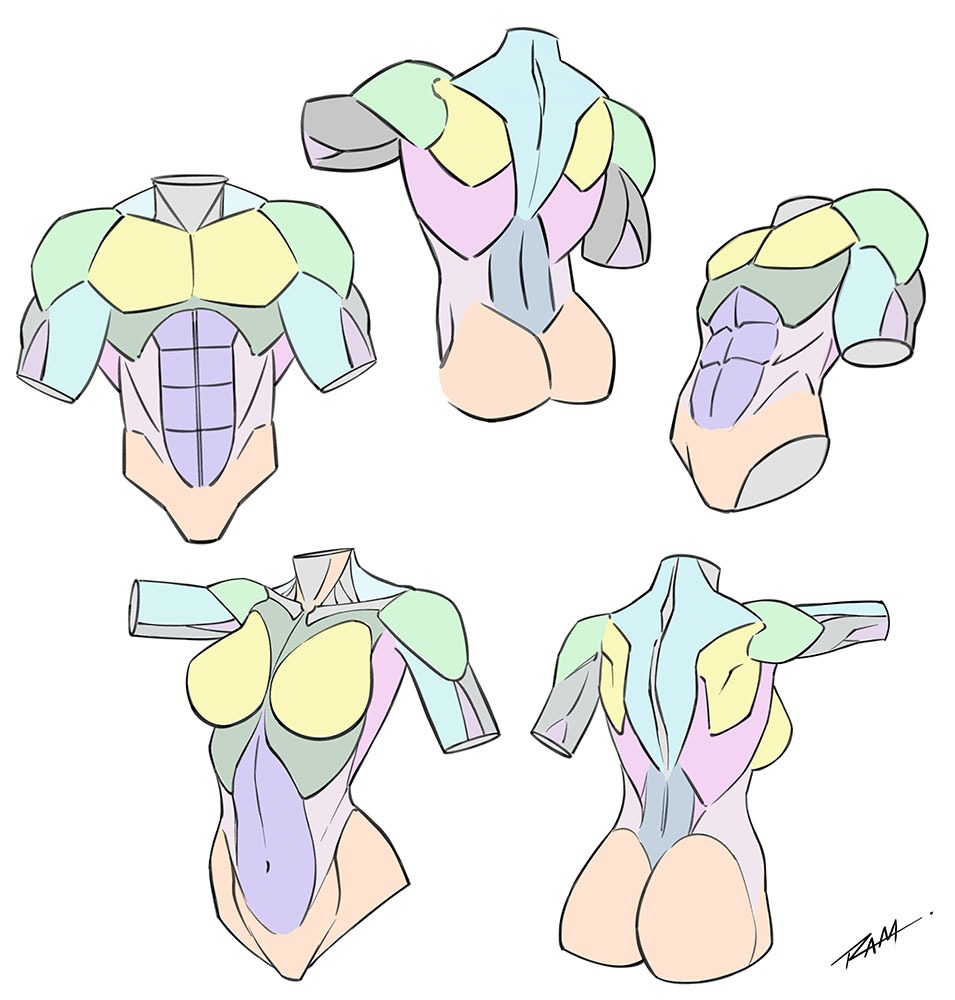

Now, let's watch a demonstration of an artist applying these muscle blocks to the foundational forms.
Let's return to David Finch's video. He follows the foundation sketch by layering on the simplified anatomy. This is a direct look at the process you'll be undertaking.
Watch the sections on the front view (02:48 - 04:45) and the back view (04:45 - 06:54). Pay attention to how he draws: Front View: The V-shape of the pectorals, the blocky shapes of the abs, and the way the obliques connect the ribcage to the pelvis. Back View: The kite-shape of the trapezius and the large mass of the lats creating the V-taper of the back.
If you need a quick text-and-image refresher on the specific muscles, you can refer back to the "Muscles of the Human Body" article from Clip Studio Paint (LINK). The first section on torso muscles provides a great summary.
3. Practice: Constructing the Torso Views
It's time to apply this in Procreate. Your task is to create three separate drawings: a front view, a back view, and a side view of the torso, showing the correct placement of the major muscle groups.
Exercise: Torso Assembly (30 minutes)
- Set Up: In Procreate, find some good reference photos of a figure from the front, back, and side. You can search for "male anatomy model front back side" or similar terms.
- Layer 1 - Foundation (Blue Pencil): For each view, start on a new layer. Using a blue color, draw the foundational forms: the ribcage (as a barrel or box) and the pelvis (as a block or 'underwear' shape). Make sure their proportions and alignment are correct according to your reference.
- Layer 2 - Muscle Blocks (Red Pencil): On a new layer above the foundation, switch to a red color. Using the "Simplified Male and Female Torso Anatomy" diagram (LINK) as your primary guide, block in the major muscles.
- Front: Draw the pectorals, deltoids, rectus abdominis, and obliques. Note how the linea alba divides the abs.
- Back: Draw the trapezius, deltoids, lats, and erector spinae.
- Side: Show how the pectorals, lats, obliques, and serratus anterior interact. This view is great for seeing the "zigzag" pattern where the obliques and serratus muscles interlock.
- Layer 3 - Refined Linework (Black Pencil): Reduce the opacity of your construction layers. On a final top layer, use a black color to draw cleaner contour lines. You don't need to trace every construction line. Instead, focus on the overall silhouette and the key lines that define the separation between major muscle groups.
The goal is to produce three clear, constructed drawings that demonstrate your understanding of where each muscle group belongs on the human torso.
Conclusion
Fantastic work today. You've successfully integrated all the individual torso muscles into a complete figure. This two-part process—building the structural foundation first, then layering on the simplified muscle anatomy—is a powerful and repeatable workflow you can use for any pose.
Key Takeaways:
- Torso drawing begins with a solid foundation of two masses: the ribcage and the pelvis.
- The major muscle groups (pecs, abs, obliques, lats, traps) can be simplified into clear, geometric shapes.
- By layering these muscle shapes over the foundation, you can construct a believable torso from any angle.
- Using a layered approach in Procreate (foundation -> muscle blocks -> final lines) helps manage complexity and ensures a well-constructed result.
This lesson concludes our deep dive into the torso. In our next session, we'll begin a new module focusing on the Muscles of the Arms. We'll start by examining how the deltoid transitions into the upper arm and then identify the iconic biceps and triceps.