Hello! Welcome to the first lesson in our new module, "Anatomy in Detail: Muscles of the Arms."
In our last session, we successfully assembled the entire torso by layering simplified muscle groups over a foundational structure. We treated the deltoid as one of these large, simple blocks that defined the shoulder. Today, we're going to zoom in on that deltoid and see that it's more than just a shoulder pad.
Our goal is to draw the transition from the deltoid to the upper arm, showing how shoulder muscles integrate with the arm. Think of the deltoid as a critical interface connecting the torso component to the arm component. Understanding this junction is key to making your figures look cohesive and structurally sound.
1. Deconstructing the Deltoid
A common mistake for beginners is to draw the deltoid as a simple sphere, creating a "bubbleman" effect. The reality is more complex and interesting. The deltoid is not one muscle, but a group of three distinct heads that wrap around the shoulder joint.
To get a clear overview of this structure, we'll turn to a fantastic video by Proko, a well-known resource for artistic anatomy.
How to Draw Deltoids - Anatomy for Artists
This video, 'How to Draw Deltoids,' provides a concise and clear explanation of the muscle's structure. We'll start by focusing on its basic anatomy.
Watch from the beginning to 02:29. Pay close attention to: The concept of the deltoid as a three-headed muscle (anterior, lateral, posterior). The origin points: notice how the three heads start along a wide arc on the clavicle (collarbone) and the scapula (shoulder blade). The single insertion point: see how all three heads converge to attach to one spot on the humerus (upper arm bone), about halfway down.
This concept of a wide origin funnelling into a narrow insertion is the most important anatomical principle for understanding the deltoid's form. It's what creates the characteristic tapering shape of the shoulder.
For a static reference you can review, the accompanying article for the video presents the same information with helpful diagrams.
How to Draw Deltoids – Anatomy for Artists
Let's review the key attachment points in the article 'How to Draw Deltoids – Anatomy for Artists.'
Quickly read the sections 'Origin' and 'Insertion.' These sections explicitly state where each head of the deltoid attaches to the skeleton. This reinforces what you just saw in the video.
2. From Anatomy to Form: The Shoulder-Arm Integration
Now that we know the skeletal connection points, let's explore how they create the visible surface form. The deltoid acts like a piece of armor, a cap that sits over the top of the arm and integrates with the muscles of the chest and arm itself.
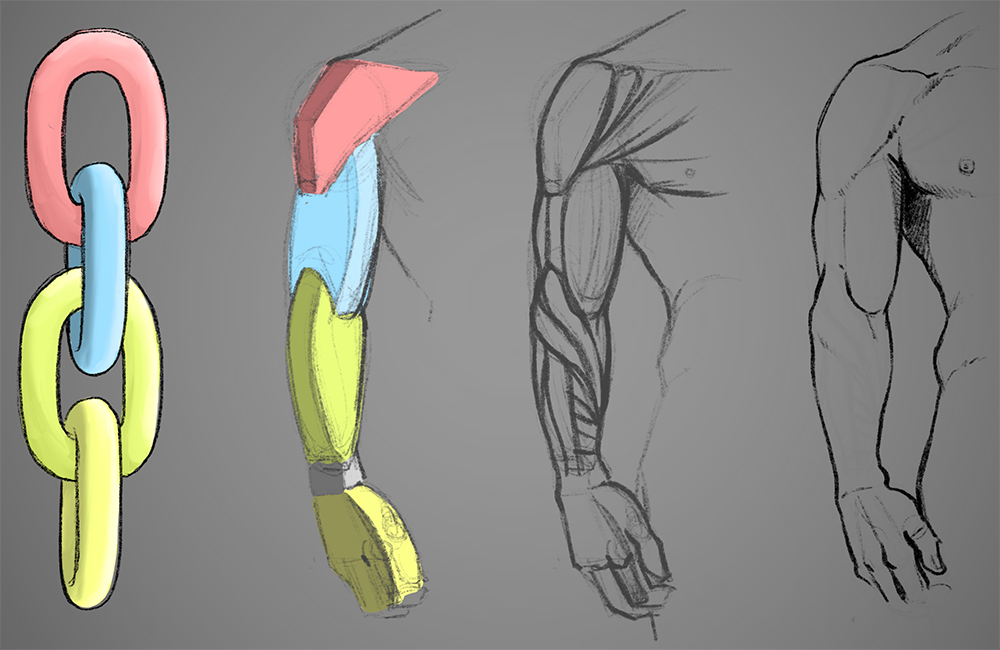
Let's return to the Proko video to see how the three heads translate into distinct surface forms.
How to Draw Deltoids - Anatomy for Artists
We'll continue with the Proko video to understand the specific shape of each deltoid head and the overall form they create.
Watch from 02:29 to 07:08. Focus on: The description of the anterior (front), lateral (side), and posterior (back) heads. Notice the clear division between the front and side heads. The summary of the overall form as an 'upside-down pyramid' that tapers down the arm.
The Proko video mentions the relationship between the anterior deltoid and the pectoralis major. To truly understand the integration with the arm, we need to see where the deltoid inserts in relation to the arm muscles.
The following article has some excellent diagrams that clarify this.
How to Draw the Shoulders, From the Front, Back, and Arms Raised
The article 'How to Draw the Shoulders, From the Front, Back, and Arms Raised' by Gvaat offers a very clear look at how the deltoid wedges itself into the arm.
First, read the section 'Muscular anatomy of the shoulder for drawing,' focusing on the subsection 'Shoulder muscles – anterior view.' The diagrams here clearly show the three heads wrapping around and, crucially, wedging between the biceps and brachialis muscles. Then, look at the section 'Shoulder muscles folding over chest muscles.' The diagram here perfectly illustrates the separation between the deltoid and the chest muscle at the front.
This "wedging" is the key to drawing a believable transition. The deltoid doesn't just sit on top of the arm; it becomes part of its structure, creating a division between the muscles on the front and side of the upper arm.
3. Practice: Drawing the Shoulder-Arm Connection
Now it's time to put this theory into practice in Procreate. Your goal is to create two drawings, one from the front and one from the side, that show how the deltoid connects the torso to the arm.
Exercise: The Deltoid Transition (30 minutes)
- Find Reference: Search online for "male anatomy reference front view" and "side view." Look for well-lit photos where the shoulder definition is clear.
- Foundation (Layer 1 - Blue):
- For each view, lightly sketch the landmarks of the shoulder girdle: the S-curve of the clavicle and the spine of the scapula.
- Draw a simple cylinder for the humerus (upper arm bone) extending down from the shoulder joint.
- Construction (Layer 2 - Red):
- On a new layer, map out the anatomy based on what you've learned. Mark the origin points along the clavicle and scapula. Mark the single insertion point about halfway down the outside of the humerus cylinder.
- Draw the three heads of the deltoid connecting these points. Think of it as wrapping an "upside-down pyramid" over the top of the cylinder.
- Indicate the simple forms of the pectoralis (chest) muscle and the biceps on the front of the arm cylinder.
- Refinement (Layer 3 - Black):
- Lower the opacity of your construction layers. On a new top layer, draw the final contour lines.
- Focus on capturing the key transitional lines:
- The groove separating the anterior deltoid from the pectoralis major.
- The clear separation between the anterior and lateral heads of the deltoid.
- The way the bottom of the deltoid wedges into the side of the arm, defining the edge of the biceps.
Refer back to the diagrams in the Proko and Gvaat articles to guide your construction. The goal is not a perfectly rendered drawing, but a clear structural diagram that shows you understand the connections.
Conclusion
Excellent work. Today you've moved beyond seeing the deltoid as a simple shape and have deconstructed it into its functional parts. By understanding its specific attachment points, you can now draw the shoulder not as something stuck onto the body, but as an integrated part that logically connects the torso to the arm.
Key Takeaways:
- The deltoid consists of three heads: anterior, lateral, and posterior.
- It originates widely along the clavicle and scapula and inserts at a single point on the humerus. This creates a tapered, "upside-down pyramid" form.
- The deltoid visibly integrates with surrounding muscles, creating a distinct separation from the pectoralis major and wedging into the upper arm between the biceps and brachialis.
- Drawing this transition accurately requires starting with the skeletal landmarks and mapping the muscle forms over them.
In our next lesson, we will continue down the arm to explore the forms of the biceps and triceps, the muscles that lie directly beneath the deltoid's insertion point.