Hello! Welcome to your next lesson.
In our last session, we covered the major muscles of the back—the trapezius, lats, and erector spinae. We saw how the trapezius connects to the spine of the scapula, a critical bony landmark. Today, we'll build directly on that knowledge as we move from the torso to the arm.
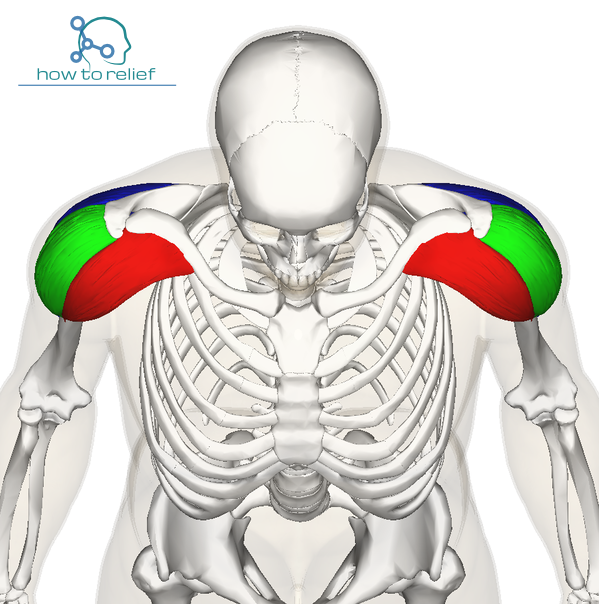
This lesson focuses on the deltoid muscle, the cap of the shoulder that gives it its rounded shape. Our goal is to identify and draw the deltoid muscle and its connections to the torso and arm. We will break down its three-part structure, map out exactly where it attaches to the skeleton, and learn how to represent its form from different angles.
1. The Deltoid: A Three-Headed Muscle
The deltoid is a powerful muscle that wraps over the shoulder joint. Its name comes from the Greek letter Delta (Δ) because of its characteristic upside-down triangular shape.
A common mistake for beginners is to draw the shoulder as a simple sphere, which looks unnatural. The key to drawing it accurately is understanding that it's not one uniform mass, but three distinct heads.
Let's start with a video that provides a comprehensive overview of the deltoid's structure.
How to Draw Deltoids - Anatomy for Artists
The video 'How to Draw Deltoids' from the Proko channel is an excellent resource for artists. We'll start with the sections that introduce the muscle and its precise attachment points.
Watch from 00:16 to 02:29. Focus on these key anatomical facts: The Three Heads: Note the names and locations of the anterior, lateral, and posterior heads. Origin: Pay close attention to the continuous line of attachment along the clavicle, the acromion, and the spine of the scapula. You'll recognize these landmarks from our previous lessons. Insertion: See how all three heads converge to a single point on the humerus (upper arm bone).
To summarize the crucial origin and insertion points:
| Deltoid Head | Origin (Where it starts) | Insertion (Where it ends) |
|---|---|---|
| Anterior | Lateral third of the clavicle (collarbone) | Deltoid tuberosity of the humerus |
| Lateral | Acromion (the bony tip of the shoulder) | Deltoid tuberosity of the humerus |
| Posterior | Spine of the scapula (shoulder blade) | Deltoid tuberosity of the humerus |
This "origin-and-insertion" model is fundamental. The muscle fibers run from the wide origin on the torso to the single insertion point on the arm. This structure is what allows the deltoid to lift the arm in different directions.
2. The Form and Flow of the Deltoid
Now that we know where the muscle attaches, let's look at the specific shape and form of each head and how they interact with neighboring muscles like the pectorals.
How to Draw Deltoids - Anatomy for Artists
Let's continue with the Proko video to see how an artist translates the anatomical facts into drawable forms.
Watch from 02:29 to 05:26. As you watch, look for these visual characteristics: Anterior Head: Notice its teardrop shape and the small gap that separates it from the pectoralis major near the clavicle. Lateral Head: This is the largest head. Note the complex, braided texture ('bananas') seen on very muscular individuals and how it descends lowest on the arm. Posterior Head: Observe its flatter, wider teardrop shape and the smooth transition from the lateral head.
The connection between the deltoid and the pectoralis major is especially important for creating a natural-looking armpit area. The muscle fibers of the front deltoid run alongside the upper fibers of the pecs, creating a rhythm and flow between the arm and the chest.

For a concise summary of the deltoid's attachments and its interaction with other muscles, you can refer to the following resource.
How to Draw the Shoulders, From the Front, Back, and Arms Raised
The article 'How to Draw the Shoulders' on Gvaat.com offers clear diagrams and a handy table summarizing the muscle connections.
Quickly review the sections '3. Muscular anatomy of the shoulder for drawing' and '4. Shoulder muscles folding over chest muscles'. Pay special attention to the summary table of origin/insertion points and the diagram showing how the pectoralis muscle tucks under the deltoid at the insertion point on the humerus.
3. Practice: Drawing the Deltoid
It's time to put this knowledge into practice in Procreate. Your goal is not just to copy a photo, but to construct the deltoid based on your understanding of its underlying structure.
This exercise follows a layered, constructive approach that should feel familiar given your background in development. We build the foundation before adding complexity.
Exercise: Constructing the Deltoid (25-30 minutes)
- Find References: Open Procreate and import a few good reference photos. The Proko video has links to model photos in its description, or you can search for "figure drawing shoulder" or "anatomy pose deltoid" on a site like Pinterest. Try to find a front, side, and 3/4 view.
- Layer 1 - Bony Landmarks: On a new layer, lightly sketch the simple shapes of the torso (ribcage and pelvis) and the cylinder of the upper arm. Most importantly, identify and draw the clavicle and the spine of the scapula. This bony 'hanger' is the foundation for the deltoid.
- Layer 2 - Map the Muscle (Red): On a new layer, draw the key attachment points.
- Trace the U-shaped origin line along the clavicle, acromion, and scapular spine.
- Mark the insertion point about halfway down the outer side of the humerus cylinder.
- Layer 3 - Block in the Heads (Blue, Green, Yellow): On a new layer, block in the three heads using simple shapes and different colors.
- Draw the anterior head connecting the clavicle to the insertion point.
- Draw the lateral head connecting the acromion to the insertion point.
- Draw the posterior head connecting the scapular spine to the insertion point.
- This should create the overall upside-down triangle shape.
- Layer 4 - Refine the Contour: Reduce the opacity of your construction layers. On a final layer, draw the refined contour of the shoulder. Focus on capturing:
- The clear separation between the anterior and lateral heads.
- The smoother transition between the lateral and posterior heads.
- The way the overall shape tapers down into the arm.
- The slight overlap of the deltoid over the pectoralis major.
Repeat this process for your different reference views to solidify your understanding.
Conclusion
Excellent work today. You've now bridged the gap between the torso and the arm by mastering the deltoid. By moving beyond a simple 'ball' shape and understanding its three-part structure, you can add a new level of realism and dynamism to your figures.
Key Takeaways:
- The deltoid consists of three heads: anterior, lateral, and posterior.
- It has a wide origin along the clavicle, acromion, and spine of the scapula.
- All three heads converge to a single insertion point halfway down the humerus.
- This structure creates an upside-down triangle or pyramid shape that caps the shoulder.
- The deltoid connects to the torso by originating on the shoulder girdle and interacting with muscles like the trapezius and pectoralis major.
In our next lesson, we will continue our journey down the arm. We'll explore how the deltoid transitions into the upper arm, and we'll identify the biceps and triceps muscles that define its shape.