Hello! Welcome back.
In our last lesson, we simplified the forearm's complex structure into three manageable muscle groups: the flexors, extensors, and ridge muscles. You learned to identify their basic shapes and placement, laying the groundwork for constructing the arm.
Today, we'll bring those static forms to life. The forearm's primary function, from an artist's perspective, is rotation. Our goal is to draw the simplified forms of the forearm in pronation and supination. We will explore how the shapes you learned about twist and change as the hand turns from a palm-up to a palm-down position.
Think of the muscle groups we defined as a 'component' in your code. Last time, we defined its properties and initial state. Today, we're exploring the methods (pronate() and supinate()) that transform its appearance. Understanding this mechanism is the key to drawing dynamic and believable arms.
1. The Mechanical Foundation: How Bones Rotate
Before we can draw the changing muscles, we must understand the skeleton's movement that causes the change. The forearm contains two bones: the ulna and the radius.
- The ulna is anchored at the elbow and runs to the pinky side of the wrist. It is relatively stationary.
- The radius is on the thumb side of the wrist. It is designed to pivot around the ulna.
Supination is the palm-up position. Here, the radius and ulna are parallel.
Pronation is the palm-down position. To achieve this, the radius rotates and crosses over the ulna.
This single mechanical action—the radius crossing the ulna—is responsible for all the changes in form we see on the surface.
To see this in action, let's watch a short video segment.
DECIPHERING BRIDGMAN 3: DRAWING THE ARM
This clip from the 'DECIPHERING BRIDGMAN' series by moderndayjames clearly illustrates the relationship between the radius and ulna.
Watch from 09:41 to 10:20. Focus on the animation showing the radius and ulna moving from a parallel (supination) to a crossed (pronation) position. This is the core concept for this lesson.
2. The Muscular Consequence: The Twisting Form
Now that you understand the bony mechanism, let's see how it affects the muscle groups we've learned. Since the ridge muscles (specifically the brachioradialis) attach from the upper arm to the radius, they are directly affected by this rotation.
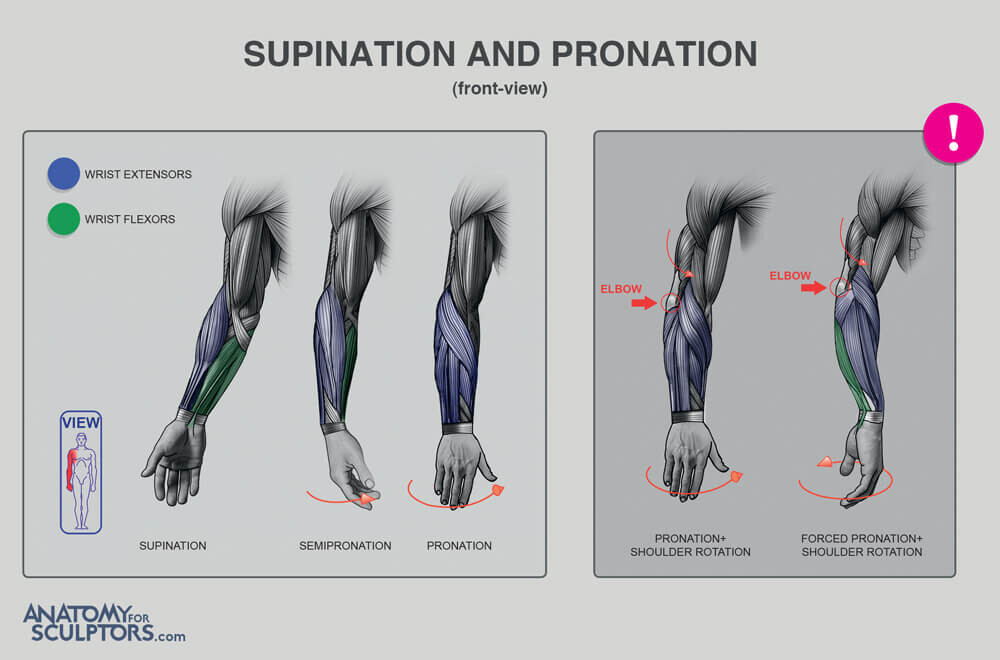
When the radius pivots, it pulls the ridge muscles with it, causing them to wrap diagonally across the forearm. This creates the most significant visual cue of pronation.
The following image provides an excellent overview of the transition from supination to pronation, color-coding the flexor and extensor groups.
Let's hear this explained in detail.
How To Draw Forearms - Arm Anatomy for Artists
Stan Prokopenko provides a concise explanation of how to represent this movement artistically.
Watch from 12:16 to 13:25. Pay close attention to his key observation: the ridge muscles are 'straight during supination and an oblique S curve during pronation.' He also stresses that knowing the forms is crucial to drawing how they deform.
3. Simplified Forms for Drawing
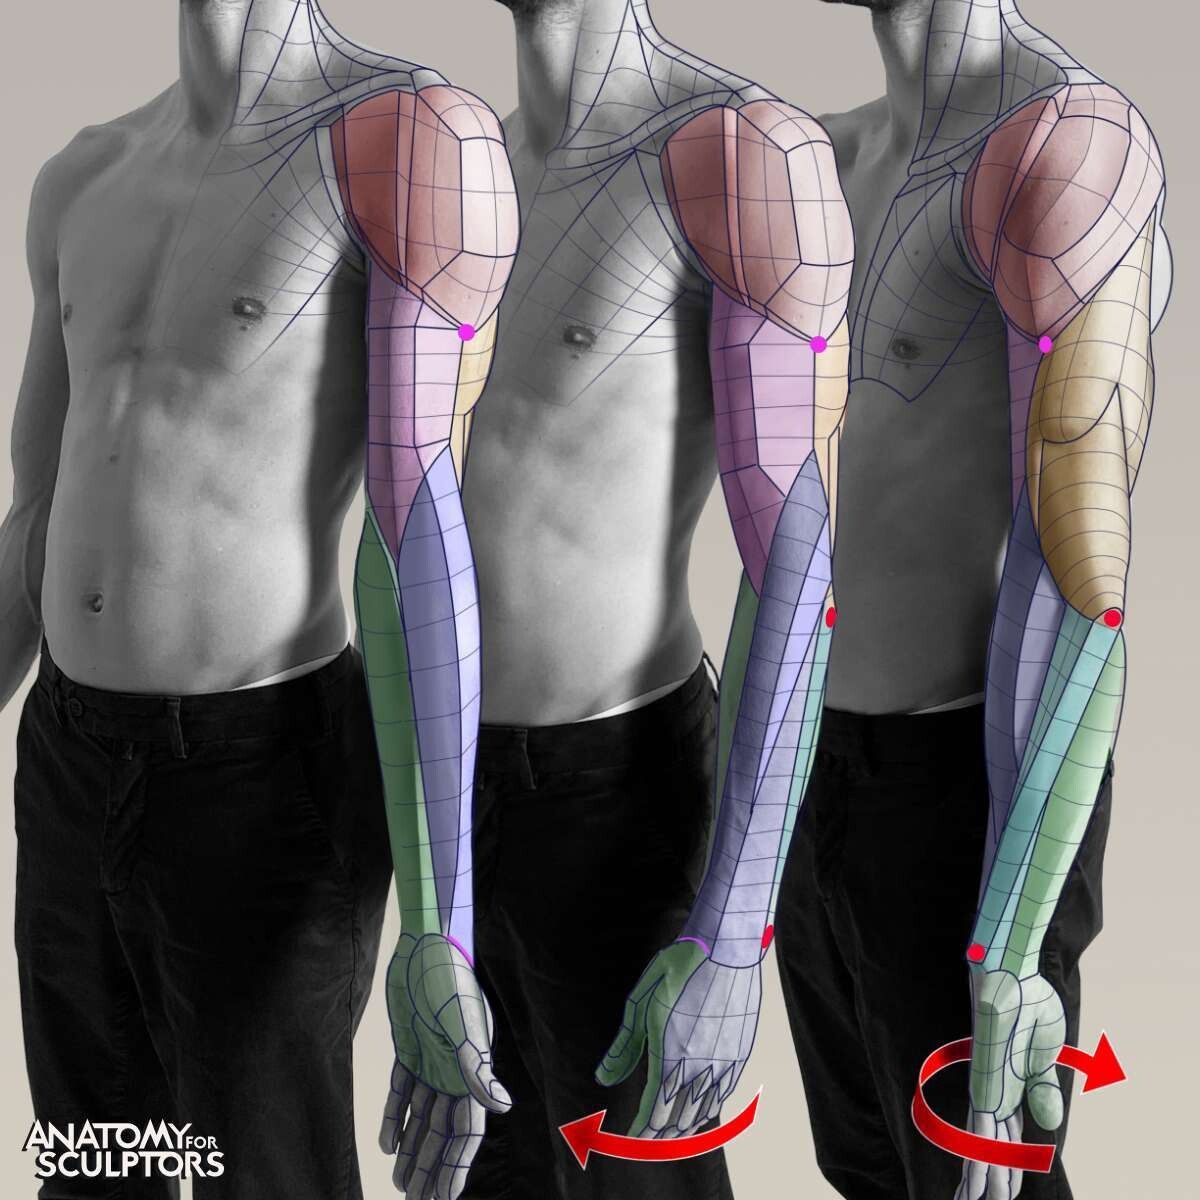
To effectively draw this complex movement, we need to simplify it into basic forms, just as we did in previous lessons. In supination, the forearm can be thought of as a simple, slightly tapered box. In pronation, that box twists.
The image below demonstrates this simplification beautifully.
For another excellent set of simplified diagrams, let's turn to Michel Lauricella's book, Morpho: Simplified Forms.
This excerpt from Lauricella's book explains and illustrates the concept of pronation and supination with elegant, simplified drawings.
Read the section on pages 13-14 (as numbered in the PDF). Start from 'The forearm creates a conical shape...' and end at '...when the thumb is turned outward (supination, the act of supporting).' The diagrams here are key, showing exactly how the brachioradialis muscle (part of the ridge group) tracks the movement of the thumb.
4. Practice: Drawing the Twist (30 minutes)
It's time to put this knowledge into practice. This exercise will train you to observe and capture the structural twist of the forearm.
What You'll Need:
- Your drawing app (Procreate).
- Reference images. Search for terms like "forearm pronation supination," "hand grabbing pole," or "arm holding a hammer." Collect a few images showing the arm in a clear supinated state (palm up/forward) and a clear pronated state (palm down/back).
Exercise Steps:
- Choose a Pronated Reference: Start with an arm in a pronated (twisted) position.
- Basic Construction (Layer 1):
- Begin by drawing the simple block/cylinder forms of the upper arm and forearm. Establish the gesture and proportions.
- Locate the thumb and pinky. This tells you where the radius and ulna are.
- Draw the Twist (Layer 2):
- On a new layer, focus on the ridge muscles. Draw the "oblique S-curve" that Proko mentioned, showing this muscle group wrapping from the outer elbow region towards the thumb side of the wrist. This line is the most important part of the drawing. It should feel like it's wrapping around the core form.
- Next, block in the masses of the extensors and flexors. Notice how they are now twisted and overlap each other. Use the ulnar furrow (the groove along the ulna bone) as a landmark to separate them.
- Refine the Contour:
- Pay attention to the outside contour of the arm. In pronation, the silhouette is complex and asymmetrical due to the muscle crossover. Contrast this with the smoother, straighter silhouette of a supinated arm.
- Repeat with a Supinated Reference:
- Now, choose a supinated (untwisted) reference. Repeat the process. This time, you'll find that the muscle groups are more parallel and the contours are simpler. The ridge muscles will follow a much straighter path down the side of the arm.
- Compare: Place your two drawings side-by-side. The goal is to clearly see the difference in structure and form caused by the rotation.
Conclusion
Great work today. You've moved beyond static anatomy and tackled the primary motion of the forearm. By understanding the simple mechanics of how the radius rotates over the ulna, you can now logically construct the complex, twisting forms seen on the surface.
Key Takeaways:
- Supination vs. Pronation: Supination is palm-up (bones parallel); Pronation is palm-down (radius crosses over ulna).
- The Key Indicator: The ridge muscles are the primary visual cue for rotation. They run straight in supination and form an oblique S-curve in pronation as they are pulled across the arm.
- Simplify to Draw: By simplifying the forearm into a twisting box, you can manage the complexity and create a structurally sound drawing.
In our next lesson, we will focus on drawing the arm in a bent position, exploring how the muscles of the upper and lower arm—biceps, triceps, and the forearm groups—interact, compress, and bulge at the elbow joint.