Hello! Welcome back.
In our last few lessons, we've methodically assembled the major bone groups of the human skeleton: the axial skeleton, the arms, and the legs. You've learned to see and draw these components as simple, three-dimensional forms. But a skeleton isn't just a pile of bones; it's a precise, interconnected framework. How does this internal framework influence the visible surface of the body?
Today's lesson answers that question. Our goal is to locate and draw the key bony landmarks that are visible on the body's surface and influence form. Think of these landmarks as the API for the human figure—stable, reliable points that you can use to build the rest of your drawing. They are consistent across different body types, making them the most important reference points for establishing accurate proportions and structure.
We will tour the body to identify these landmarks, see how they create visible bumps and ridges on the skin, and then practice using them to construct a figure's foundation.
1. The Artist's "X-Ray Vision"
Before we start mapping out individual points, let's solidify why they are so important. The most skilled figure artists seem to have a kind of "x-ray vision," allowing them to see the skeleton beneath the skin. This isn't magic; it's a trained knowledge of bony landmarks.
To start, let's watch the introduction of this video from Proko. It perfectly explains why landmarks are the foundation of good figure drawing.
Watch from the beginning to 01:27. Pay close attention to the comparison between thin, muscular, and overweight body types. Notice how the underlying skeleton remains the constant factor.
The key idea is that while muscle and fat can change dramatically, the skeleton provides a fixed set of coordinates. By learning to find these points, you gain a powerful tool for analyzing and constructing any pose.
2. A Guided Tour of Bony Landmarks
Now, let's take a comprehensive tour of the most critical landmarks for an artist. We'll go through the body region by region. As we do, have these two reference images open. They will serve as your maps for this lesson.
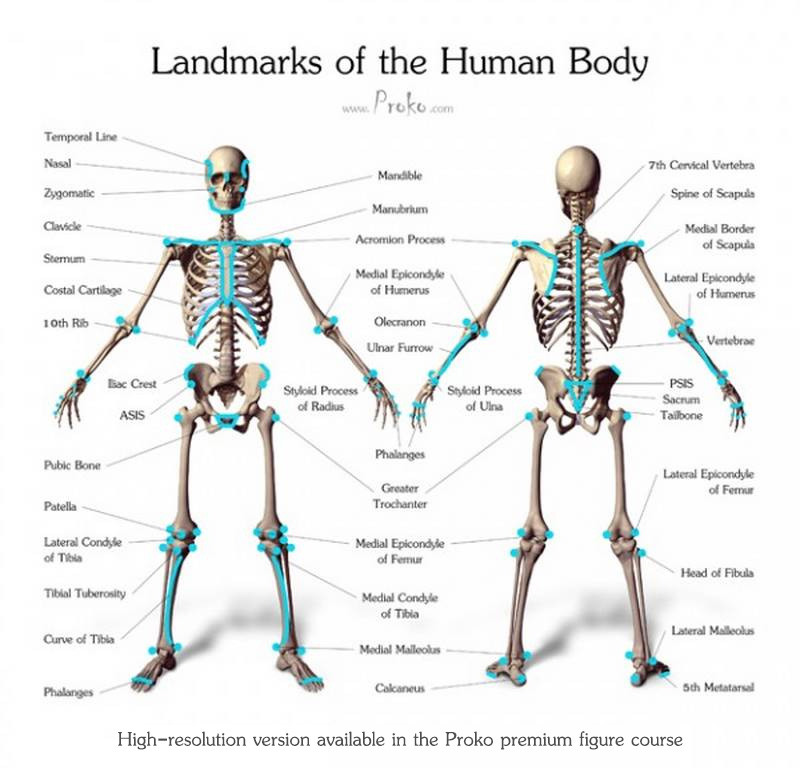

Now, let's continue with the Proko video to identify these points on the figure.
This video will walk us through the major landmarks of the torso, arms, and legs. Try to find these points on your own body as Stan Prokopenko points them out.
Watch from 01:27 to 06:49. The video will cover: Torso (Front & Back): Look for the clavicles (collarbones), sternum, the points of the pelvis (ASIS and PSIS), the spine, and the scapula (shoulder blade). Limbs: Focus on the joints. Note the key points of the elbow (epicondyles, olecranon), wrist, hip (greater trochanter), knee, and the prominent inner and outer ankle bones (malleoli).
To reinforce this information and see it presented in another clear, systematic way, you can also refer to the following resource. You don't need to study it in depth right now, but it's an excellent supplement if any point from the video was unclear.
Artistic Anatomy for Digital Artists
The book Artistic Anatomy for Digital Artists by Scott Eaton contains concise diagrams and lists of the most important landmarks. It's a great quick-reference.
Briefly review pages 19-20 for the overview diagrams. Then, quickly scan the 'Important Landmarks' lists on page 24 (Torso), page 36 (Arm), and the landmark descriptions in the 'Feet' section on page 55. This will help you build a mental checklist.
3. Practice: Landmark Identification and Construction
Theory is one thing, but finding these landmarks on a real figure is the essential skill. This exercise combines landmark identification with the first step of figure construction. The practice of drawing the flayed figure to reveal the anatomy underneath is known as Écorché. We will do a simplified version of this.
Your task is to create a "superstickman" based on the visible landmarks of a figure.
Starting construction using visible landmarks
This article from Love Life Drawing explains a simple but effective method for starting a figure drawing by connecting the major landmarks. This is the practical application of what we've just learned.
Read the sections 'Visible landmarks,' 'Front view poses,' and the descriptions of drawing the head, neck, torso lines, and limb lines. Focus on how they build a structural skeleton by connecting points like the shoulders, pelvic tips, elbows, and knees.
Exercise: Find the Landmarks (20-25 minutes)
- Find 2-3 Reference Photos: Use Pinterest, a stock photo site, or an artist's reference site to find clear photos of people in dynamic poses. Photos of athletes or dancers are excellent because their anatomy is often clearly visible.
- Import into Procreate: Choose one photo and import it onto your canvas.
- Layer 1: Mark the Landmarks: Create a new layer. Using a bright color, place a dot on every bony landmark you can identify. Refer back to the "Landmarks of the Human Body" image (LINK) as your guide. Key points to find include:
- Pit of the neck
- Tips of the shoulders (acromion process)
- Ends of the collarbones
- Bottom of the sternum
- Front points of the pelvis (ASIS)
- Elbows, wrists, knees, and ankles
- If visible: 7th cervical vertebra (base of the neck), spine of the scapula, and dimples of the lower back (PSIS).
- Layer 2: Build the "Superstickman": Create a second new layer. Following the method from the Love Life Drawing article, connect your landmark dots to build the simple structural skeleton of the figure. Draw the centerlines and the lines connecting the joints.
- Review: Hide the original photo and your landmark dots. Does your stickman capture the gesture and structure of the pose? Repeat this process for your other reference photos.
This exercise trains your eye to look through the surface and see the underlying architecture, a foundational skill for everything we will do from here on.
Conclusion
Excellent work. Today you've bridged the gap between internal anatomy and external form. You are no longer just drawing shapes; you are building a figure on a solid, logical foundation.
Key Takeaways:
- Bony landmarks are points on the skeleton that are close to the skin, creating visible or palpable forms.
- They are the artist's most reliable reference points because they are consistent across different body types.
- Key landmarks include the clavicles, scapula, sternum, ASIS, PSIS, greater trochanter, elbow, knee, and ankle bones.
- Identifying and connecting these landmarks is the first and most critical step in constructing an accurate figure drawing.
You have now completed our module on the skeleton. You have the complete blueprint of the human figure's framework. In our next lesson, we will begin Module 7: Anatomy in Detail: Muscles of the Torso. We will start draping this skeleton with muscle, beginning with the pectoralis major (the chest muscles), and you will see how they attach directly to the landmarks you learned about today, like the clavicle and sternum.