Hello! Welcome back to our anatomical journey.
In our last lesson, we deconstructed the arm, learning how the humerus, radius, and ulna work together to provide structure and rotation. You practiced identifying these bones and drawing them as simplified forms, a crucial skill for any figure artist.
Today, we're moving down to the lower body to tackle the leg's foundation. Our objective is to identify and draw the major bones of the lower limbs: the femur, tibia, and fibula.
Much like the arm, the leg follows a "one bone, two bones" structure. However, its primary functions—supporting the body's entire weight and enabling powerful locomotion—have led to a very different design. Understanding this robust architecture is the next key step in your goal to master figure drawing.
1. The Leg's Structure: A Simplified Model
Before diving into the complex details of each bone, let's start with a high-level abstraction. Just as in computer science where you might start with a simple flowchart before writing code, we can represent the leg with basic lines and shapes to understand its core mechanics.
Drawing legs and feet by jozlixart
This article from Clip Studio TIPS provides an excellent, beginner-friendly method for simplifying the leg's bone structure. It's a great way to grasp the fundamental relationships before we add detail.
Please read the section titled "Simple bone structure." Pay close attention to the numbered diagram and the step-by-step process of building a 'stick figure' leg using simple shapes. Notice the inward angle of the lines representing the bones.
This simplified model gives us the essential information: the pelvis as a base, the inward angle of the upper and lower leg, and the location of the key joints. Now, let's replace those simple lines with the actual bone structures.
2. Deconstructing the Leg Bones
We'll now examine the specific forms of the femur, tibia, and fibula. These three bones are responsible for the overall shape and proportion of the legs.
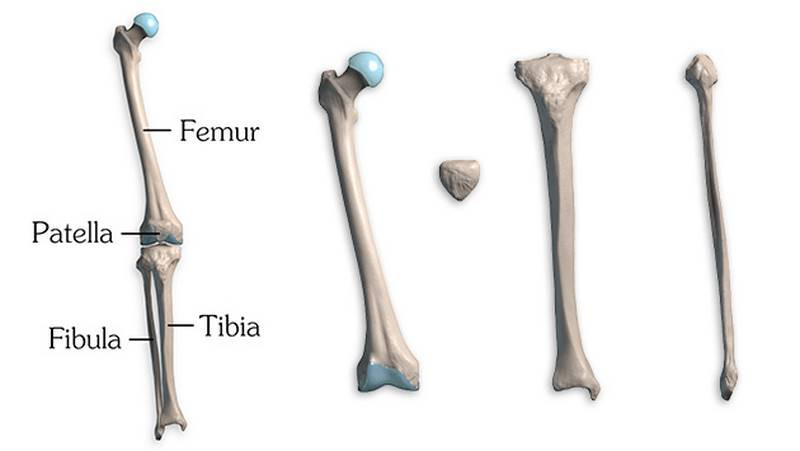
To get a dynamic, artist-focused look at these bones, we'll turn to a video from Proko's anatomy course.
How to Draw Legs - Bone Anatomy for Artists
This video breaks down the leg bones, focusing on the details that are most important for artists to know. We'll watch it in sections.
First, watch from 00:46 to 06:22 to learn about the femur. As you watch, focus on these key points: The Diagonal Angle: The femur is not vertical; it angles inward from the wide pelvis to the narrow knees. The Greater Trochanter: This is a critical bony landmark on the side of your hip. You can feel it yourself. Note its position relative to the pelvis. The Forward Curve: From the side, the femur bows forward. The Condyles: These are the 'wheels' at the bottom of the femur that form the upper part of the knee joint.
Now let's move on to the lower leg, which consists of the tibia and fibula.
How to Draw Legs - Bone Anatomy for Artists
Let's continue with the same Proko video to cover the lower leg bones.
Watch from 07:31 to 12:24. This section covers the tibia and fibula. Your focus should be on: Tough Tibia, Fragile Fibula: The tibia is the large, weight-bearing shin bone. The fibula is the thin, stabilizing bone on the outside. The Shin: The front edge of the tibia is subcutaneous (right under the skin), creating the sharp line of the shin. Ankle Asymmetry: This is a critical detail for artists. The fibula extends lower than the tibia, making the outer ankle bone lower than the inner ankle bone. Never draw them symmetrically!
3. Reinforcing the Forms
Seeing the same information presented in a slightly different way can often solidify understanding. This next video shows another artist drawing and discussing these bones, which can help reinforce their three-dimensional forms.
Anatomy Of The Leg Bones - Anatomy For Artists (Study Session)
In this 'study session' video, artist Dan Beardshaw provides a calm, methodical drawing demonstration of the leg bones. This will help reinforce the shapes you just learned.
Watch the segments covering the femur (03:00 - 05:05), tibia (05:39 - 07:01), and fibula (07:01 - 08:21). You don't need to take detailed notes; simply observe how he constructs the bones from different angles. This will help build your visual library.
Remember, the ultimate goal is to understand how this internal framework dictates the external shape of the body.

4. Practice Exercise: Drawing the Leg's Framework
It's time to apply what you've learned. As in the last lesson, you'll act as a "human x-ray machine" to find the bones within a photo reference.
Estimated Time: 20-25 minutes
Tools: Your iPad and Procreate.
Instructions:
- Find Reference Photos: Find 2-3 clear, full-length photos of legs. I recommend finding one straight-on standing pose and one with the legs bent (e.g., sitting or squatting). Pinterest or anatomy websites for artists are good sources.
- Create a New Layer: Import your chosen photo into Procreate and create a new layer on top.
- Draw the Bones:
- Start with Landmarks: On your new layer, first mark the key landmarks you can identify: the greater trochanter (the wide point of the hip), the sides of the knee, and the inner and outer ankle bones.
- Draw the Femur: Draw a simplified cylinder for the femur, connecting the hip to the knee. Make sure to capture its inward angle.
- Draw the Tibia and Fibula: Draw two tapering forms for the lower leg. Remember the tibia is the thicker, inner bone. Pay close attention to the ankle, ensuring the outer bump (fibula) is lower than the inner bump (tibia).
- Review: Hide the photo layer and look at your bone drawing. Does it look like a plausible skeleton? Does it capture the angles and proportions of the pose?
Your goal is not a perfect anatomical replica, but a structural drawing that demonstrates your understanding of the leg's components and their relationships.
Conclusion
Great job today. You have now mapped out the foundational structure of the lower limbs by learning to identify and draw the femur, tibia, and fibula.
Key Takeaways:
- The leg follows a 1-bone (femur) and 2-bone (tibia, fibula) pattern, similar to the arm but adapted for weight-bearing.
- The femur angles inward from the hip to the knee and has a key landmark in the greater trochanter.
- The tibia is the large, primary weight-bearing bone of the lower leg, and its front edge forms the shin.
- The fibula is the slender, outer bone of the lower leg.
- A crucial artistic detail is that the outer ankle (formed by the fibula) is lower than the inner ankle (formed by the tibia).
In the previous module, you've learned to construct the major masses of the skeleton. In our next lesson, we will focus on locating and drawing the key bony landmarks that are visible on the body's surface and influence its form. You've already gotten a head start by identifying landmarks like the greater trochanter and shin