Hello! Welcome back to your digital art journey.
In our last lesson, we focused on identifying the key anatomical landmarks and understanding how to use the head as a basic unit of measurement. You practiced spotting these crucial anchor points on various figures, which is an analytical skill.
Today, we transition from analysis to synthesis. We will use those landmarks and measurements to build a figure from the ground up. This lesson directly addresses the learning outcome: Apply the 8-head proportion system to construct a standard standing figure.
Think of this as moving from reading a blueprint to actually constructing the frame of a building. The 8-head system is a time-tested method that provides a reliable, algorithmic approach to creating a proportionally accurate human figure. For someone with your background in development, you can think of this as a set of rules or a function that takes a "head unit" as a parameter and outputs a well-structured human form. This "mannequin" we'll build today is the foundational scaffolding upon which we'll hang all the complex anatomy you're eager to learn.
1. The 8-Head System: A Proportional Blueprint
The 8-head system is an idealized model, meaning it represents a "perfect" or "heroic" figure that is exactly eight times as tall as its head. While real people vary, this system provides a clear and easy-to-remember framework that is the standard starting point for learning figure drawing.
The core idea is to divide the total height of your figure into eight equal sections, each one "head" high.
Drawing the Human Figure! - Proportions - Tutorial [PART I]
To start, let's watch a clear demonstration of how to set up the basic grid for our figure. This video by Dan Beardshaw shows the initial steps.
Watch from 01:11 to 02:22. The goal here is to understand how to create the basic vertical and horizontal grid that will guide our entire drawing. You can do this freehand or use a ruler/Procreate's drawing guides.
2. Mapping Landmarks to the Grid
With our 8-head grid established, the next step is to place the major body masses and landmarks onto it. This is where your knowledge from the last lesson becomes truly powerful.
The following text provides a step-by-step guide to constructing the figure. It's a great resource to follow along with.
Human Anatomy Fundamentals: Basic Body Proportions
This article, 'Human Anatomy Fundamentals: Basic Body Proportions,' walks through the placement of each body part on the 8-head chart. It's a clear, sequential process.
Read the section '1. How to Draw a Body: The Basic Figure.' Follow the steps from drawing the head (Step 1) to placing the arms (Step 6). Pay close attention to which 'mark' or line each body part aligns with.
To summarize the key placements from that reading, here are the essential landmarks you should map to your grid:
- Line 0 (Top): Top of the head
- Line 1: Chin
- Line 2: Nipples
- Line 3: Navel and elbows
- Line 4: Crotch and wrists (this is the halfway point of the body)
- Line 5: Fingertips
- Line 6: Bottom of the knees
- Line 8 (Bottom): Soles of the feet
Here is a helpful visual diagram that summarizes these placements at a glance.
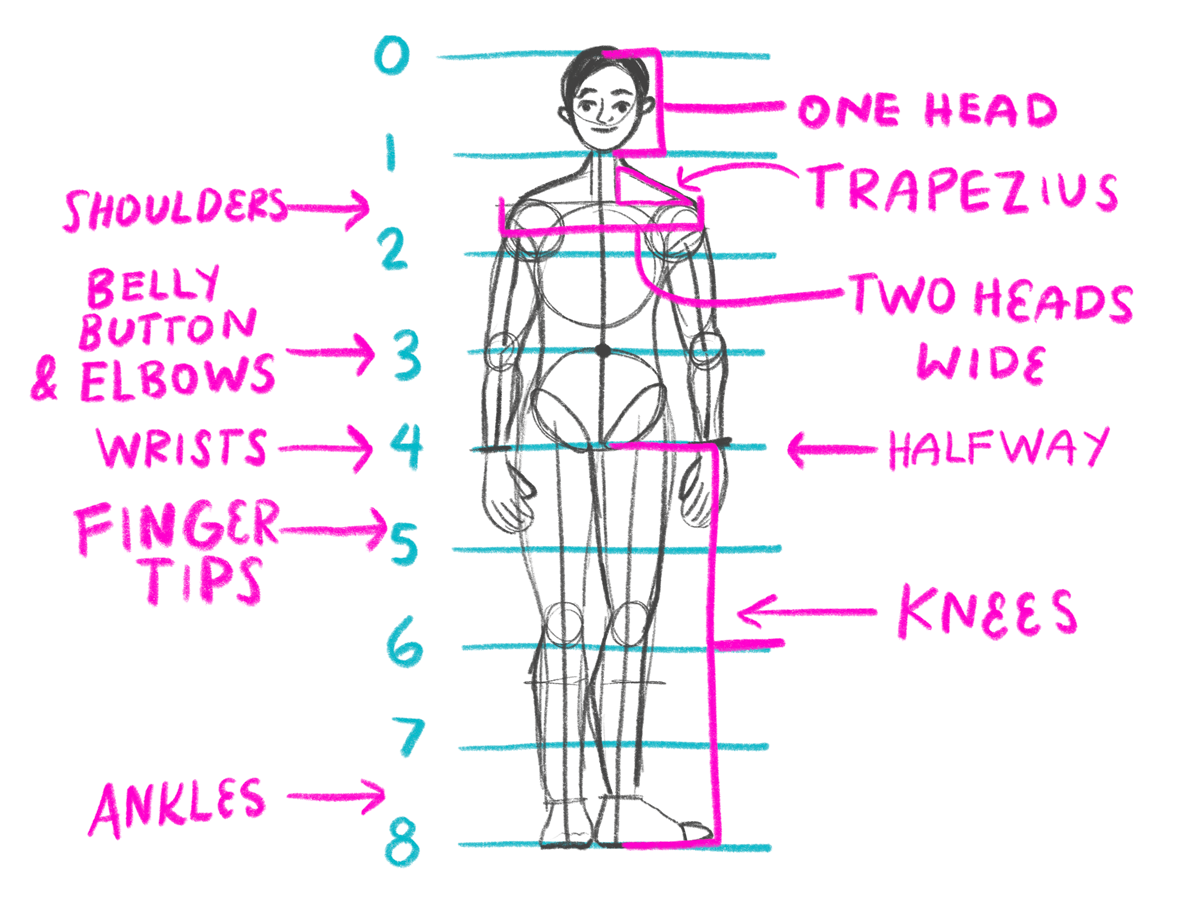
This process builds the figure from simple shapes, starting with a basic stick structure and then adding volume, as shown in the image below.

3. Practice: Constructing Your Figure
Now it's your turn to apply these principles. This exercise will guide you through constructing a standing figure in Procreate from scratch.
Estimated Time: 30 minutes
Objective: To create a simplified "mannequin" figure in a neutral standing pose using the 8-head proportion system.
Instructions:
-
Set Up Your Grid (Layer 1):
- In Procreate, open a new canvas.
- On your first layer, draw a straight vertical line.
- Divide this line into eight equal segments. You can do this by eye (halving the line three times) or by using a simple shape as a measurement tool.
- Draw faint horizontal lines across the canvas for each of the 8 head-units. This is your guide layer. Lower its opacity slightly.
-
Block in the Figure (Layer 2):
- Create a new layer.
- Head & Torso: Draw an oval for the head in the top unit (0-1). Draw a simple oval or box for the ribcage (roughly between lines 1.5 and 3) and a block for the pelvis (between lines 3 and 4). Connect them with a line for the spine.
- Legs: From the bottom of the pelvis, draw lines down for the legs. Mark the knee joints on line 6. Draw the feet at the very bottom (line 8).
- Arms: Draw the shoulder line about halfway between lines 1 and 2. Draw lines for the arms, marking the elbow joints on line 3 and the wrist joints on line 4. The hands should end around line 5.
-
Flesh out the Mannequin (Layer 3):
- Create a third layer.
- Using your block-in as a guide, draw the simplified 3D forms of the body. Think in terms of cylinders for the arms and legs, a sphere for the cranium, and blocky forms for the torso. Refer back to the "Mannequin Construction" image above to see how to build volume on your skeleton.
- Don't worry about muscles or details yet. The goal is a clean, well-proportioned structural drawing.
To help guide you through this process in real-time, you can follow along with the video we looked at earlier.
Drawing the Human Figure! - Proportions - Tutorial [PART I]
The 'Drawing the Human Figure!' video provides a complete walkthrough of this construction process. You can use it as a real-time guide for your own drawing.
Watch from 03:59 to 07:37. The artist demonstrates how to block in the torso, legs, and arms on the grid you've already created. Try to follow along with his steps on your own canvas.
Conclusion
Excellent work! You have now moved from simply knowing about proportions to actively using them as a constructive tool. You've built your first proportionally correct figure, which is a significant milestone.
Key Takeaways:
- The 8-head system is a reliable blueprint for constructing an idealized human figure.
- The body can be systematically mapped to an 8-part grid: chin (1), nipples (2), navel/elbows (3), crotch/wrists (4), fingertips (5), and knees (6).
- Construction follows a logical order: grid -> simple skeleton/landmarks -> volumetric forms (mannequin).
In our next lesson, we will take this static mannequin and learn how to make it move. We'll combine the structural knowledge from today with the dynamic energy from our gesture drawing lesson to sketch simplified 'mannequin' figures in varied poses using basic shapes and proportion guidelines. This will be the final step before we start layering on the anatomy you're keen to master.