Hello! Welcome back to your digital art training.
In the last lesson, we constructed a static, standing figure using the 8-head proportion system. You learned how to map out the body's landmarks on a grid to create a proportionally accurate, but rigid, "blueprint."
Today, we're going to bring that blueprint to life. Our goal is to sketch simplified 'mannequin' figures in varied poses using basic shapes and proportion guidelines. We'll be moving from a static structure to a dynamic, articulated one.
This is the final and most crucial step in this module. Mastering the mannequin will provide the foundational armature for all the detailed anatomy studies you're eager to begin. Think of it like this: in the last lesson, you defined a static "class" for a human figure. Today, you'll learn how to instantiate that class with different parameters (poses, angles, perspectives) to create a versatile and reusable component for your art.
1. The "Why": Mannequinization for Figure Drawing
Before we jump into the "how," it's important to understand why this step is so critical. Trying to memorize the entire muscular system without a simplified model is like trying to understand a complex application by reading its minified source code. The mannequin is a simplified, volumetric model of the body that allows you to solve problems of pose, proportion, and perspective first.
To get a quick overview of why this approach is so effective, let's watch the beginning of the following video.
drawing anatomy is easier than you think, here's how.
The video "drawing anatomy is easier than you think, here's how" from the channel brokendraw clearly explains the purpose of the mannequin.
Watch the first 46 seconds of the video. Pay attention to how the artist frames the mannequin not as a final product, but as a crucial learning tool for simplifying complexity.
2. Building the Core: The Three Major Masses
As you saw in the video, the mannequin is built from simple 3D forms. The most important relationship to capture in any pose is the orientation of the three major masses: the head, the ribcage, and the pelvis. Getting their relative angle, tilt, and twist correct is 90% of creating a believable pose.
We'll continue with the same video to see how to construct this core structure.
drawing anatomy is easier than you think, here's how.
Let's see how to translate the concept of the three major masses into simple, drawable forms.
Watch from 00:46 to 02:05. Focus on how the artist uses boxes for the ribcage and pelvis and emphasizes capturing the twist between them. This is the key to creating dynamic, non-rigid poses.
To reinforce this, the image below shows how these simple solid forms come together to create a dynamic figure. Notice how the torso is not a single rigid block, but two separate forms (a "thin box" for the ribcage and a "wider box" for the pelvis) that can twist and tilt independently.

3. Adding the Limbs and Defining Joints
Once the torso is established, you can attach the limbs. The limbs are best simplified as cylinders or, for a slightly more advanced and organic feel, as tapered "drumstick" shapes.
A key detail is to show the orientation of the major joints.
- Shoulders and Hips: These are ball joints, allowing for a wide range of motion. You can represent them with spheres.
- Elbows and Knees: These are hinge joints, moving primarily in one direction. Indicating their position helps clarify the limb's direction and bend.
This next video offers a clear look at this more organic approach to building the mannequin.
The First, EASY Step To Draw Bodies (For Beginners)
The video "The First, EASY Step To Draw Bodies" by The Art Of Nemo demonstrates how to evolve the basic boxy mannequin into a more organic structure.
Watch from 01:41 to 03:47 and then from 04:14 to 06:20. Notice how the artist starts with simple boxes and cylinders, but then refines them into more organic forms. Pay close attention to the discussion on how to indicate the orientation of the knees and elbows.
4. Practice: Sketching Mannequins from Reference
Now it's time to put all these pieces together. The goal here is not to create a perfect drawing, but to practice seeing and constructing the human form as a collection of simple volumes in space.
Estimated Time: 35-40 minutes
Objective: To sketch at least 3-5 mannequin figures from photographic reference, focusing on capturing the pose and volume.
Instructions:
-
Find Your References: Find a few photos of people in varied and clear poses. You can search for terms like "action poses," "dance poses," or "figure drawing reference." Sites like Pinterest or Unsplash are great for this. Choose poses where the limbs are not overly obscured.
-
Analyze and Construct (for each pose):
- Gesture First: On a new layer in Procreate, quickly draw the "line of action" that you practiced in our first lesson on figure drawing. This captures the main energy of the pose.
- Place the Masses: Using your line of action as a guide, block in the head, ribcage, and pelvis as simple boxes or ovals. Focus intently on their relative angles. Is the chest tilted forward? Is the pelvis twisted away from the viewer?
- Attach the Limbs: Draw the limbs as cylinders. Use spheres to indicate the shoulder and hip joints. Place a simple line or small box to mark the direction of the knees and elbows. Keep the 8-head proportions in mind as a general guide (e.g., elbows align roughly with the navel, fingertips reach mid-thigh).
- Keep it Simple: The goal is a structural sketch, not a detailed drawing. Don't worry about hands, feet, or facial features yet. Simplify them to blocks or wedges.
The image below shows excellent examples of what your final sketches for this exercise should look like: simple, clear, volumetric, and dynamic.
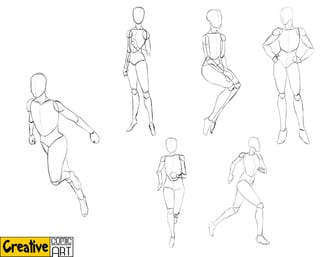
To see this process in action one more time, the next segment of the brokendraw video walks through several examples of building mannequins from reference.
drawing anatomy is easier than you think, here's how.
This final video segment will give you a real-time look at applying the mannequinization process to a variety of poses.
Watch from 02:05 to 04:28. You don't need to follow along and draw these specific examples. Instead, watch how the artist analyzes each reference photo, establishes the perspective and twist of the torso, and then builds the rest of the figure around it.
Conclusion
Fantastic work today. You have successfully bridged the gap between static proportion and dynamic gesture. By learning to construct a mannequin, you've developed the single most important skill for drawing figures from reference or imagination.
Key Takeaways:
- The mannequin simplifies the complex human body into manageable 3D forms (boxes, cylinders, spheres).
- The relationship between the ribcage and pelvis (tilt and twist) is the foundation of a dynamic pose.
- Proportions are still important, but they become more flexible to accommodate foreshortening and perspective in dynamic poses.
- Practice from reference is key to building a mental library of how the body moves and occupies space.
This lesson completes our module on the foundations of figure drawing. You now have all the necessary structural knowledge to begin your deep dive into anatomy.
In our next lesson, we will begin the "Human Skeleton" module. We'll take the simple boxes and cylinders of our mannequin and start replacing them with the actual forms of the skeleton, starting with the major components of the axial skeleton: the skull, spine, ribcage, and pelvis.