Hello! Welcome back.
In our last lesson, you did a great job learning to capture the essence of a pose with quick gesture sketches. We focused on energy, movement, and weight, prioritizing the "feel" of the figure over precision.
Today, we're going to shift gears and introduce that precision. While gesture gives a drawing life, proportions give it structure and believability. This lesson focuses on the learning outcome: Identify major body landmarks used for establishing correct proportions.
Think of our previous work on gesture as defining the dynamic flow of a function. Today, we're defining the key parameters and anchor points that this function will operate on. These landmarks are the non-negotiable points on the body that we build everything else around. Mastering them is a critical step, especially given your goal to fast-track to detailed anatomy, as these bony points are the foundation upon which muscles are layered.
1. What Are Landmarks and Why Do They Come First?
Before we can think about the relative size of the head to the torso, or the length of the arm, we need to know what we're measuring from and to. Anatomical landmarks are these measuring points. They are typically parts of the skeleton that are close to the surface and visible or at least palpable on most people, regardless of muscle mass or body fat.
Learning to see these landmarks is the true first step to constructing a believable figure.
The Figure Drawing Roadmap – all the skills, in order, part 1
To understand why we're starting here, let's look at an article from Love Life Drawing that places landmarks as the very first skill in their 'Figure Drawing Roadmap'.
Please read the first section, '1. Landmarks'. Note the author's point that learning to 'see' the landmarks is a huge improvement in itself, even before your drawings look 'good'. That's our exact goal today.
Now that you see the "why," let's get into the "what." Which landmarks are the most important for an artist?
Anatomy Landmarks - Reuben Lara
This article by artist Reuben Lara provides a fantastic, clear list of the essential landmarks you should learn to identify.
Start reading at the heading 'LANDMARKS' and review the list of key points like the acromion process, collarbones, sternum, and iliac crest. As you read through the list, try to find these points on your own body to get a physical sense of their location.
2. A System for Measurement: The Head Unit
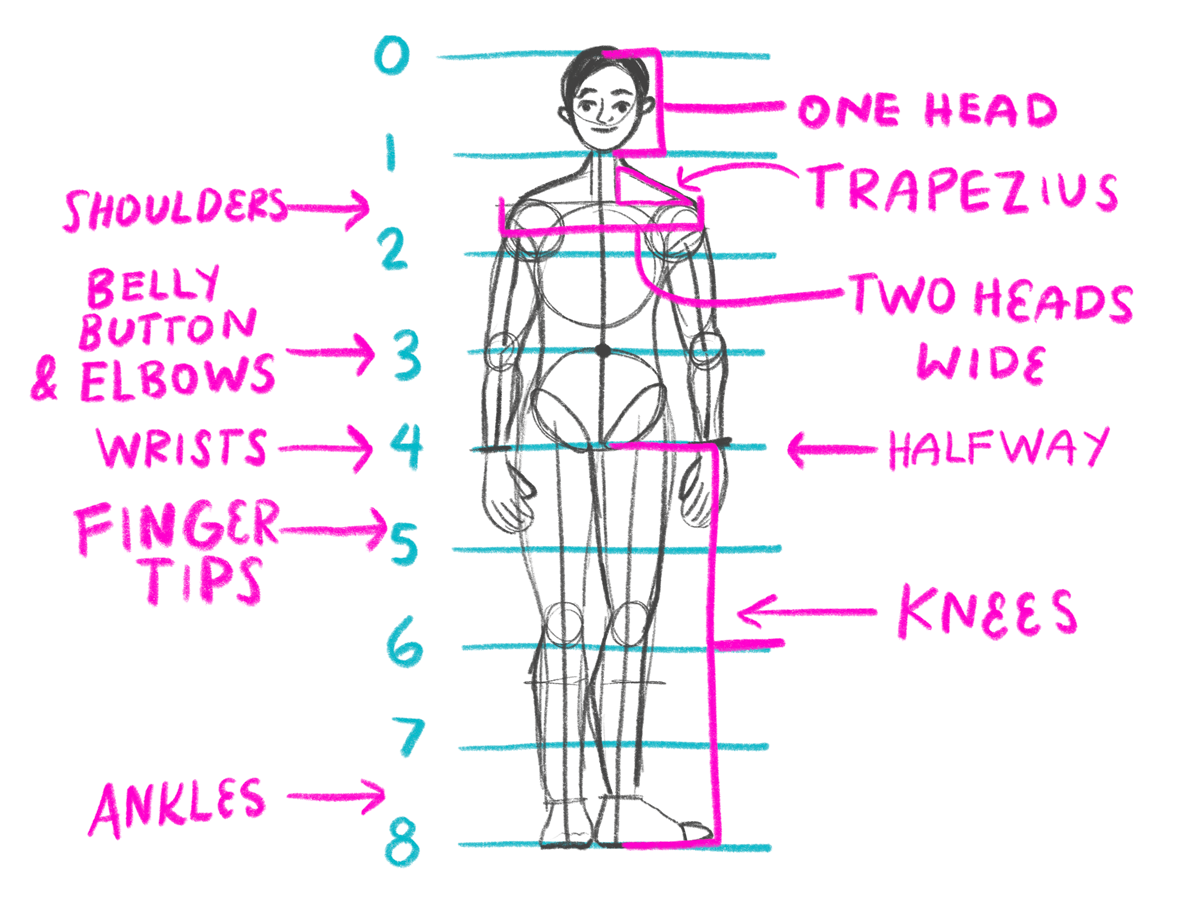
Identifying landmarks is the first step. The second is understanding the spatial relationship between them. For centuries, artists have used a simple and convenient ruler: the height of the figure's own head. By using the head as a unit of measurement, you can establish proportions that are internally consistent.
There are two common models: the "heroic" 8-head proportion and the more "average" 7.5-head proportion. Both are useful guides.
Human Figure Proportions - Anatomy Master Class
Let's start with the classical 8-head system. This video from Drawing Art Academy introduces the concept and shows how the body's primary masses align with this grid.
Watch from 00:58 to 03:32. Pay close attention to the major divisions: the halfway point (pubic bone), the quarter point (nipples), and where the wrists fall. This gives you the main horizontal lines of your proportional map.
While the 8-head model is a clean ideal, many artists find a 7.5-head model to be a more realistic representation of an average person. The following video breaks this down into a set of very practical rules.
Human Proportion for Figure Drawing: The Ultimate Guide
This video from Merrill Kazanjian's channel provides an excellent set of rules based on the 7.5-head average. Think of these as practical shortcuts for checking your work.
Watch from 01:18 to 04:44, and then skip to 05:08 and watch until 06:24. The presenter offers a great list of equivalencies (e.g., '1 head length from the chin to the nipples,' '2 heads across the shoulders'). You don't need to memorize the entire list, but absorb the systematic approach of comparing different body parts to the head unit.
3. Visualizing the Proportional Map
Here are two diagrams that bring these concepts together. They map out the key landmarks onto idealized figures.

4. Practice: Becoming a Landmark Spotter
Now it's time for the most important part of the lesson: practice. Your task is not to create a finished drawing, but simply to find the landmarks on different bodies in different poses.
Estimated Time: 20-25 minutes
For this exercise, we'll return to the "Anatomy Landmarks" article by Reuben Lara. It contains two excellent practice tools: a gallery of annotated photos and an interactive 3D model.
Activity 1: Landmark Identification in Photos (10 minutes)
- Open the Anatomy Landmarks article.
- Scroll down to the gallery of photos (below the list of landmarks).
- For each pair of images, look at the first, un-annotated photo. In your mind (or with a quick sketch in Procreate), try to pinpoint the location of:
- The collarbones (clavicles) and the pit of the neck.
- The top of the sternum (breastbone).
- The bottom of the ribcage.
- The bony points of the pelvis (iliac crest).
- The spine.
- The shoulder blades (scapulae).
- After you've made your guess, click the right arrow to see the second photo with the artist's annotations. Compare your findings.
- Repeat this process for at least five different models in the gallery. Notice how the visibility of these landmarks changes depending on the person's pose and physique.
Activity 2: Exploring with the 3D Mannequin (10-15 minutes)
- In the same article, find the LANDMARK MANNEQUIN 3D viewer. For a better experience, click the "FULL SCREEN DIRECT LINK".
- Spend a few minutes simply rotating the model. See how the landmarks you've been studying appear from different angles.
- Now, use the controls to pose the mannequin. Pay special attention to the relationship between the major masses:
- Raise an arm and watch how the clavicle and scapula move with it.
- Twist the torso and observe the changing relationship between the bottom of the ribcage and the top of the pelvis (iliac crest). This "squash and stretch" area is critical for creating dynamic poses.
- Practice Sketching: With the 3D model on your screen, do a few quick sketches in Procreate. Don't try to draw the whole figure. Just focus on:
- Drawing the blocky forms of the ribcage and pelvis.
- Marking the key landmarks on those forms with an 'X' or a dot.
- This exercise directly trains your eye to see the underlying structure.
Conclusion
Great work today. You've taken a massive step from the free-flowing world of gesture into the structured world of proportion. You now have a mental checklist of the key anchor points to look for on any figure.
Key Takeaways:
- Landmarks are the foundation: They are the visible or palpable bony points that provide the structure for a figure drawing.
- Key landmarks to identify: Pit of the neck, collarbones (clavicles), sternum, bottom of the ribcage, iliac crest (pelvis), sacrum, spine, and major joints (shoulders, elbows, wrists, knees, ankles).
- The head is your ruler: The head unit is a reliable tool for measuring the distances between landmarks and establishing proportion.
- Observation is key: The ability to find these landmarks on real bodies, despite variations in physique and pose, is the essential skill.
In our next lesson, we will put this knowledge into practice. You'll learn how to apply the 8-head proportion system to construct a standard standing figure from scratch. We'll move from just identifying the landmarks to actively using them to build a correctly proportioned mannequin.