Hello! Welcome back to your figure drawing journey.
In our last lesson, you learned to see and capture the line of action—the single, expressive curve that defines a pose's energy. This was the first crucial step in simplifying the complex human form into its most essential information.
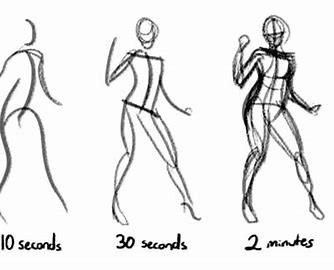
Today, we'll build directly on that foundation. Your goal is to produce 30-second to 2-minute gesture sketches that communicate movement and weight. We will expand from that single line to a full, albeit simplified, figure. Think of this as moving from a basic algorithm for the pose to a rapid, low-fidelity prototype of the entire figure. The objective isn't accuracy or detail, but capturing the life and force of the pose quickly and efficiently.
1. What is a Gesture Sketch?
While the line of action captures the main thrust, a gesture sketch captures the entire story of the pose—its movement, energy, and distribution of weight. It's the soul of a figure drawing.

A good gesture sketch successfully communicates two key ideas: movement and weight.
- Movement is the flow and energy you started capturing with the line of action.
- Weight is about making the figure feel grounded and subject to gravity. To convey weight, you need to understand balance.
This short reading provides an excellent overview of these concepts.
Elements of Gesture - Making Comics
The article 'Elements of Gesture' on Making Comics defines gesture and explains the crucial role of weight and balance.
Please read the introduction and the section 'Weight and Balance'. Pay attention to how a figure being 'unbalanced' isn't a mistake, but rather a way to communicate motion.
As the article mentions, a figure's sense of balance (or imbalance) is key. A balanced pose feels static and stable. An unbalanced pose feels dynamic, as if the figure is in the middle of an action—falling, running, or shifting their weight.
2. From Line of Action to Full Gesture
So, how do you build a full gesture from the line of action you practiced? Let's establish a simple, repeatable process. In the previous lesson, we used a resource from Line-of-Action.com. We'll now use the subsequent steps from that same tutorial.
It breaks the process down into three logical parts:
- Draw the line of action (what you did last lesson).
- Hang the head, ribcage, and hips along this line.
- Capture the limbs with simple lines or ovals.
Learn how to draw poses and gestures from references - Line of Action
This guide from Line-of-Action.com provides a clear, step-by-step method for constructing a gesture sketch. It's the perfect next step from our previous lesson.
Read the sections titled 'Hang the head, ribcage and hips' and 'Capture the limbs'. This will give you the complete, simple framework for our practice exercise.
This progressive approach is a powerful way to manage the complexity of the figure under a time limit.
3. The 'How': Mark-Making and Mindset
Knowing the steps is one thing; executing them effectively is another. The key is to use simple marks and adopt the right mindset.
Simplifying Your Lines
Don't get lost in complex contours. Limit your marks to three simple types: C-curves, S-curves, and Straight lines (CSI). This forces you to simplify and find the most important information.
The Role of the Time Limit
The most common mistake with timed exercises is to panic and rush. The purpose of a 30-second or 2-minute limit is the opposite: it forces you to draw less and be more decisive. You simply don't have time for details, so you're free to focus only on the gesture.
This video from Love Life Drawing explains these concepts brilliantly.
The 11 Steps to Great Gesture Drawing
In this video, 'The 11 Steps to Great Gesture Drawing', the instructor from the Love Life Drawing channel provides fantastic, practical advice. We'll focus on his tips for mark-making and using time limits effectively.
Watch from 04:22 to 06:32. Pay close attention to the 'CSI' method and the counter-intuitive but crucial advice on how to approach a time limit: 'slow down and draw less'.
4. Practical Exercise: Timed Gestures
It's time to put it all together. Just like last time, we'll use the free tool from Line-of-Action.com. Remember, these are exercises, not finished drawings. Embrace the messy, energetic lines.
Estimated time: 25 minutes
-
Set Up Your Tools:
- Open Procreate on your iPad. Choose a simple brush, like the "6B Pencil" or "Peppermint" brush from the Sketching set.
- Navigate to the Line-of-Action practice tool.
- Models: Select "Clothed".
- Class Mode: Select this option.
-
Phase 1: 30-Second Gestures (10 minutes)
- Set the Intervals to "30 seconds".
- Click "Start Drawing".
- For each pose, try to capture:
- The line of action.
- The head, ribcage, and pelvis as simple ovals or blocks.
- Don't worry about limbs yet. Focus on the core of the body and its main rhythm. Fill your canvas with these quick sketches.
-
Phase 2: 2-Minute Gestures (15 minutes)
- Now, change the Intervals to "2 minutes".
- Start a new session.
- For each pose, follow the full process:
- Start with the line of action.
- Place the head, ribcage, and hips. Pay attention to their tilt and the "squash and stretch" on the torso.
- Add the limbs using simple lines or long ovals (CSI method). Indicate joints with a small circle or by simply changing the direction of your line.
- If you have extra time, try to refine the shape of the torso or suggest the connection of the limbs to the body. Do not draw details like fingers or faces.
By the end of this exercise, you will have a collection of drawings that, while not "perfect," should feel alive and full of energy.
Conclusion
Excellent work today! You have successfully bridged the gap from a single abstract line to a complete, dynamic figure sketch. This skill is the absolute cornerstone of figure drawing and will be invaluable as we move into more detailed anatomy.
Key Takeaways:
- A gesture sketch builds on the line of action to capture the movement and weight of the entire figure.
- A simple and effective method is to first establish the line of action, then "hang" the major masses (head, ribcage, pelvis), and finally add the limbs.
- Use simplified marks like C-curves, S-curves, and straights (CSI) to avoid getting lost in detail.
- Timed exercises are designed to force decisiveness and focus on the essential, not to encourage rushing.
- Weight and balance are conveyed through the relationship of the body's masses. An unbalanced pose creates a sense of dynamism.
In our next lesson, we will slow things down. You'll learn how to construct a more proportionally accurate figure using the 8-head proportion system. This will add a layer of structural correctness to the fluid, energetic gestures you practiced today.