Hello! Welcome back to our detailed study of human anatomy.
In the past few lessons, we've dissected the leg into its core components: the quadriceps on the front of the thigh, the hamstrings on the back, and the calf muscles of the lower leg. Now it's time to assemble these parts into a cohesive whole.
This lesson directly addresses the learning outcome: Draw the leg from a frontal or posterior view in a neutral standing pose, indicating the major muscle groups. We will integrate your knowledge from the previous sessions to construct a complete and anatomically sound leg.
1. A Quick Review of the Leg's Musculature
Before we start drawing, let's quickly refresh our memory of the muscle groups we'll be working with. Each muscle has a unique shape and function, and understanding how they fit together is the key to drawing a believable leg.
🧍 FULL BODY ANATOMY CRASH COURSE (for artists)
This segment from Marc Brunet's "FULL BODY ANATOMY CRASH COURSE" provides a very efficient overview of all the leg muscles, from the glutes down to the calves. It's a great way to prime your brain with the key names and locations.
Watch from 08:16 to 10:33. Don't worry about memorizing every single term. Instead, focus on visually identifying the main groups we've already studied: Glutes (08:16 - 08:46): The muscles of the buttocks. Quadriceps (08:57 - 09:22): The front thigh muscles. Hamstrings (09:22 - 09:54): The back thigh muscles. Calves (10:04 - 10:33): The muscles of the lower leg.
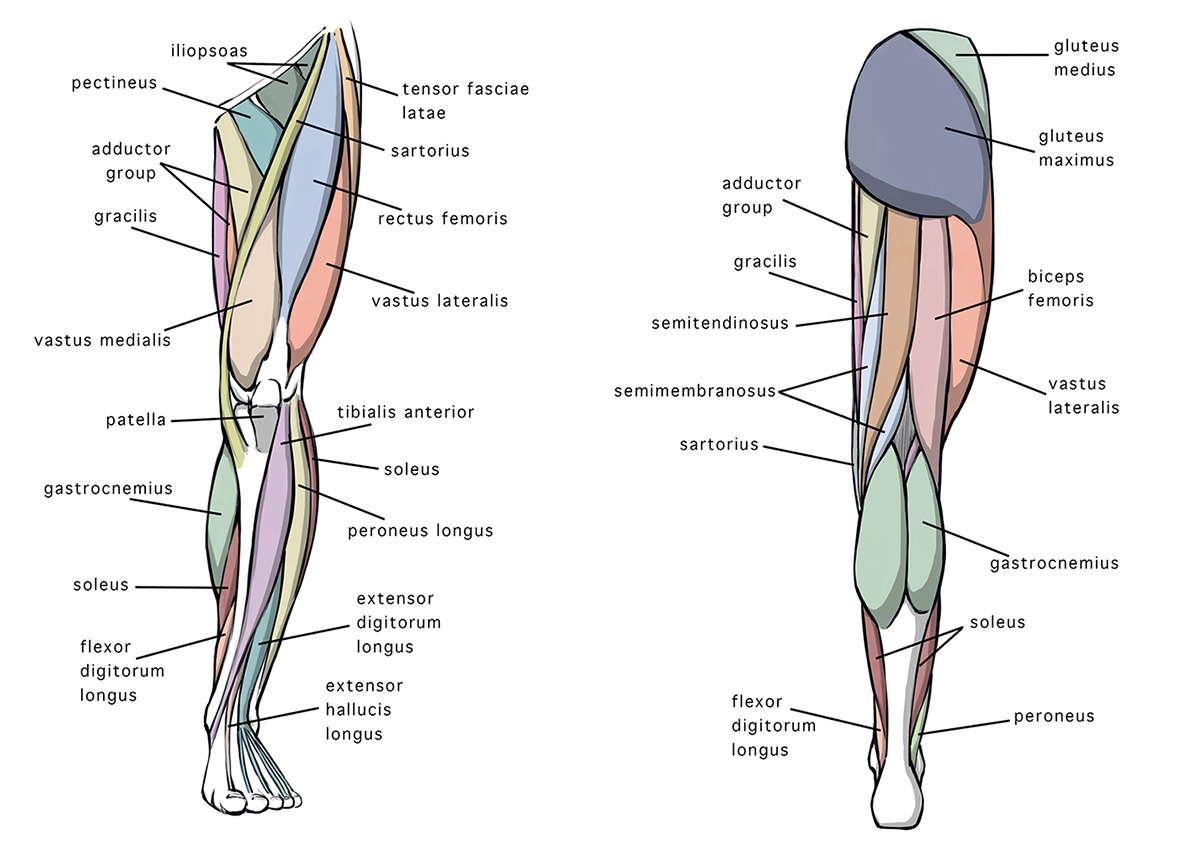
To serve as a reference throughout this lesson, here is a clear diagram showing the anterior (front) and posterior (back) views of the leg with all the major muscles labeled.
2. The Step-by-Step Drawing Process
Drawing the full leg is a process of building from simple to complex. You start with the overall gesture and proportion, block in the major forms, and then refine those forms with your anatomical knowledge.
The following guide is an excellent, in-depth resource that breaks down this entire process. We will use it as the foundation for our practice session.
How to Draw Legs, the Easy Step-by-Step Guide with Simplified Anatomy
The article "How to Draw Legs, the Easy Step-by-Step Guide" from GVAAT is one of the best resources for this topic. It provides detailed anatomical diagrams and, most importantly, clear, step-by-step drawing examples that are perfect for our goal today.
Take about 15 minutes to study this guide. First, quickly read section 3, "Simplified muscle groups of the leg", to review the origin and insertion points of the Quads, Hamstrings, Calves, and Glutes. The summary table is particularly useful. Next, carefully study the step-by-step breakdowns in section 5, "Drawing legs – step-by-step examples". Pay close attention to Example 1 (front view) and Example 3 (posterior view). Notice how the artist starts with a simple skeletal frame, then blocks in shapes, and finally adds anatomical detail.
The GVAAT article presents a methodical, analytical approach. To complement this, let's look at how a comic book artist tackles the same challenge with a focus on gesture and dynamic shapes.
In this video, comic artist David Finch demonstrates his process for drawing legs. His method is very fluid and emphasizes starting with gesture and using simple "football shapes" to build up the muscle forms.
Watch the sections demonstrating the front view (01:14 - 02:40) and the rear view (02:40 - 04:14). Focus on how he establishes the overall flow and shape of the leg before adding the specific muscle details. This gestural approach is a great habit to develop.
3. Key Forms: Front vs. Back
Let's quickly summarize the key muscle landmarks for each view.
Anterior (Front) View
The front of the leg is dominated by the quadriceps. For a deeper look at the forms of the quads, this Proko article is an invaluable reference.
How to Draw Legs – The Quad Muscles
This Proko article, "How to Draw Legs – The Quad Muscles", focuses specifically on the shapes and asymmetries of the front thigh, which are crucial for a convincing drawing.
Skim through the sections "Let's Introduce the 4 Muscles," "Asymmetry," and "Basic Forms." The key takeaway is the asymmetrical relationship of the quad muscles around the kneecap: the vastus medialis (inner muscle) forms a low teardrop shape, while the vastus lateralis (outer muscle) sits higher.
What to look for from the front:
- The V-shape at the hip created by the Tensor Fasciae Latae (TFL) on the outside and the Sartorius muscle on the inside.
- The three visible heads of the Quadriceps: Vastus Lateralis (outer), Rectus Femoris (center), and Vastus Medialis (inner teardrop).
- The Adductor muscles on the inner thigh, separated from the quads by the Sartorius.
- The bony landmark of the patella (kneecap).
- The front of the tibia (shin bone), which is very close to the surface.
- The shapes of the calf muscles defining the contours of the lower leg.
Posterior (Back) View
What to look for from the back:
- The Gluteus Maximus and Medius, which form the buttocks.
- The "fangs" of the Hamstrings behind the knee. The Biceps Femoris is on the outside, and the Semitendinosus/Semimembranosus are on the inside.
- The diamond-shaped space behind the knee, called the popliteal fossa.
- The prominent, heart-shaped forms of the Gastrocnemius (calf bellies). Remember the inner head is lower and larger.
- The powerful Achilles tendon tapering down to the heel.
4. Practice: Front and Back Leg Studies (30-35 minutes)
Now, let's open Procreate and apply these concepts. The goal is to create two separate drawings: one of the legs from the front, and one from the back, both in a neutral standing pose.
What You'll Need:
- Procreate on your iPad.
- Two reference photos: one of a figure standing, seen from the front, and one seen from the back. Search for "male anatomy standing pose front" and "male anatomy standing pose back" for good, clear references.
Exercise Steps (repeat for both front and back views):
- Setup: Import your reference photo into a new Procreate canvas.
- Step 1: Skeletal Guideline (New Layer): Following the process from the GVAAT article, start with a simple line drawing representing the skeleton. Focus on getting the angles of the pelvis, femurs, and tibias correct. Establish the overall proportions.
- Step 2: Block-in the Shapes (New Layer): Loosely sketch the main shapes and contours of the leg over your skeletal guide. Think in terms of simple cylinders and tapering forms. Try to capture the overall rhythm and gesture, as David Finch demonstrated.
- Step 3: Define Muscle Groups (New Layer): Now, using your anatomical knowledge, refine the block-in by drawing the major muscle groups.
- For the front view: Clearly define the quads, sartorius, and adductors.
- For the back view: Draw the glutes, hamstrings, and the two heads of the gastrocnemius.
- Step 4: Label the Anatomy (New Layer): To test your knowledge, lower the opacity of your drawing layers. On a new layer, use text or simple labels to point out the key muscles you've drawn (e.g., "Vastus Medialis," "Biceps Femoris," "Gastrocnemius"). This is a great way to solidify your learning.
Don't worry about perfect rendering or shading. The goal is a clear line drawing that shows you understand the placement and shape of the major muscle groups.
Conclusion
Fantastic work today. By integrating the individual muscle groups into a complete structure, you've taken a significant step toward mastering the anatomy of the leg. This process of building from a simple skeleton to complex muscle forms is a fundamental workflow in figure drawing.
Key Takeaways:
- Drawing the leg is a process of assembling the quadriceps, hamstrings, glutes, and calves onto a skeletal frame.
- From the front view, the key forms are the asymmetrical quads, the S-shaped sartorius, and the adductors.
- From the posterior view, the key forms are the glutes, the two distinct hamstring groups, and the prominent heart-shape of the gastrocnemius.
- Always start with simple gestures and proportional guides before adding complex anatomical detail.
In our next lesson, we will introduce dynamism and movement. We will tackle the learning outcome: Draw the leg from a side view in a flexed pose, showing how the quadriceps and hamstrings change shape. This will challenge you to think about muscles not just as static shapes, but as tissues that stretch and contract.