Hello! Welcome to Module 10, where we'll dive into one of the most challenging and rewarding subjects in figure drawing: the human head.
In our last lesson, we focused on the dynamics of the leg muscles in a flexed pose. You learned how opposing muscle groups create movement through "squash and stretch." We're going to carry forward this idea of building on an underlying structure as we tackle the head.
Today's lesson addresses the first and most crucial step in drawing a believable head: Constructing the basic form of the head using the Loomis method. This method, developed by illustrator Andrew Loomis, is a foundational technique that treats the head not as a flat oval, but as a three-dimensional object in space. Think of it as creating a structural blueprint, much like a 3D model's wireframe, upon which all the features will be built. Mastering this will give you a reliable system for drawing the head from any angle.
1. The Core Idea: The Head as a Sphere
The complexity of the human skull can be intimidating. The Loomis method simplifies it by starting with a single, basic form: a sphere. The large, rounded part of your skull that houses your brain (the cranium) is very ball-like.
However, the head isn't a perfect sphere. The sides, where your temples are, are flatter. So, the first step is to imagine slicing off a section from each side of the sphere.
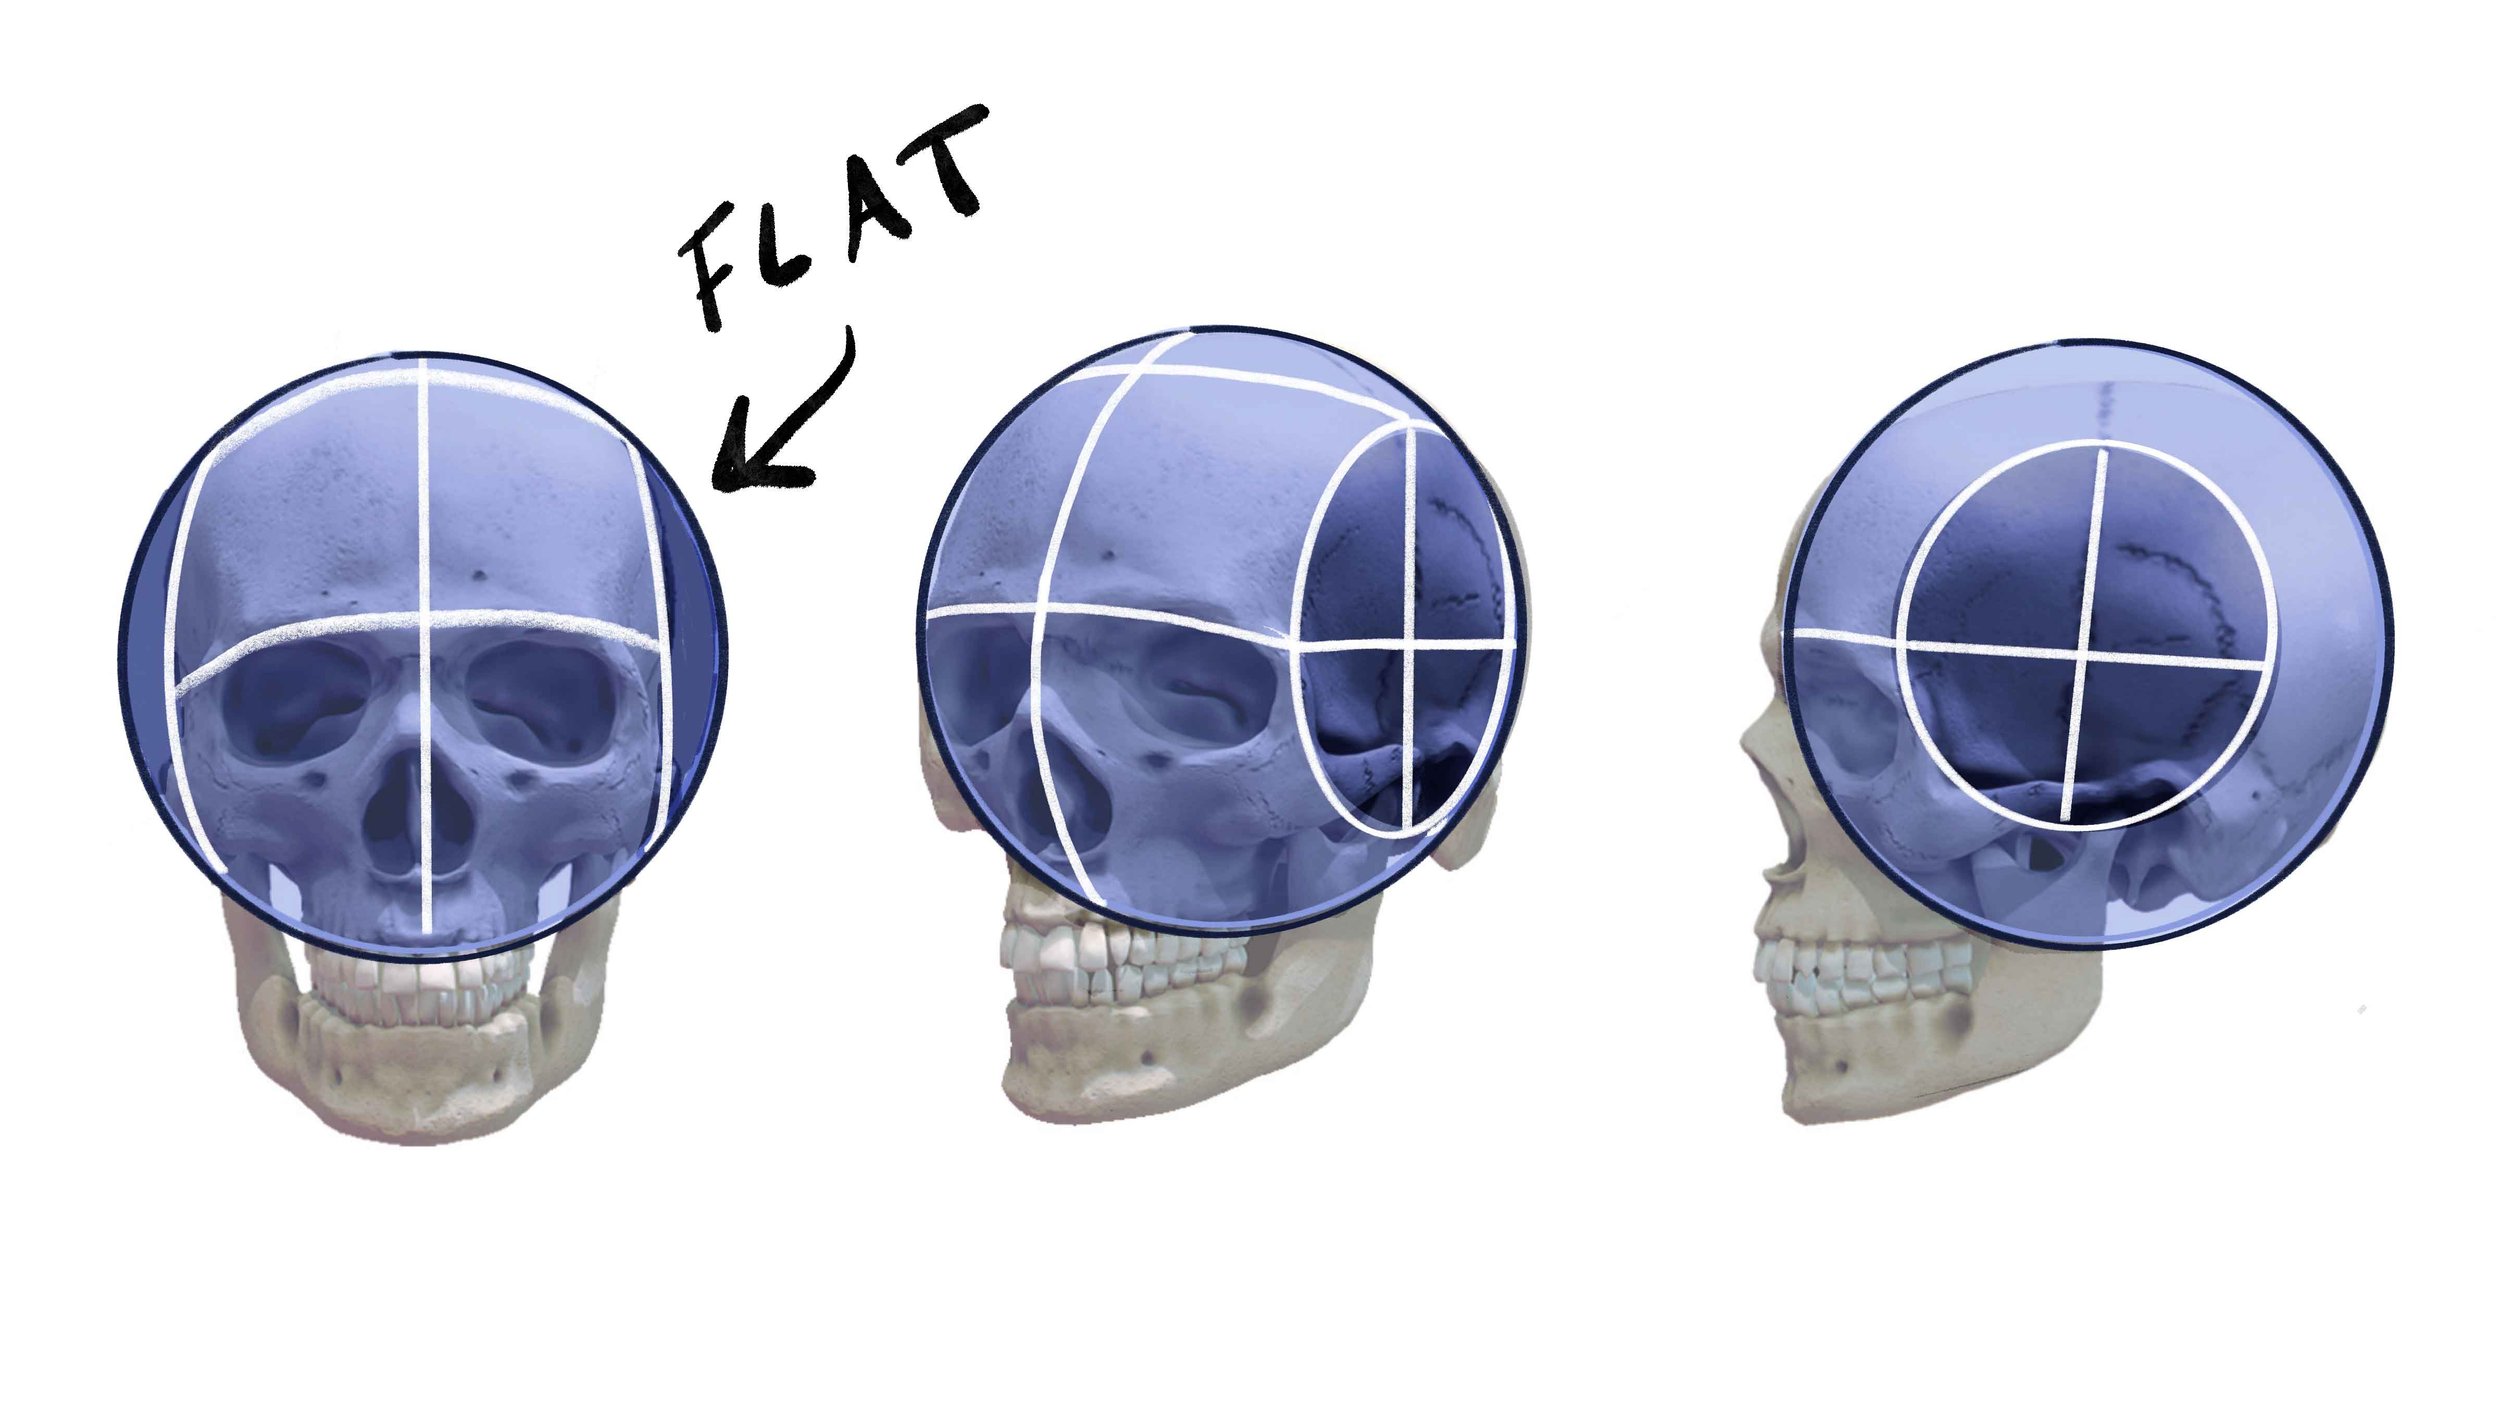
This "flattened ball" is the starting point for our entire construction. It's a simple but powerful way to start thinking about the head in three dimensions.
2. Building the Loomis Head: A Step-by-Step Guide
Now, let's walk through the process of building the head structure on this sphere. We'll use a video that demonstrates the steps directly in Procreate.
How TO DRAW a FACE using the Loomis Method on PROCREATE
The artist SAM CLARK in this video provides a very clear, step-by-step demonstration of constructing a Loomis head in Procreate. We'll watch it in segments to break down the process.
For now, watch from the beginning to 2:23. Pay attention to how the initial circle is drawn and how the oval on the side defines the head's orientation. The instructor also shares a useful Procreate-specific tip for drawing perfect circles.
Let's recap what you just saw:
- Draw a sphere: This represents the main mass of the cranium.
- Slice the side: An oval is drawn to indicate the flattened side plane of the head. The size and position of this oval determine how much the head is turned.
- Find the brow line: A horizontal line is drawn through the center of the sphere. This is the brow line, and it is one of the most important landmarks.
- Find the center line: A vertical line wrapping around the sphere's surface indicates the center of the face.
Now, let's establish the key proportions of the face.
How TO DRAW a FACE using the Loomis Method on PROCREATE
Let's continue with the same video to see how the face is divided into thirds.
Watch the segment from 2:23 to 3:32. The instructor demonstrates how to establish the hairline, nose line, and chin line. Notice that the distance from the brow to the nose is used to measure the distance from the nose to the chin.
This brings us to the core proportional rule of the Loomis method: the face is divided into three equal parts.
- Part 1: Hairline to Brow line
- Part 2: Brow line to Nose line
- Part 3: Nose line to Chin line
Finally, let's attach the jaw to complete the structure.
How TO DRAW a FACE using the Loomis Method on PROCREATE
In this last segment, you'll see how to connect the jaw and define the cheekbone to complete the basic head form.
Watch from 3:32 to 4:42. Observe how a curved line from the side of the cranium connects down to the chin to form the jaw. A second line defines the plane of the cheek.
And there you have it—a complete Loomis head structure.

3. Thinking in 3D: Wrapping the Lines
A common mistake for beginners is to draw the Loomis guidelines as flat, straight lines. It's crucial to remember that you are drawing on a curved surface. The brow line, center line, and others are more like the equator and longitude lines on a globe—they wrap around the form.
This becomes especially important when the head is tilted.
Quickly Draw Heads with the Loomis Method - Part 1
The artist Stan Prokopenko (Proko) is an expert at explaining anatomical structure. In this video, he demonstrates how to apply the Loomis method to heads at different angles, which really emphasizes the 3D nature of the construction.
Please watch from 3:58 to 6:10. Focus on how the guidelines for the brow, nose, and chin become curved ellipses when the head is tilted down. This is the key to creating a sense of dimension and avoiding a flat 'symbol' of a face.
As Proko shows, when the head tilts up or down, the horizontal guidelines become curves. Visualizing these lines wrapping around the sphere is essential for drawing the head in any position other than straight-on.
4. Practice: Constructing Loomis Heads (30 minutes)
It's time to put this into practice. Your task is to apply these steps to draw several Loomis heads. The goal is not perfection, but to internalize the construction process.
What You'll Need:
- Procreate on your iPad.
- (Optional) Reference photos of heads from different angles. You can search for "portrait 3/4 view," "portrait profile," "head tilted down."
Exercise Steps:
-
Draw the 3/4 View:
- On a new layer in Procreate, follow the steps from the SAM CLARK video to construct your first Loomis head. Start with a light-colored brush for the construction lines.
- Step 1: Draw the sphere.
- Step 2: Slice the side plane with an oval.
- Step 3: Draw the curved center line and the brow line (the 'equator' of the sphere).
- Step 4: Mark the hairline, nose line, and chin line, keeping the three main sections equal.
- Step 5: Connect the jaw from the cranium to the chin. Add the cheek line.
-
Draw the Profile (Side View):
- Try another head, this time from a perfect side view. The process is similar, but the side "slice" is now a circle in the center of the larger sphere. The center line of the face becomes the front edge of the face profile. The Proko video touches on this from 7:13 onwards if you need a refresher.
-
Challenge: Draw a Tilted Head:
- Find a reference of a head looking slightly up or down.
- Try to construct it using the Loomis method. Remember to curve your guidelines as demonstrated in the Proko video. This will be challenging, but it is excellent practice for thinking in 3D.
- Aim to draw at least 3-5 heads during this practice session. Don't erase; if one doesn't work, just start a new one. The repetition is what builds the skill.
Conclusion
Great work today. You've learned a systematic approach to constructing the human head, which is a major milestone. This method provides a solid foundation that takes the guesswork out of drawing heads and will be invaluable as we add more complexity.
Key Takeaways:
- The Loomis method simplifies the head into a "flattened sphere" to represent the cranium.
- The face is divided into three equal sections: hairline to brow, brow to nose, and nose to chin.
- The construction lines are not flat; they are contours that must wrap around the 3D form of the head.
- This method provides a reliable framework for drawing the head from any angle.
In our next lesson, we will build directly on this foundation. Now that you know how to construct the "house," we'll learn how to place the "windows and doors." We will focus on placing facial features accurately using standard proportion guidelines within the Loomis structure you learned today.