Hello again! Last time, we established the foundational structure of the head using the Loomis method, treating it as a 3D form in space. You learned to construct the "blueprint" of the head with its key landmarks: the hairline, brow line, nose line, and chin.
Today, we'll build directly on that blueprint. Our goal is to place the facial features accurately using standard proportion guidelines. Now that you have the "house" constructed, we'll figure out exactly where to put the windows, door, and other architectural details. Mastering these proportions is the key to creating faces that look believable and correctly structured.
Let's get started.
1. The Proportional Grid: Placing the Features
The Loomis head you practiced drawing provides the primary vertical divisions. Now, we'll add a set of horizontal and relational guidelines to pinpoint the location and size of each feature.
The key insight to remember is that the features of the face are all related to one another in a surprisingly consistent way.
To get a quick but comprehensive overview of these relationships, let's watch a video that breaks them down.
Easy Head Drawing Tutorial for Beginners (That Actually Makes Sense)
This video from the channel 'gwendolyn' provides an excellent and modern summary of the standard facial proportions that artists use. It's fast-paced, so we'll focus on the key measurement sections.
Please watch from 2:28 to 4:18. Pay close attention to: Eye Placement: The vertical location of the eyes and the 'five-eye rule' for spacing. Feature Alignment: How the nose, mouth, and ears align with the eyes and the Loomis guidelines we already know.
This video gave you the core set of rules. Let's break them down one by one to make sure they're crystal clear.
A. The Eyes: The Center of the Head
- Vertical Placement: A common mistake is placing the eyes too high. The eyes actually sit on the horizontal centerline of the entire head (from the very top of the skull to the bottom of the chin). This line is often just slightly below the Loomis brow line.
- Horizontal Placement (The Five-Eye Rule): The width of the head, from ear to ear, is approximately five eyes wide. This means:
- The space between your two eyes is equal to the width of one eye.
- The space between the outer corner of your eye and the side of your head is also about one eye-width.
B. The Nose: Width and Alignment
- Vertical Placement: The bottom of the nose rests on the nose line you established with the Loomis method.
- Width: The wings (sides) of the nose generally align vertically with the inner corners (tear ducts) of the eyes. This is a very reliable measurement.
C. The Mouth: The Rule of Thirds
- Vertical Placement: The area from the bottom of your nose to your chin can be divided into three equal parts.
- The first third contains the upper lip. The line where the lips meet sits at the bottom of this first third.
- The second third contains the lower lip.
- The final third is the chin itself.
- Width: The corners of the mouth typically align vertically with the center of the pupils or irises when the face is in a neutral expression.
D. The Ears: The Final Landmark
- The ears are the easiest to place once the other features are set. They slot neatly into the space between the brow line (at the top) and the nose line (at the bottom).
2. A Step-by-Step Guide
Now that you have an overview of the individual rules, let's see how they come together in a methodical process. The following reading provides a clear, step-by-step guide that reinforces what we just covered.
How to Draw a Face from the FRONT (Loomis Method)
This article from RapidFireArt breaks down the front-view construction and feature placement in a very clear, illustrated sequence. It will help solidify the order of operations.
Please read the sections 'Determine Where each Facial Feature Goes' and 'Time to Draw the Actual Facial Features'. Focus on the images and descriptions that explain how to find the eye line and lip line, and then how to use those guides to place the eyes, nose, and mouth.
This methodical approach, moving from large forms to smaller details, is fundamental. It's analogous to how in software development you might build out the main application architecture before implementing specific functions. By ensuring the foundation is correct, you prevent problems later on.

3. Practice: Placing the Features (30 minutes)
Time to apply these rules in Procreate. The goal here isn't to draw beautiful, detailed features, but to correctly place simple shapes representing them on the Loomis head structure.
Exercise Steps:
-
Set Up Your Canvas:
- Open Procreate. On one layer, draw a front-view Loomis head, just as you practiced in the last lesson. Use a light color for these construction lines.
- Create a new layer on top for your feature guidelines.
-
Add Proportional Guidelines:
- Eye Line: Find the halfway point between the top of the skull and the bottom of the chin. Draw a horizontal line here.
- Eye Spacing: Divide this eye line into five roughly equal segments. This will show you where to place the two eyes and the space between them.
- Nose Width: Draw light vertical lines down from the inner corners of the eye-spaces you just marked. These show the width of the nose.
- Mouth Placement: Divide the space from the nose line to the chin into thirds. Make a mark for your mouth line at the end of the top third.
- Mouth Width: Draw light vertical lines down from the center of where your eyes will be. These mark the corners of the mouth.
-
Block In the Features:
- On yet another new layer, use your guidelines to draw simple shapes for the features.
- Draw almond/oval shapes for the eyes.
- Draw a simple wedge or trapezoid for the nose.
- Draw a simple line for the mouth, indicating the corners.
- Sketch in the ears between the brow and nose lines.
- On yet another new layer, use your guidelines to draw simple shapes for the features.
-
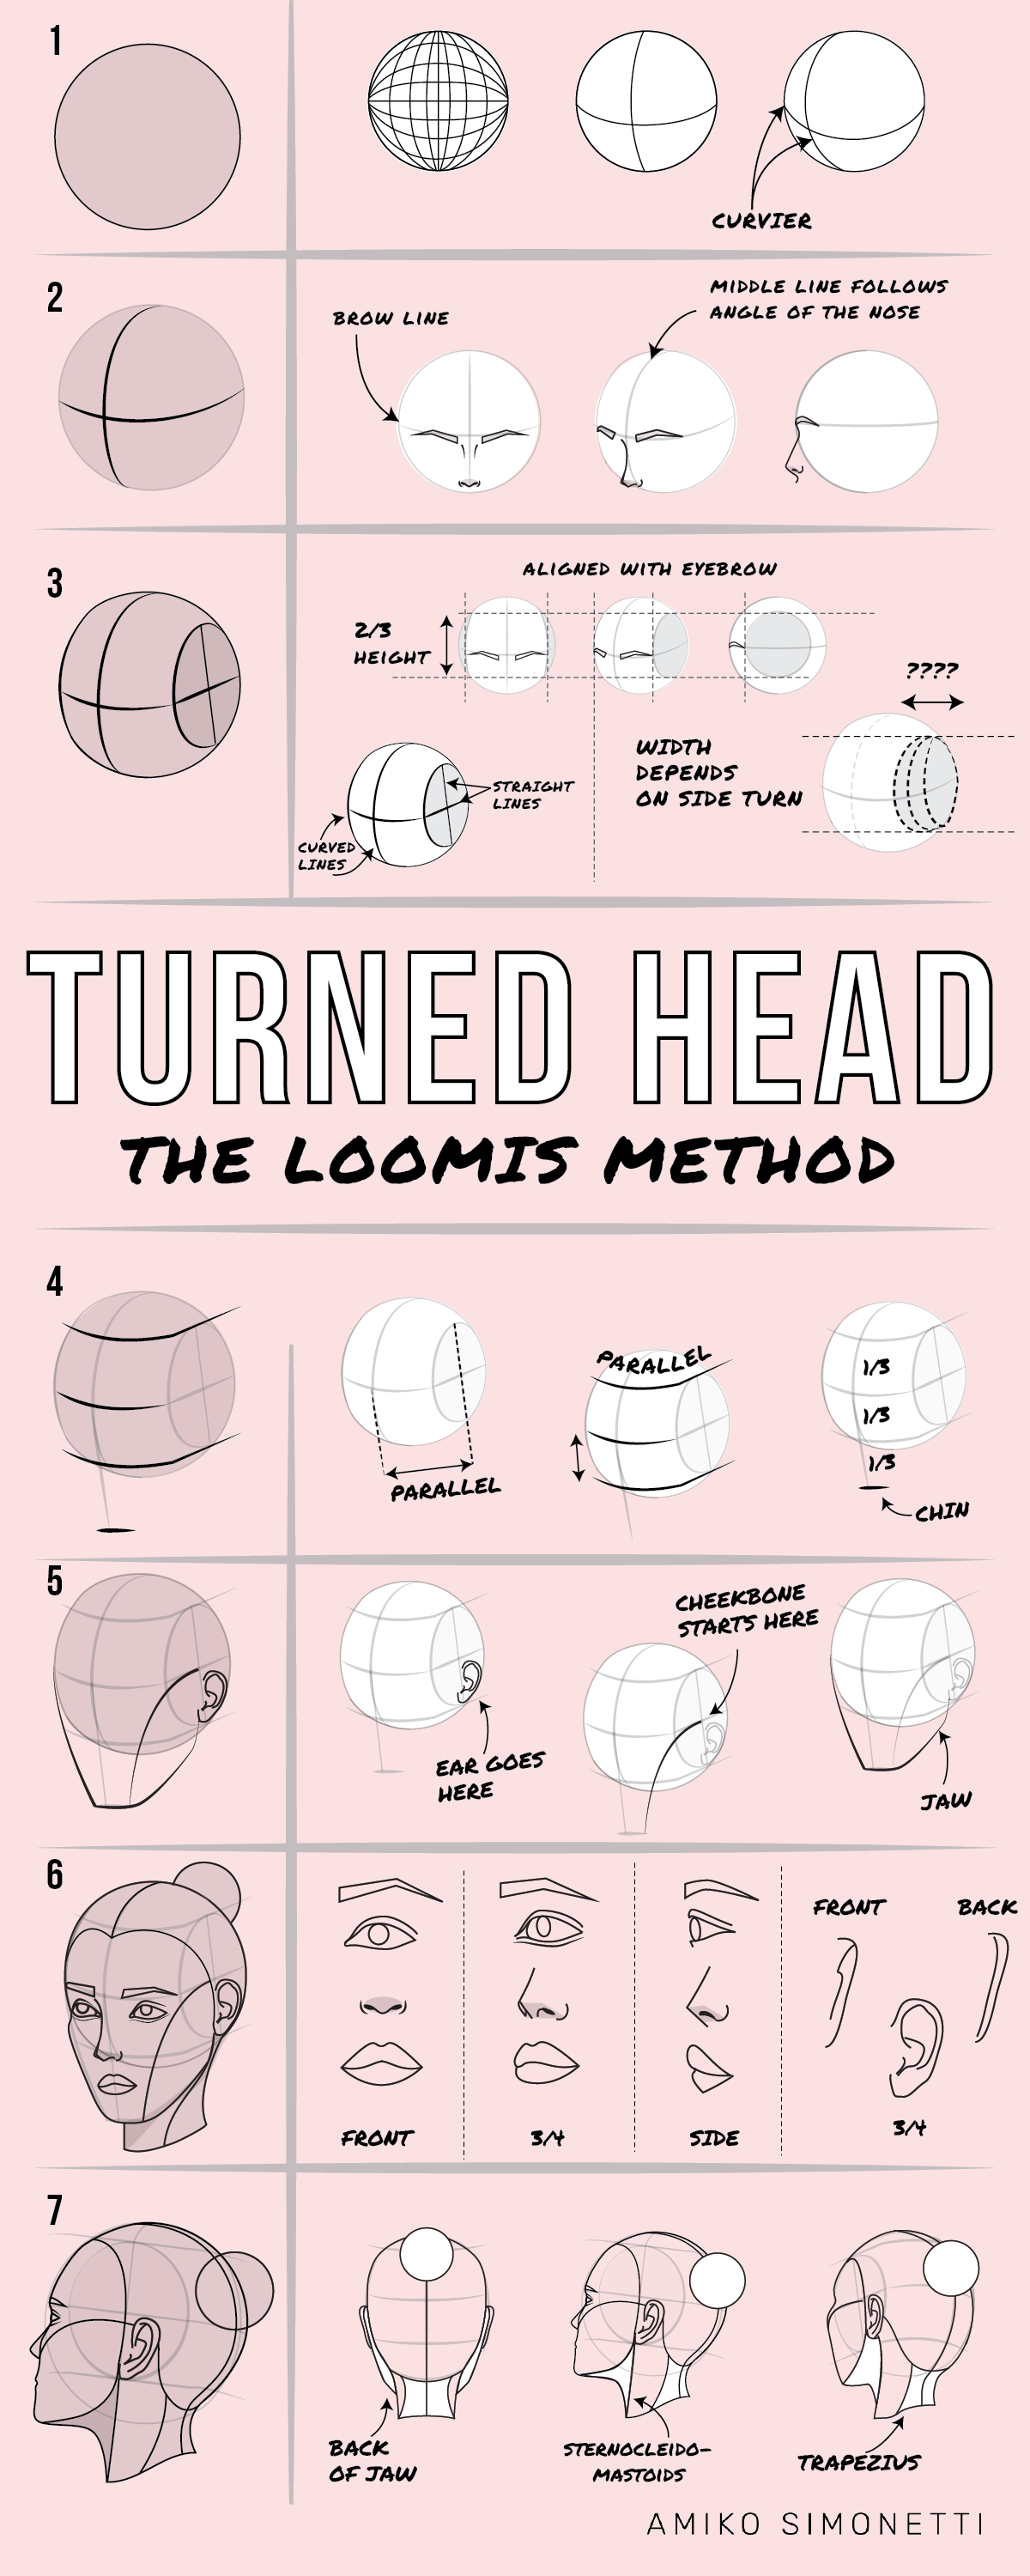
(Challenge) The 3/4 View:
- Repeat the process for a 3/4 view Loomis head.
- Remember that the guidelines must wrap around the 3D form. The five "eye" units will be foreshortened—the eye on the far side of the head will appear narrower than the one closer to the viewer. This is a great test of your 3D thinking.
Don't worry about making it perfect. The goal is to go through the logical steps of placing the features.
Conclusion
Excellent work. You have now combined the 3D structure of the Loomis head with the relational proportions of the facial features. This two-part system is incredibly powerful and will serve as the foundation for all the heads you draw in the future.
Key Takeaways:
- The eyes are located at the horizontal midpoint of the head.
- The head is "five eyes" wide, which determines eye size and spacing.
- The nose width aligns with the inner corners of the eyes.
- The mouth corners align with the pupils.
- The ears fit between the brow line and the nose line.
- These are idealized proportions. Real people vary, but you must know the standard before you can draw variations convincingly.
In our next lesson, we will zoom in on the very first feature you placed: the eye. We will move beyond a simple oval and learn to draw the structure of the eye and its placement within the socket, adding another layer of realism to your work.