Hello! In our last lesson, we created a complete "blueprint" for the face by placing the major features using standard proportions on the Loomis head. We learned that the eyes sit on the horizontal centerline and are spaced according to the "five-eye rule."
Today, we're going to zoom in and give that blueprint its first piece of high-resolution detail. We'll move beyond the simple almond shape and focus on our learning outcome: to draw the structure of the eye and its placement within the socket.
Think of this as moving from architectural plans to building the first complex component. Understanding the eye's 3D anatomy—the sphere of the eyeball, the bony socket it sits in, and the fleshy eyelids that wrap around it—is a fundamental step toward the realistic anatomical drawing you're aiming for.
1. The Eye in Context: The Socket
A common mistake is to draw the eye as if it's a sticker on the face. In reality, the eyeball is a sphere protected within a cavity in the skull called the orbit, or eye socket. Understanding this "housing" is the first step to drawing a convincing eye.
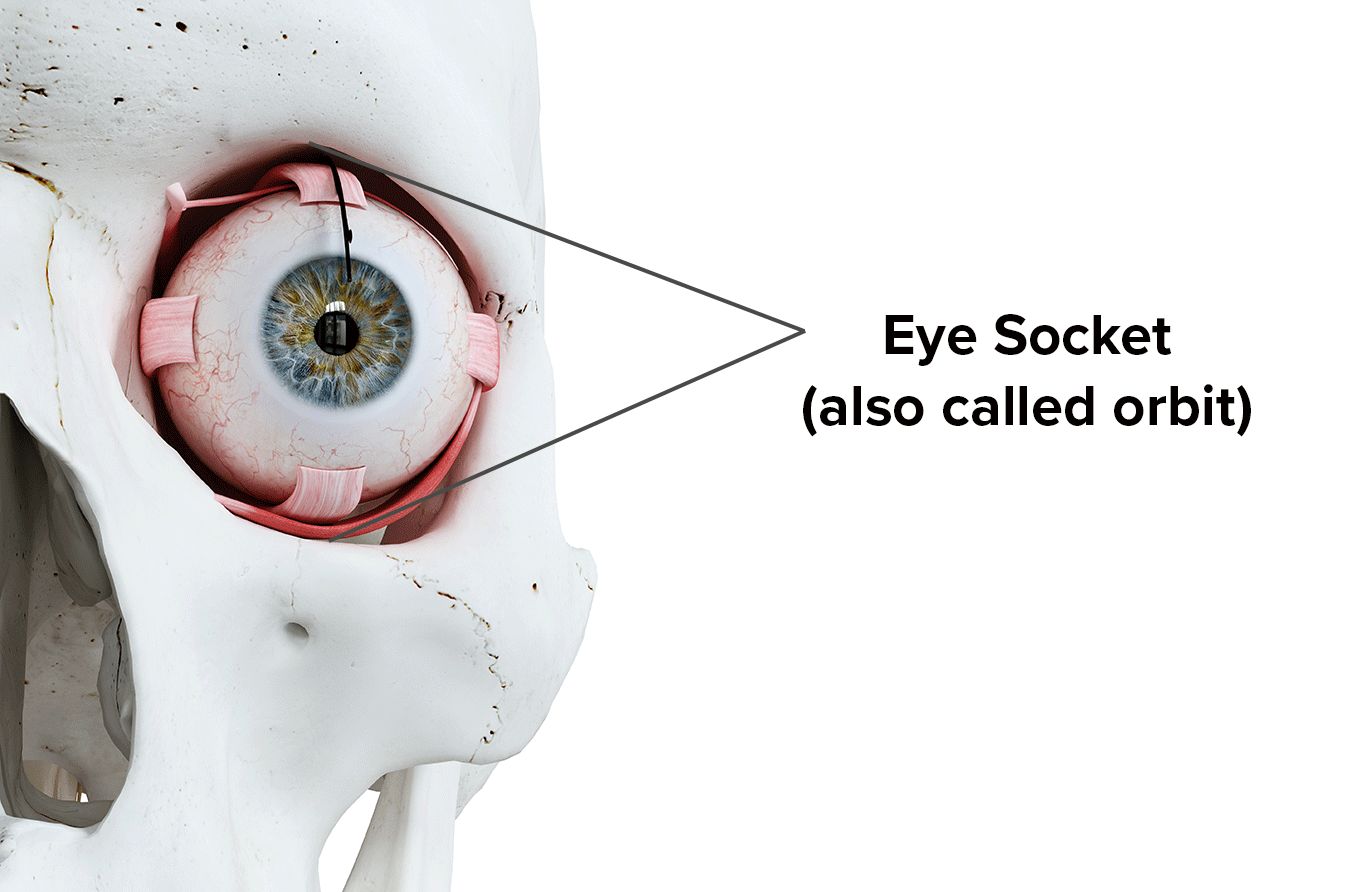
To start our drawing process correctly, we should first establish this socket.
How To Draw Eyes–A Detailed Guide
The article 'How To Draw Eyes' from Vitruvian Fine Art Studio provides an excellent explanation for why we should begin with the largest forms first. It introduces the bony structures that define the socket's shape.
Please read the beginning of the article, from the start down to the end of the section titled '1: Build the Eye Socket'. Pay close attention to the idea of working from 'general to specific' and how the bones of the skull create a rhombus-like shape for the socket.
As the article mentions, establishing the eye socket provides the structural boundaries for everything else we are about to draw.
2. Deconstructing the Eye: From Sphere to Detail
Now that we have the housing, let's build the eye itself. We'll break it down into its core components: the eyeball, the iris and pupil, and the eyelids that wrap around them. The following video provides a clear, structured overview of this entire process.
The Proko video 'How to Draw Eyes - Structure' is a classic for a reason. It simplifies the complex anatomy of the eye into manageable geometric forms. This systematic approach should resonate well with your background in building complex systems from simple components.
Watch the video from the beginning (0:21) to 5:11. This covers all the core structural components. Focus on these key ideas: Eyeball as a Sphere: Notice how the sclera (the 'white' of the eye) is shaded to show its roundness. Wrapping Eyelids: Pay attention to how the eyelids are constructed with multiple planes and have visible thickness. Iris, Pupil, and Cornea: Understand how the iris changes shape from an oval to a circle and how the convex cornea affects the shape of the eyelid and the placement of highlights.
Let's quickly review and solidify the crucial points from that video.
- The Eyeball is a Sphere: The sclera is never pure white. It must be shaded with a slight gradient to show that it's a round surface receding into the socket.
- Eyelids Have Thickness and Form: The eyelids are not simple lines. They are three-dimensional bands of flesh that wrap around the eyeball. Crucially, they have a thickness that creates planes. In typical overhead lighting, the top plane of the lower lid catches light, while the bottom plane of the upper lid is in shadow.
- Lids are Asymmetrical: The highest point of the upper lid's curve is usually toward the inner corner (nose), while the lowest point of the lower lid's curve is toward the outer corner. Drawing them symmetrically results in an unnatural "almond" or "football" shape.
- The Iris and Cornea: The iris is the colored part, and it appears as an ellipse when the eye turns. The cornea is a transparent, dome-like lens over the iris. Because it bulges out, it pushes the eyelid's shape and is where you'll find the sharpest highlights.
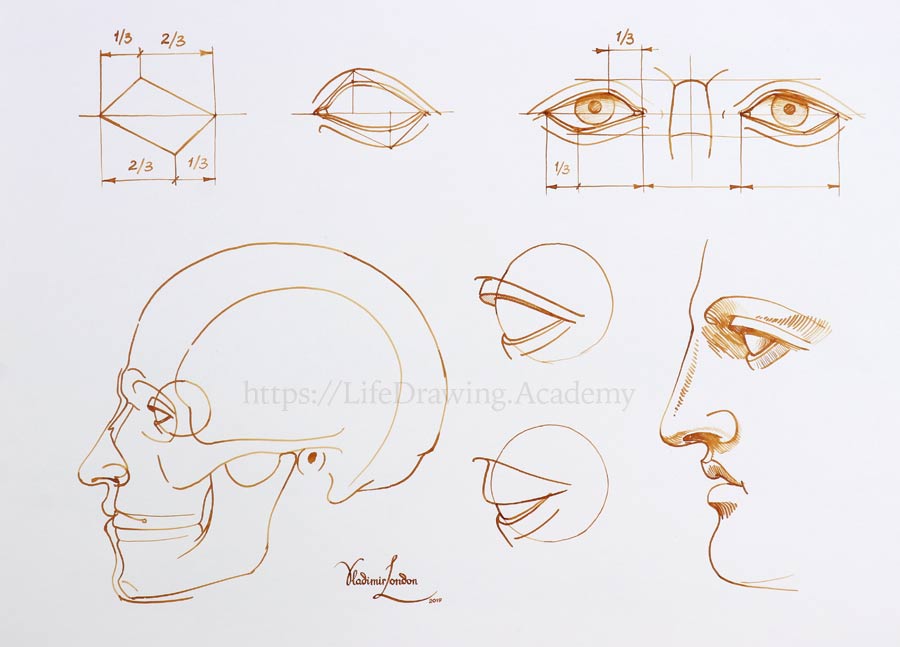
3. Adding More Detail: The Planes of the Eye
To further refine our understanding, let's look at one more resource that excels at breaking down the eyelids and socket into distinct planes. Thinking in planes is a powerful way to understand how light will interact with a form.
How to Draw the Eye: Shapes, Structures, & Shading (A Step-by-Step Guide)
This video by Michael John Nolan provides another look at the eye's structure, with a fantastic visualization of the distinct planes that make up the eyelids and socket.
Please watch from 2:30 to 7:37. Focus on how he breaks the opening of the eye into five distinct planes (three for the upper lid, two for the lower). This is a more advanced way of thinking about the eyelid's form that builds on Proko's simpler model.
4. Practice: Drawing the Eye (30 minutes)
It's time to put theory into practice in Procreate. Your goal is not a perfectly rendered, photorealistic eye, but a structurally sound drawing that correctly applies the principles we've just covered.
Follow these steps, using a new layer for each:
- Draw the Socket (Layer 1): Using a light-colored brush, sketch the rhombus/box shape of the eye socket. This is your main structural guide.
- Place the Eyeball (Layer 2): Inside the socket, draw a perfect sphere for the eyeball. Remember from the resources that it sits quite high, tucked under the brow ridge. Procreate's QuickShape feature (drawing a circle and holding your stylus down) is perfect for this.
- Construct the Eyelids (Layer 3):
- Draw the wrapping curves of the upper and lower eyelids around the sphere. Remember the asymmetrical peaks.
- Give the eyelids thickness by drawing their top/bottom planes. The upper lid should slightly overlap the lower lid at the outer corner.
- Define the tear duct at the inner corner.
- Add the Iris and Pupil (Layer 4):
- Draw the circular iris. In a neutral forward gaze, the top lid will typically cover the top of the iris slightly.
- Place the pupil in the center of the iris.
- Basic Shading (Optional Challenge - on new layers):
- Sclera: Add a light tone to the sclera, making it slightly darker at the corners to show it's curving away.
- Shadows: Add a soft shadow on the eyeball cast by the upper lid. Darken the plane that represents the thickness of the upper lid.
- Highlight: Use the eraser or a white brush to add a small, sharp highlight on the cornea, partially covering the iris and pupil.
Feel free to have one of the videos or the article from Vitruvian Studio open for reference as you draw.
Conclusion
Great job! You've successfully moved from a 2D symbol to a 3D construction of the human eye. By understanding it as a sphere housed in a bony socket and wrapped by fleshy, thick eyelids, you've built a foundation that will hold up under any lighting condition and from any angle.
Key Takeaways:
- Always start with the larger context: the eye socket.
- The eyeball is a sphere, and the "white" of the eye must be shaded to show this.
- Eyelids are not flat outlines; they are 3D forms with thickness that wrap around the eyeball.
- The shapes of the eyelids are asymmetrical, and their curves change as the eye moves.
- Structure comes first. Details like eyelashes and intricate shading are built on top of a solid foundation.
In our next lesson, we will continue our journey across the face by tackling another complex feature. We will learn how to draw the structure of the nose using simple planes.