Hello! Welcome back to our detailed exploration of the human head.
In our last session, we deconstructed the eye, moving from a simple 2D symbol to a full 3D structure by understanding it as a sphere within a socket, wrapped by planes of flesh. This "structural thinking" is the key to drawing realistically, and it's a skill we'll build on today.
Our focus now shifts to the center of the face. The learning outcome for this lesson is to draw the structure of the nose using simple planes. Just like with the eye, a common pitfall is to draw the idea of a nose—two curves and two dots for nostrils. We're going to bypass that by building it from simple, geometric forms, a process that should feel familiar from your work in building complex systems from fundamental components.
1. The Nose as a Simple Form
Before we can draw the details, we must first establish the nose as a single, three-dimensional object in space. The most effective way to do this is to simplify its overall volume into a basic geometric shape, like a wedge or a prism. This initial block-in defines the nose's size, its angle on the face, and how it obeys the rules of perspective.
Getting this simple form right is over half the battle. To see this principle in action, let's turn to a great resource from Proko.
How to Draw a Nose - Anatomy and Structure
The video 'How to Draw a Nose - Anatomy and Structure' by Proko starts by demonstrating this exact concept. It shows how simplifying the nose into a basic box with major planes helps solve the complex problem of perspective first.
Please watch from 0:44 to 2:26. Pay close attention to how the shapes of the top, side, and bottom planes change as the head turns from a front view to a 3/4 view, and as it tilts up and down.
As the video explains, once you've solved the perspective of this simple box, adding the anatomical details becomes much more manageable. You've already defined the space the nose will occupy.
This image shows a similar idea, breaking the drawing process into steps. Notice how the first step is just a simple block.

2. Refining the Structure: Secondary Planes
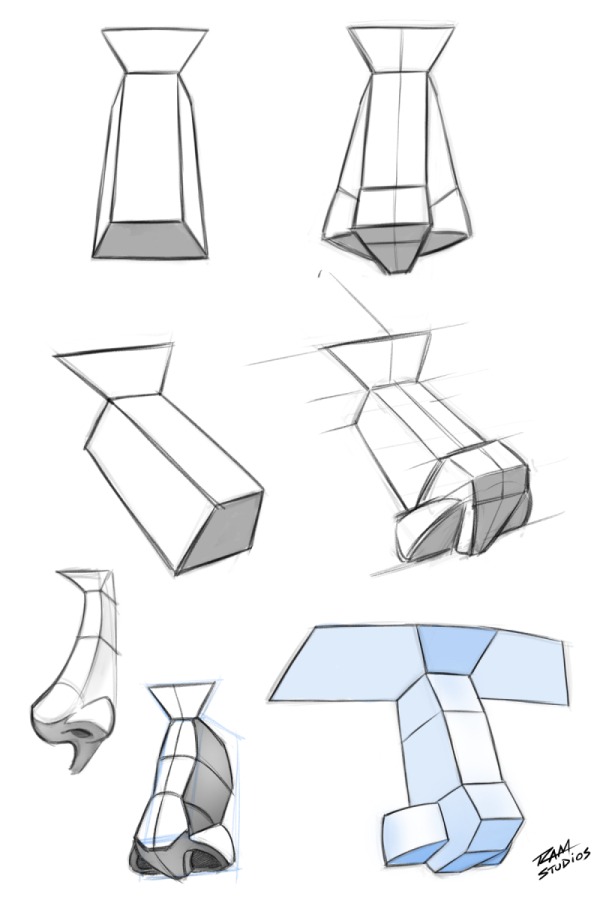
With the main block established, we can now add a layer of complexity by breaking that simple form into more descriptive "secondary planes." This is where we define the distinct parts of the nose:
- The Bridge: The upper, bony part.
- The Ball: The fleshy, often rounded tip of the nose.
- The Wings: The fleshy parts that form the nostrils (also called the Alae).
Each of these parts can be thought of as its own set of smaller planes. The article below provides an excellent, structured walkthrough of this process, referencing the methods of famed artist Andrew Loomis, whose head construction method we've been using.
How to Draw Noses with Basic Steps - Like a Pro!
The article 'How to Draw Noses with Basic Steps' from Ram Studios Comics gives a clear, step-by-step guide to building the nose from planes.
Please read the sections 'Drawing the Planes of the Nose' and 'Secondary Plane Changes of the Nose'. Focus on how the simple wedge is refined by adding more angles to define the tip and wings of the nose. The images in these sections are particularly helpful.
By breaking the nose down this way, you create a detailed "wireframe" that's much easier to shade. You know exactly where one plane ends and another begins, which tells you how light should interact with the form.
This image from the article you just reviewed is a perfect summary of what these secondary planes look like from various angles.
3. Practice: Building Noses in Procreate (30 minutes)
Now it's time to apply these concepts. Open Procreate and let's draw the planar structure of the nose from three key angles: front, three-quarter, and side. Your goal is a clean, structural line drawing, not a rendered illustration.
For a simpler, more guided demonstration of these steps, you might find the video "How to draw NOSES - easy steps for beginners" by Sketching Scottie (LINK) helpful to have open as a reference.
Instructions:
- Set Up Your Canvas: Lightly sketch a Loomis head for context, marking the brow line and the bottom of the nose. This gives you the boundaries for your construction.
- Front View (on a new layer):
- Start with a simple wedge or trapezoid shape for the main mass of the nose.
- Draw the "keystone" shape at the glabella (between the brows).
- Subdivide the main mass into secondary planes: a long rectangle for the bridge, a diamond or circle for the ball/tip, and two shapes for the wings on either side.
- Indicate the bottom planes for the tip and wings, and sketch in the nostril shapes.
- Three-Quarter View (on a new layer):
- This is the most challenging but also the most common view. Start again with the main wedge, but now it will be in perspective. One side plane will be much more visible than the other.
- The centerline of the nose will curve away from the centerline of the face.
- Build the secondary planes onto this angled form. Pay attention to how the far wing and nostril might be partially or fully hidden.
- Side View / Profile (on a new layer):
- This view clearly shows the main angles of the nose.
- Draw the primary angle from the glabella down the bridge. Note the subtle shift in angle where the bone of the bridge meets the cartilage.
- Define the plane for the bottom of the nose, indicating the wing and nostril.
Take your time and don't be afraid to use the undo gesture. The goal is to train your brain to see the nose as a set of interconnected planes.
Conclusion
Excellent work. You've now applied our structural approach to a second major facial feature. By learning to construct the nose from simple planes, you've equipped yourself to draw it convincingly from any angle and under any lighting condition.
Key Takeaways:
- The nose should first be simplified into a basic 3D form (like a wedge) to establish its perspective and volume.
- This basic form can be subdivided into secondary planes representing the bridge, ball, and wings.
- This planar structure provides a logical framework for understanding how light and shadow will fall on the nose, creating a sense of three-dimensionality.
- Thinking in planes transforms a complex organic shape into a manageable geometric problem.
In our next lesson, we'll continue moving down the face to tackle another feature that relies heavily on an underlying form: we will draw the structure of the mouth and its surrounding forms. We'll discover that the lips wrap around the curve of the teeth, and understanding that cylindrical form is the key to drawing a mouth that feels real and integrated with the face.