Hello! Welcome back to our study of facial anatomy.
In our last lesson, we focused on constructing the nose from simple planes, breaking down a complex organic shape into a manageable geometric problem. This method of "structural thinking" is the foundation of realistic drawing, and we'll continue to build on it today.
Now, we move down the face to another expressive and challenging feature. The learning outcome for this lesson is to draw the structure of the mouth and its surrounding forms. Just as we avoided drawing a "symbol" for the nose, our goal here is to move beyond flat, lipstick-shape outlines. We'll learn to see and draw the mouth as a three-dimensional form that is fully integrated with the structure of the face.
1. The Foundation: The Tooth Cylinder
The single most important concept for drawing the mouth is understanding that it isn't flat. The lips wrap around the curve of the teeth and jaw. If you ignore this underlying volume, your drawings of mouths will always look pasted-on and dimensionless.
Artists often simplify this underlying structure into a form called the "tooth cylinder" or "muzzle." Think of it as a slightly curved, barrel-like shape that sits between the base of the nose and the point of the chin.
How to Draw Lips - Anatomy and Structure
The video 'How to Draw Lips - Anatomy and Structure' by Proko provides an excellent introduction to this foundational idea. He uses the analogy of a 'bloated tuna can' to describe this form.
Please watch from the beginning until 1:14. Pay close attention to how the centerline of the lips curves around this cylindrical form, especially when viewed from an angle.
This underlying cylinder dictates the perspective of the mouth and is the first form you should consider before drawing any details.
To reinforce this crucial concept, let's look at a quick reading that discusses the same principle from a slightly different perspective, referencing classical art instruction.
The article 'Drawing the mouth' by Jeff Searle elaborates on this concept of the 'muzzle' or 'tooth cylinder'.
Read the first section titled 'The muzzle'. Notice how the provided diagrams from Bridgman and Loomis visualize the lips wrapping around this cylindrical volume.
2. Deconstructing the Lips: The Five Cushions
With the foundational cylinder established, we can now focus on the structure of the lips themselves. A common and effective method is to simplify the lips into five soft, cushion-like forms.
- The upper lip consists of three forms.
- The lower lip consists of two forms.
The central form of the upper lip, called the tubercle, wedges neatly between the two forms of the lower lip.
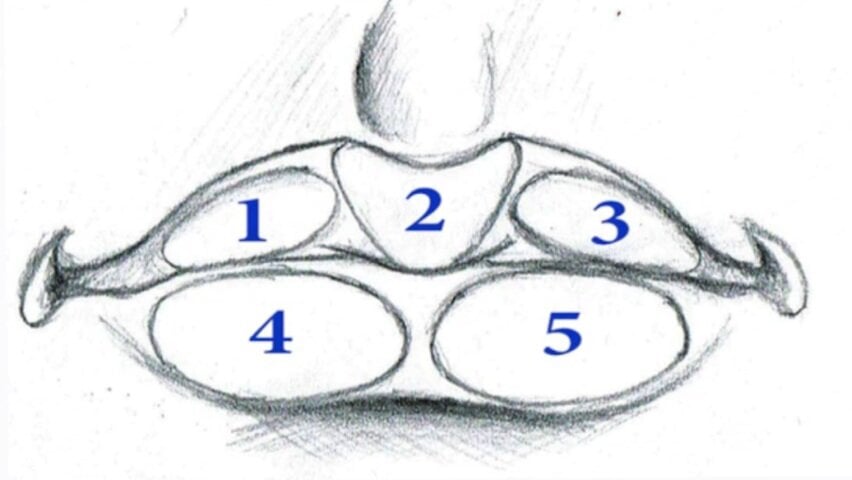
This model helps you think about the lips not as a single shape, but as a collection of smaller, softer volumes that push against each other.
How to Draw Lips - Anatomy and Structure
Proko's video also details this five-part structure, referring to them as 'squishy little pillows'.
Now, watch from 2:30 to 3:18. Focus on how these forms overlap, creating what artists call 'T-intersections'. These overlaps are critical for creating the illusion of depth.
The video "Anatomy Quick Tips: Mouths" by Sinix Design also covers this concept and introduces the idea of "shape dominance" and "T-lines," which will likely feel intuitive given your background in development, where hierarchies and dependencies are common.
This video from Sinix Design offers a complementary perspective on structure and simplification.
Watch the segment from 2:05 to 2:42 to hear about 'T lines'. Then, watch from 4:25 to 5:06 to see another take on the 'fatty deposits' or cushion forms.
3. The Surrounding Forms
A mouth doesn't exist in isolation. To draw it convincingly, you must understand the forms that surround it and connect it to the rest of the face.

Let's identify these key surrounding landmarks, using the Jeff Searle article as our guide.
The 'Drawing the mouth' article provides a clear breakdown of the anatomical forms around the lips.
Read the sections titled 'Structure' and 'The chin'. As you read, locate these forms in the diagrams and on your own face: Philtrum: The vertical groove between the nose and the upper lip. Nodes: The fleshy bumps at the corners of the mouth where muscles connect. Pillars of the mouth: The two forms that create an arch under the bottom lip. Mentolabial furrow: The depression between the lower lip and the chin.
Understanding these surrounding planes is what separates a drawing of lips from a drawing of a mouth that belongs to a face.
4. Practice: Constructing the Mouth in Procreate (30 minutes)
Let's put this theory into practice. Your goal is to create structural line drawings of the mouth, not fully rendered paintings.
Instructions:
- Set Up: On your iPad, lightly sketch a Loomis head from a front view and another from a three-quarter view. Mark the brow line, nose line, and chin line for context.
- Draw the Foundation: On a new layer, draw the "tooth cylinder" for each head. This should be a simple curved form that indicates the volume of the mouth area.
- Define the Centerline: Draw the main parting line between the lips. Make sure this line curves around the cylinder. In the 3/4 view, this curve will be more pronounced, and the center point will be shifted due to perspective.
- Block in the Cushions:
- Sketch the five cushion forms (three on top, two on the bottom).
- Focus on how they nestle together. Use T-intersections to show which form is in front of another. For example, the central tubercle of the upper lip wedges into the lower lip.
- Add Surrounding Forms: Lightly sketch the philtrum connecting to the nose, the nodes at the corners, and the mentolabial furrow that defines the top of the chin.
- Refine: Create a new layer and draw a cleaner line drawing over your construction sketch. Focus on clear, confident lines that describe the forms you've built.
For this exercise, you can refer to the step-by-step process in the Jeff Searle article under the section "Drawing the lips", specifically steps 2 and 3 ("Sketch the mouth" and "Colour blocking"), as a guide for the construction phase.
Conclusion
Great work today. You've deconstructed the mouth, moving from its foundational volume to its specific surface forms and its connection to the rest of the face.
Key Takeaways:
- The mouth is not flat; it wraps around the curved form of the "tooth cylinder." This is the most critical concept for drawing believable lips.
- The lips can be simplified into five primary forms or "cushions" (three upper, two lower) that overlap and interact.
- The mouth is anchored to the face by surrounding forms like the philtrum, nodes, and the chin structure. Drawing these forms is essential for a cohesive portrait.
In our next lesson, we will tackle the final feature in this module: we will draw the structure of the ear and its attachment to the head. Though often simplified, the ear has a complex but logical structure of cartilage that we can break down into simpler shapes, just as we have with the other features.