Hello! Let's continue our journey down the human leg.
In the previous lesson, we thoroughly examined the quadriceps, the powerful muscle group that defines the front of the thigh. You learned to identify the three visible muscles—the rectus femoris, vastus lateralis, and vastus medialis—and how their staggered, asymmetrical arrangement creates the thigh's surface form.
Today, we'll flip our view to the back of the leg to study the opposing muscle group. This lesson addresses the learning outcome: Identify and draw the hamstrings and their effect on the contour of the posterior thigh. The hamstrings are responsible for bending the knee and play a crucial role in shaping the back of the leg. Mastering them is essential for drawing the leg from any posterior or side view.
1. Identifying the Hamstrings
Functionally, the hamstrings are the antagonists to the quadriceps. Where the quads extend the leg, the hamstrings flex it. While they can seem less distinct than the quads, understanding their structure is key to drawing them correctly.
Let's begin with a video that introduces the hamstrings from an artist's perspective.
How to Draw Hamstrings - Leg Anatomy for Artists
This video from Proko's renowned anatomy course introduces the hamstrings, their function, and why they are visually important for artists.
Watch the segment from 00:16 to 01:26. Notice the comparison of the hamstrings to the biceps in the arm—both are flexors.
The hamstrings are a group of three main muscles that all share a common origin point on the ischial tuberosity, the part of the pelvis you feel when you're sitting (often called the "sit bones").
The three muscles are:
- Biceps Femoris: Located on the outside (lateral) part of the posterior thigh.
- Semitendinosus: Located on the inside (medial) part, sitting on top of the semimembranosus.
- Semimembranosus: Located on the inside (medial) part, sitting underneath the semitendinosus.
This animated GIF clearly shows the location of the hamstring group on the back of the leg.

For a more detailed, text-based breakdown of the specific muscles and their attachment points, let's revisit the GVAAT article from our last session.
How to Draw Legs, the Easy Step-by-Step Guide
This guide provides a concise summary of the individual hamstring muscles, their origins, and their insertions. This will help you solidify the 'identification' part of our goal.
In the article, find the section titled '3. How to Draw Legs – Simplified muscle groups of the leg'. Read the subsection on 'Hamstrings'. This will introduce you to the three key muscles by name. Scroll down to the table under 'Muscles of the leg – simplified anatomy review, Origin and Insertion' and review the rows for the three hamstring muscles. Notice they all share an origin but have different insertion points on either side of the knee.
The key takeaway from an anatomical standpoint is this: the hamstring group starts as one mass at the hip and splits into two groups of tendons that insert on opposite sides of the lower leg. This forked structure is what defines the back of the knee.
2. Drawing the Hamstrings: Form and Simplification
Knowing the individual muscles is useful, but drawing them effectively requires simplification. On most people, a layer of fat smooths the hamstrings into a single, cohesive form. The most visible and structurally important parts for an artist are the tendons near the knee.
Let's return to the Proko video to learn how to simplify the hamstrings into drawable forms.
How to Draw Hamstrings - Leg Anatomy for Artists
This part of the video is the core of our lesson. It breaks down how to interpret the hamstring anatomy and translate it into simple shapes and lines that create a convincing drawing.
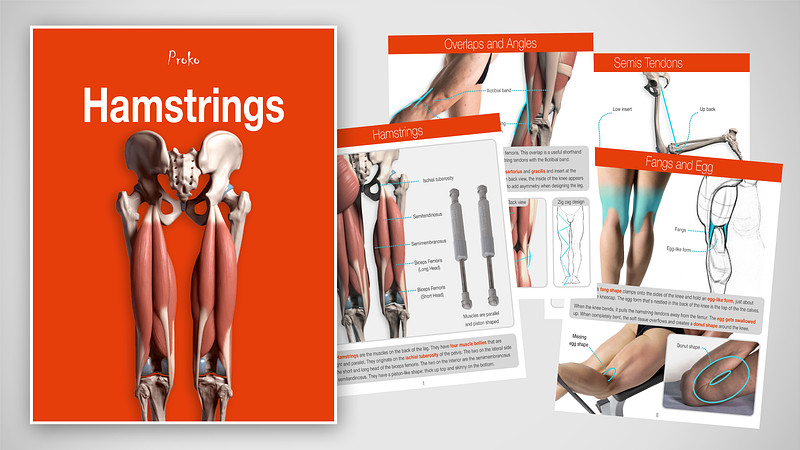
Watch from 01:26 to 06:35. Pay close attention to these critical artistic concepts: The Single Form (01:26 - 03:43): Note how the hamstrings, adductors, and fat combine to create a single, egg-like form on the back of the thigh. The Tendons (03:43 - 05:07): This is the most important part. See how the tendons split and create straight, structural lines that contrast with the curves of the muscles. Memorize how the biceps femoris tendon points directly to the head of the fibula. The 'Fangs and Egg' Analogy (05:07 - 06:35): The hamstring tendons are described as 'fangs' or 'tongs' clamping onto the top of the calf muscle (the 'egg'). This is an extremely powerful and memorable tool for constructing the back of the knee.
When the knee bends, these forms become even more pronounced. The tendons pop out, and the soft tissue around the back of the knee bunches up.
3. Practice: Anatomical Dissection (25-30 minutes)
Now it's time to apply this knowledge. We will adapt Proko's suggestion of an "anatomical tracing" exercise. Your goal is not to mindlessly trace the outlines of a photo, but to actively dissect the forms you see, identifying the underlying muscle and tendon structures we've just discussed.
What You'll Need:
- Procreate on your iPad.
- A reference photo showing the back of a person's leg. Search for terms like "sprinter posterior leg," "hamstring anatomy reference," or "figure drawing leg back view." Choose an image with clear (but not necessarily extreme) muscle definition.
Exercise Steps:
-
Import and Setup:
- Place your reference photo on a layer in Procreate. Lower its opacity to about 50%.
-
Skeletal Foundation (Layer 2):
- On a new layer, sketch the simple forms of the bones: the femur, and the tops of the tibia and fibula. This provides the core structure.
-
Dissect the Hamstrings (Layer 3):
- On a new layer, use a distinct color (like red) to map out the anatomy.
- Start by drawing the prominent tendons at the back of the knee. Draw the straight line of the biceps femoris tendon on the outside, pointing to the head of the fibula. Draw the tendons on the inside. You should have a clear "V" or "fang" shape.
- Draw the overall egg-like mass of the hamstrings above the tendons.
- Draw the "egg" of the gastrocnemius (calf) muscle nestled between the hamstring tendons.
- Indicate where other muscles, like the glutes above and the adductors on the inside, contribute to the overall shape.
-
Refine the Contour (Layer 4):
- Hide your anatomy layer. Create a new layer for your final lines.
- Looking at both your reference and your anatomical map, draw the final contour of the leg. Your lines should now be informed by your understanding of why the leg has those specific bumps and curves.
As you work, remember this key piece of advice: you are drawing the muscles underneath the skin. Ignore superficial details like skin folds and focus on the volumes of the biceps femoris, the medial hamstring group, and their powerful tendons.
Conclusion
Fantastic work today! By tackling the hamstrings, you have now covered the primary muscle groups of the upper leg. You can now analyze and construct the thigh from both the front and the back.
Key Takeaways:
- The hamstrings are a group of three muscles on the posterior thigh that flex the knee.
- They originate together on the pelvis and split to insert on either side of the knee.
- For artists, the most important features are the prominent tendons that create straight lines at the back of the knee.
- The "Fangs and Egg" analogy (hamstring tendons clamping the calf muscle) is a powerful tool for simplifying and drawing this complex area.
In our next lesson, we will put everything together. You will practice drawing the leg from both frontal and posterior views in a neutral standing pose, applying your knowledge of both the quadriceps and the hamstrings to construct a complete and believable form.