Hello! Welcome back to your anatomy studies.
In our last lesson, you did a great job identifying the gluteal muscles and understanding how they create the form of the hip and buttocks. We also touched on the Tensor Fasciae Latae (TFL) and the Iliotibial (IT) band, which runs down the side of the leg.
Today, we continue our journey down the leg to focus on the front of the thigh. This lesson fulfills the next learning outcome: to identify and draw the quadriceps group and their effect on the front of the thigh. The quadriceps are a massive, powerful muscle group responsible for extending the leg, and they are dominant in defining the shape of the upper leg from the front and side.
We'll break this group down into its main components, understand their specific jobs and shapes, and then learn how to draw them as simplified, convincing forms.
1. Anatomy of the Quadriceps
The "quads" get their name because they are a group of four muscles. For our purposes as artists, we only need to be concerned with the three that are visible on the surface. The fourth, the vastus intermedius, lies hidden beneath the others.
The three visible muscles are:
- Rectus Femoris: Runs straight down the center of the thigh.
- Vastus Lateralis: The large muscle on the outside (lateral side) of the thigh.
- Vastus Medialis: The muscle on the inside (medial side) of the thigh, famous for its "teardrop" shape near the knee.
Let's begin with a video that introduces these muscles and their general arrangement.
How to Draw Legs - The Quad Muscles
This video from Proko provides an artist-focused introduction to the quadriceps group. It will help you identify the main players and understand their collective function.
Watch the segment from 00:23 to 02:12. Pay attention to the names of the three visible muscles and the key fact that they all share a common insertion point: the quadriceps tendon, which attaches to the kneecap (patella).
As the video explained, a key simplification is that all these muscles come together to pull on the kneecap to straighten the leg. Now, let's get a more precise look at where each one originates and how they fit together.
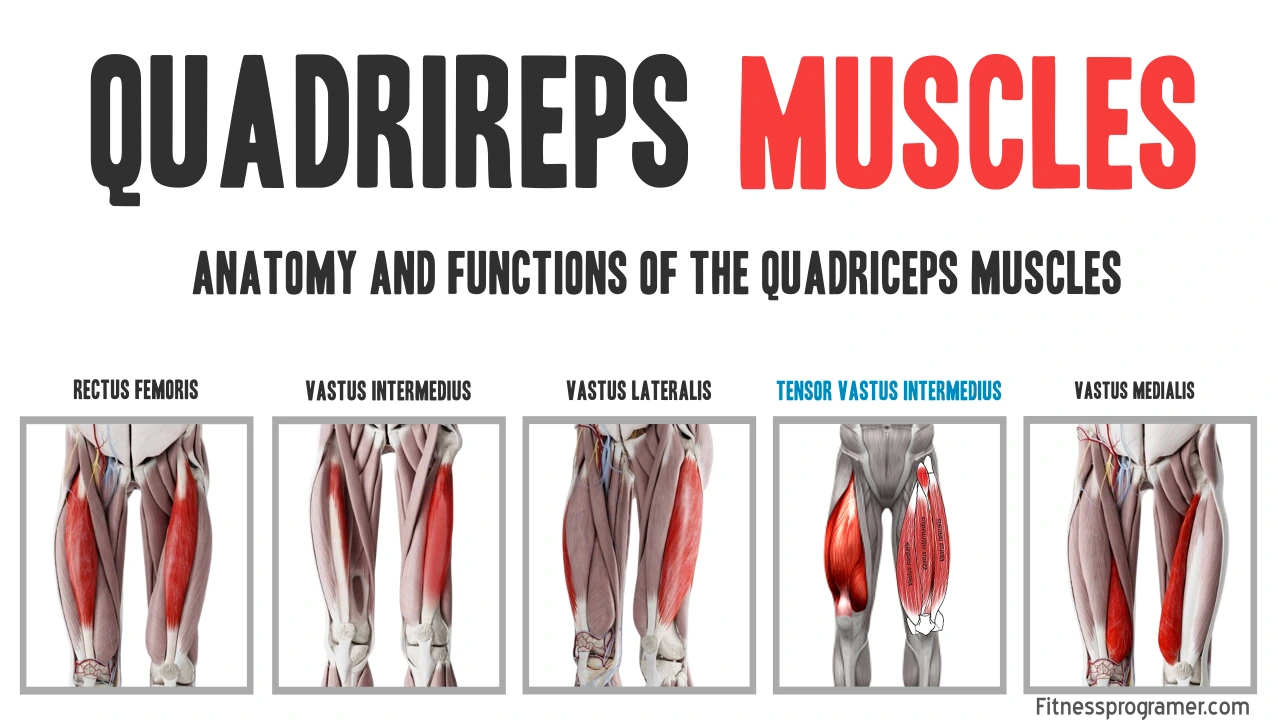
To solidify your understanding of the origins and insertions, the next video offers a very clear and systematic breakdown.
The Drawsh Studio channel gives a concise anatomical overview of each muscle. This will clarify the specific attachment points and the staggered positioning of the quads.
Watch from 00:17 to 02:43. Focus on how the three muscles are 'staggered': the vastus medialis is lowest, the vastus lateralis is higher up, and the rectus femoris sits highest of all.
This "staggered" placement is the single most important concept for drawing the quads correctly. It's what creates the asymmetrical and dynamic look of the thigh.

2. Translating Anatomy into Form
Now that you know the parts, let's focus on how to draw their shapes. This involves simplifying the complex muscle bellies into understandable forms and understanding how they influence the overall contour of the leg.
The key is to move beyond just outlining the leg and start thinking about the volumes within it.
How to Draw Legs - The Quad Muscles
Let's return to the Proko video, which excels at translating anatomy into simple, drawable forms. It covers the asymmetry, cross-sections, and characteristic shapes of each muscle.
Watch from 02:12 to 07:45. This is the core of the lesson for drawing. Focus on these concepts: Asymmetry (02:12): How the muscles create an asymmetrical 'V' at the hip and how the quad tendon itself is asymmetrical. Basic Forms (03:53): The idea of the leg's cross-section being like a 'bread slice' and how the quads create the bulges. Vastus Medialis (05:31): Its prominent 'teardrop' shape above the knee. Vastus Lateralis (06:31): Its large 'football' shape on the side of the leg. Rectus Femoris (07:16): How it sits on top and defines the main front contour.
To see this process in action, the following reading provides a step-by-step example of constructing a leg drawing, starting with basic shapes and building up to the muscle definition.
How to Draw Legs, the Easy Step-by-Step Guide
This article from GVAAT demonstrates a practical approach to drawing the legs, showing how to block in the quad muscles over a simple structural sketch.
Scroll down to the section '5. How to Draw Legs – step-by-step examples'. Study 'Drawing legs – Example 1'. Observe how the artist moves from a simple gesture to blocking in the main masses of the quads, explicitly identifying the vastus medialis, lateralis, and rectus femoris based on anatomical knowledge.
3. Practice: Drawing the Quadriceps (20-25 minutes)
It's time to apply these concepts. Your goal is to create a drawing of the front of the thigh that clearly shows the placement and form of the three main quadriceps muscles.
What You'll Need:
- Procreate on your iPad.
- A photo reference of a leg from a front or three-quarter view. Searching for "athlete quadriceps," "cyclist legs," or "anatomy for artists leg reference" will yield good results. Choose an image where the muscles are reasonably well-defined.
Exercise Steps:
-
Foundation (Layer 1):
- Lightly sketch the femur bone and the patella (kneecap). This provides the structural core for your drawing.
- Block in the simple cylindrical or tapered form of the upper leg, from the hip to the knee.
-
Placing the Muscles (Layer 2):
- On a new layer, start mapping out the three visible quad muscles as simple shapes, remembering their staggered placement:
- Draw the Vastus Medialis as a teardrop shape on the inside of the leg, with its bulk sitting low, just above the knee.
- Draw the Vastus Lateralis as a longer, football-like shape on the outside of the leg. Its mass sits higher than the medialis. This muscle creates a relatively flat side plane.
- Draw the Rectus Femoris as a long, rounded form sitting on top of the other two, running straight down the center from the hip towards the knee. It should appear to be the highest muscle.
- On a new layer, start mapping out the three visible quad muscles as simple shapes, remembering their staggered placement:
-
Refining the Contour (Layer 3):
- Create a new layer. Using your muscle map as a guide, draw the final contour of the leg. The outline should bulge and curve according to the underlying muscle forms you've established.
- Add the shared quadriceps tendon, showing how the three muscles converge into a flat shape above the kneecap.
-
Adding Volume:
- Add simple shading to suggest the volume of each muscle belly. A bit of shadow in the valleys between the muscles will make them pop and clearly define each form.
Focus on communicating the structure, not on creating a perfect, polished rendering. The main goal is to demonstrate that you can identify the three muscles and place them correctly to create a believable thigh form.
Conclusion
Excellent work! You have now dissected the largest muscle group in the human body. Understanding the individual shapes of the quadriceps and, most importantly, their asymmetrical arrangement is a huge step forward in drawing convincing legs.
Key Takeaways:
- The quadriceps group has three visible muscles that define the front of the thigh: Rectus Femoris, Vastus Lateralis, and Vastus Medialis.
- They all insert into the quadriceps tendon, which attaches to the patella (kneecap).
- The key to drawing them is to remember their staggered and asymmetrical placement: the medialis is lowest, the lateralis is higher, and the rectus femoris is on top.
- Simplifying them into basic shapes—a teardrop for the medialis, a football for the lateralis, and a long central form for the rectus femoris—is an effective artistic strategy.
In our next lesson, we will move to the back of the thigh to study the hamstrings. This will complete our look at the major muscles of the upper leg and give you a comprehensive view of how to construct this critical part of the human figure.