Hello! In our last session, we mastered the spread and rest operators, powerful tools for manipulating data within a file. Now, we'll zoom out and tackle a fundamental aspect of structuring larger applications: how to organize your code across multiple files.
Today's lesson is dedicated to organizing code into ES6 modules using import and export statements. As a Laravel developer, you're accustomed to the well-organized, namespaced file structures that make large projects manageable. ES6 modules bring this same level of organization and sanity to the JavaScript world, moving us away from the old-school approach of dumping everything into a global scope via multiple <script> tags.
Mastering modules is essential for building virtually any modern JavaScript application, and it's a non-negotiable prerequisite for working with frameworks like React, where every component is its own module.
1. Why Modules? And How to Make Them Work
At its core, a module is just a JavaScript file. However, what makes it a module is its ability to selectively make its code (functions, classes, variables) available to other files (exporting) and to consume code from other files (importing). This creates a clear boundary, preventing global scope pollution and making your code reusable and easier to maintain.
However, there's a critical setup step. Due to browser security policies (specifically CORS), you can't just open an HTML file that uses modules directly from your local file system. You must serve it through a local web server.
The video below explains this common pitfall and demonstrates the two essential requirements for using ES6 modules in the browser:
- Running a local server.
- Adding
type="module"to your<script>tag.
Javascript Modules | Export Import Syntax for ES6 Modules
Watch this segment from Dave Gray's video 'Javascript Modules' to understand the foundational setup required for modules to work in a browser environment.
Watch from the beginning to 03:42. Pay close attention to: The explanation of the CORS policy error when loading files directly (00:51). How to use the type="module" attribute in your HTML's script tag (02:02). The side-effects of type="module": it automatically enables defer loading and JavaScript's strict mode (02:24).
2. Exporting from a Module
There are two primary ways to export code from a module: named exports and a default export. A single module can have many named exports but only one default export.
- Named Exports: Use these when a module offers several distinct pieces of functionality. You can export them as you declare them (inline) or all at once at the end of the file.
- Default Export: Use this for the main, single piece of functionality a module provides. A common convention is to use
export defaultfor the primary class or function in a file.
The next video concisely demonstrates the syntax for both types of exports.
This clip from Web Dev Simplified's 'JavaScript ES6 Modules' clearly shows the different ways you can write your export statements.
Watch from 00:27 to 02:06. Focus on: The two syntaxes for exporting: inline (export const ...) and at the end of the file (export { ... }). The distinction between export default for a single primary export and export for multiple named exports.
Let's look at a quick example. Imagine we have a file named stringUtils.js:
// stringUtils.js

// Named exports
export const toUpperCase = (str) => str.toUpperCase();
export const toLowerCase = (str) => str.toLowerCase();

// Default export
const createGreeting = (name) => `Hello, ${name}!`;
export default createGreeting;
3. Importing into a Module
Once you have exported code, you need to import it where it's needed. The import syntax directly corresponds to how the code was exported.
- Importing Named Exports: You must use curly braces
{}and the exact variable/function names. - Importing a Default Export: You can choose any name you like for the import, and you don't use curly braces.
You can also combine these into a single line, rename imports to avoid conflicts using the as keyword, or import everything from a module into a single namespace object.
This next segment covers all these importing patterns.
Continuing with the Web Dev Simplified video, let's see how to write the corresponding import statements for the exports we just learned about.
Watch from 02:06 to 05:49. This is the core of the lesson. Make sure you understand: How to import a default export (import User from ...). How to import named exports using curly braces (import { printName } from ...). How to rename a named import to avoid conflicts (import { printName as pName } from ...). How to import both default and named exports in one line. The purpose of relative paths (./) in the import source.
Here is how we would import the code from our stringUtils.js example into a main.js file:
// main.js
// Note: your index.html would have <script type="module" src="./main.js"></script>

// Import the default export and give it a name
import makeGreeting from './stringUtils.js';

// Import named exports using their exact names
import { toUpperCase, toLowerCase } from './stringUtils.js';

const greeting = makeGreeting('Alex'); // "Hello, Alex!"
const loudGreeting = toUpperCase(greeting); // "HELLO, ALEX!"

console.log(loudGreeting);

// What if we wanted to rename 'toLowerCase' to avoid a name collision?
import { toLowerCase as toLower } from './stringUtils.js';
console.log(toLower('TEST')); // "test"
4. Syntax Cheatsheet
There are many ways to combine import and export syntax. This can feel overwhelming at first. This cheatsheet is an excellent visual reference that summarizes the most common patterns.
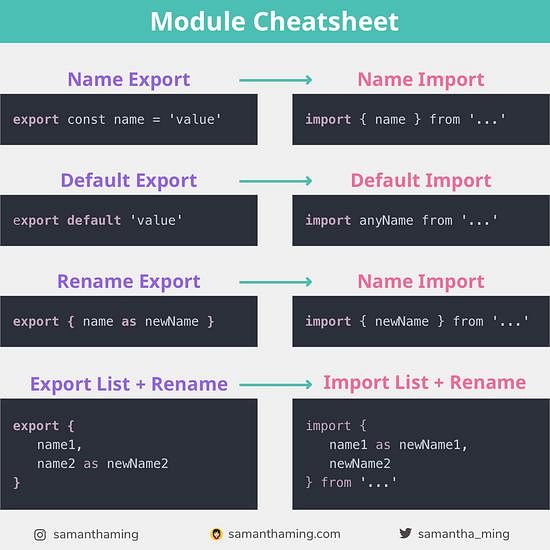
For a more comprehensive text-based summary, you can review the "Summary" section of the "Export and Import" article from javascript.info. It's a great way to solidify your understanding of all the possible syntaxes.
Export and Import - The Modern JavaScript Tutorial
To reinforce what you've learned, read the summary section of this excellent article from javascript.info. It lists every type of import and export statement in one place.
Read only the 'Summary' section. Try to recall what each syntax variation does as you read through the list.
Conclusion
You've now learned the modern, standard way to structure and organize JavaScript code. This is a massive step towards writing clean, scalable, and maintainable applications.
Key Takeaways:
- Modules Encapsulate Code: They allow you to
exportspecific pieces of code andimportthem only where needed, preventing global scope pollution. - Browser Setup is Key: Using modules in a browser requires serving your files from a web server and adding
type="module"to your<script>tag. - Named vs. Default Exports: A module can have many named exports (for libraries of helpers) but only one default export (for the module's primary purpose).
- Import Syntax Matches Export Syntax: Use
{}for named imports and a plain name for default imports. Theaskeyword lets you rename imports to avoid conflicts.
With code organization covered, we'll shift our focus in the next lesson to another handy ES6 feature: using default parameter values to make your functions more robust and readable.