Hello! Welcome back to our React course.
In our last lesson, we learned how to use conditional rendering to make our UI dynamic, showing different elements based on the application's data. Our components are now more intelligent, but they're still static—they don't yet react to user input.
This lesson bridges that gap. We'll explore how to make your components interactive by handling user events. You'll learn how to respond when a user clicks a button, types into an input field, or submits a form. This is the foundation for building almost every feature you can imagine, from a simple search box to a complete e-commerce checkout flow.
For you as a Laravel developer, this is analogous to listening for DOM events in vanilla JavaScript or handling form posts in your backend routes. In React, we handle this declaratively, right within our JSX.
Our goal for today is to handle user events such as clicks, input changes, and form submissions.
Responding to Clicks: The onClick Handler
The most fundamental user interaction is a click. In React, you attach a click listener to an element using the onClick prop. Note the camelCase syntax, which is standard for all event props in JSX.
The value you pass to onClick must be a function reference, not a function call. React will execute this function for you when the user clicks the element.
Let's see this in action. The following video provides a concise and practical guide to the most common event handlers.
This Is How You Handle Events In A React App
This video, "This Is How You Handle Events In A React App" from the Sam Meech-Ward channel, is a great starting point. We'll begin with the section on button clicks.
Watch from 00:32 to 01:55 to see how onClick works. Then, jump to 02:51 - 03:30 to learn about the event object and common naming conventions. Pay close attention to the distinction between passing the function handleSomething versus calling it handleSomething().
As the video explained, the process is straightforward:
- Define a handler function: Create a function inside your component that contains the logic you want to run. By convention, these are often named with a
handleprefix, likehandleClickorhandleLogin. - Pass it to the event prop: Assign your function to the
onClickprop in your JSX, wrapped in curly braces.
Here’s a quick example:
function ClickableButton() {
  function handleClick() {
    alert("Button was clicked!");
  }

  return (
    <button onClick={handleClick}>
      Click Me
    </button>
  );
}
Important: If you write onClick={handleClick()}, you are calling the function during rendering. This will likely cause an error or unexpected behavior. You must pass the function itself: onClick={handleClick}.
Handling Form Submissions: onSubmit and preventDefault
When working with forms, the default browser behavior is to reload the page on submission. In a Single-Page Application (SPA) like one built with React, this is almost never what you want. We need to prevent this default action.
The onSubmit event handler is attached to the <form> element itself, not the submit button. Your handler function will automatically receive an event object, which is React's "Synthetic Event" wrapper around the native browser event. You can call event.preventDefault() on this object, just as you would in vanilla JavaScript.
This Is How You Handle Events In A React App
Let's return to the same video to see how form submission is handled.
Watch the segment from 01:55 to 02:51. Notice how onSubmit is placed on the <form> tag and how event.preventDefault() is used to stop the page from refreshing.
Here's the pattern in code:
function MyForm() {
  function handleSubmit(event) {
    // Prevent the default page reload
    event.preventDefault();

    console.log("Form submitted!");
    // Later, you would add logic here to send data to an API
  }

  return (
    <form onSubmit={handleSubmit}>
      <button type="submit">Submit</button>
    </form>
  );
}
Capturing User Input: onChange and Controlled Components
Handling inputs is where React's interactivity truly comes alive. To capture what a user types into an <input>, <textarea>, or selects in a <select>, we use the onChange event handler. This handler's event object gives us access to the input's current value via event.target.value.
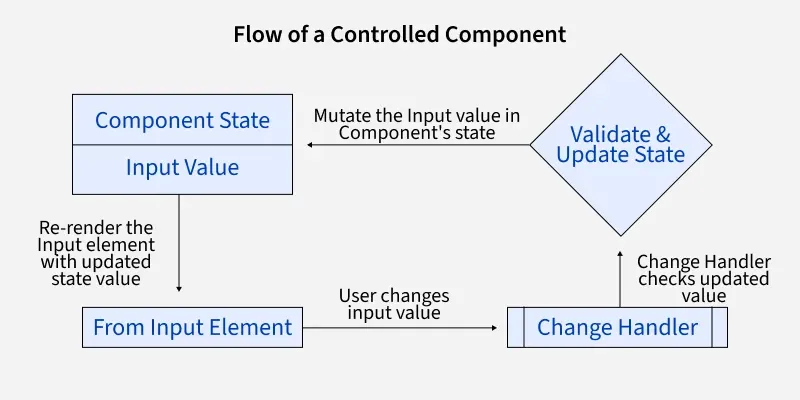
But just capturing the value isn't enough. To make the input interactive, we need to store this value and tell the input to display it. This creates a "controlled component"—an input whose value is controlled by React state.
This touches on the useState hook, which is the main topic of our next module. For now, think of useState as a way to give our component memory.
const [name, setName] = useState(''); gives us two things:
name: A variable to hold our state (the input's value).setName: A function to update that state.
Let's see how these pieces fit together.
Learn the React onChange event handler 🚦
The video "Learn the React onChange event handler" by Bro Code gives a clear, step-by-step walkthrough of creating a controlled input. It demonstrates the complete cycle of user input, state updates, and re-rendering.
Watch from the beginning to 02:54. The video will introduce useState and then show how onChange is used to call the setName function, keeping the input's displayed value perfectly in sync with the component's state.
The flow for a controlled component is a fundamental React pattern:
- User types in the input.
- The
onChangeevent fires on the<input>element. - The handler function is called (e.g.,
handleNameChange). - Inside the handler, we call the state updater function (
setName) with the new value fromevent.target.value. - React re-renders the component with the new state.
- The
<input>'svalueprop is now set to the updatednamestate, and the user sees their change on the screen.
Here is the complete code for a controlled input:
import { useState } from 'react';

function NameForm() {
  const [name, setName] = useState('');

  function handleChange(event) {
    setName(event.target.value);
  }

  return (
    <form>
      <label>Name: </label>
      <input value={name} onChange={handleChange} />
      <p>Your name is: {name}</p>
    </form>
  );
}
This pattern ensures that the React state is always the "single source of truth" for the input's value.
Practice: Building an Interactive Search Form
Let's combine what we've learned. We'll create a simple search form.
- Create a new component file named
src/components/SearchForm.jsx. - Build the component using
useStateto control the input's value and anonSubmithandler to process the search.
// src/components/SearchForm.jsx
import { useState } from 'react';

export default function SearchForm() {
  const [searchTerm, setSearchTerm] = useState('');

  function handleChange(event) {
    setSearchTerm(event.target.value);
  }

  function handleSubmit(event) {
    event.preventDefault();
    // In a real app, you'd trigger a search here.
    // For now, we'll just alert the term.
    alert(`You searched for: "${searchTerm}"`);
    // Clear the input after submission
    setSearchTerm('');
  }

  return (
    <form onSubmit={handleSubmit}>
      <label htmlFor="search-input">Search: </label>
      <input
        id="search-input"
        value={searchTerm}
        onChange={handleChange}
      />
      <button type="submit">Submit</button>
    </form>
  );
}
- Import and render
<SearchForm />in yourApp.jsxfile to see it in action.
This small exercise reinforces handling form submissions, creating controlled inputs, and managing state—three core skills you'll use constantly.
Conclusion
You've made a huge leap forward today! Your components can now listen and respond to user actions. This is the key that unlocks the ability to build complex, interactive web applications.
Key Takeaways:
- Event Handlers in JSX: Use camelCase props like
onClick,onChange, andonSubmit. - Function References: Always pass the handler function itself (e.g.,
{handleClick}) to the prop, don't call it ({handleClick()}). - Preventing Default Behavior: In
onSubmithandlers, useevent.preventDefault()to stop the browser from reloading the page. - Controlled Components: The standard React pattern for handling inputs is to use
useStateto manage the input's value. The component's state is the single source of truth. - The
eventObject: Event handlers receive a synthetic event object, which provides information about the event, likeevent.target.valuefor inputs.
Preview of Next Lesson:
We've had a taste of useState today. In the first lesson of our next module, "State Management and Forms in React," we will dive deep into the useState hook. You'll learn how to properly manage and update a component's local state, handle more complex state updates, and build robust forms, setting the stage for creating the e-commerce features you're aiming for.