Hello! Welcome to the first lesson of our module on "State Management and Forms in React."
In our last lesson, we built our first interactive components by handling user events. We got a sneak peek at the useState hook when creating "controlled" inputs, where we synchronized an input's value with a variable in our component. That variable was our first piece of state.
Today, we're going to dive deep into that concept. State is the heart of any dynamic React application. It's what allows a component to remember information, track changes over time, and re-render its UI in response. For you as a Laravel developer, you can think of a component's state as its own small, in-memory database or model instance that holds the data it needs to function.
Our goal for this lesson is to learn how to use the useState hook to manage and update a component's local state. Mastering this is the first major step toward building complex features like shopping carts, user profiles, and interactive product filters.
Why Do We Need State?
You might be wondering, "Why can't I just use a regular JavaScript variable inside my component?" This is an excellent question, and understanding the answer is key to understanding React.
In short, React doesn't automatically "watch" regular variables. If you change a variable's value, React has no idea that it needs to update the UI to reflect that change. The component renders once with the initial value, and that's it.
Let's see a practical demonstration of this problem.
Full React Tutorial #8 - Using State (useState hook)
The video "Full React Tutorial #8 - Using State (useState hook)" from The Net Ninja channel starts by perfectly illustrating why normal variables aren't enough.
Watch from the beginning to 02:19. Notice how updating a let variable inside a click handler changes its value in the console but fails to update what's shown on the screen. This is the core problem that useState solves.
The value is changing, but the UI isn't. The variable is not "reactive." To make our components dynamic, we need a way to tell React when a value has changed so it can re-render the component with the new information. This is where hooks, and specifically useState, come in.
Introducing the useState Hook
A Hook is a special function in React that lets you "hook into" React features from your functional components. The useState hook is the one that lets us add state to a component.
When you call useState, you're telling React that your component needs to remember something. In return, React gives you two things:
- The current value of that piece of state.
- A special function to update that value.
Here is the standard syntax:
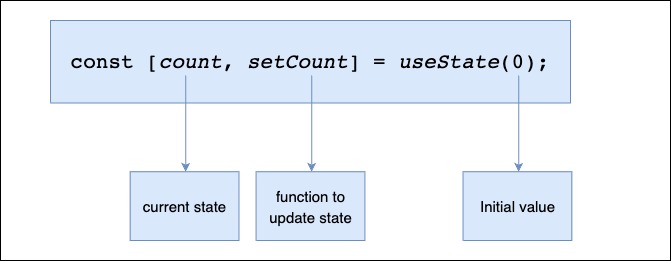
Let's break down how to use this.
Learn useState In 15 Minutes - React Hooks Explained
The video "Learn useState In 15 Minutes" by Web Dev Simplified is an excellent, comprehensive guide. We'll start with the basics of setting up and using state.
Watch from 00:23 to 01:20 to see how to import useState and set up the initial component. Then, watch from 04:08 to 06:36. This core section will show you how to: Call useState with an initial value. Use array destructuring to get the state variable and the setter function. Display the state variable in your JSX. Use the setter function inside an event handler to update the state.
As you saw, calling the setter function (e.g., setCount(1)) does two things:
- It tells React what the new value of the state should be.
- It triggers a re-render of the component, so the UI updates with the new value.
The Two Rules of Hooks
Before we go further, there are two critical rules you must follow when using any hook, including useState. Not following them will lead to bugs and errors.
- Only Call Hooks at the Top Level: Do not call hooks inside loops, conditions, or nested functions.
- Only Call Hooks from React Functions: Call hooks from within React functional components or from custom hooks.
React relies on the order in which hooks are called to keep track of their state between renders. If you put a hook inside an if statement, its call order might change, and React will get confused.
Learn useState In 15 Minutes - React Hooks Explained
Let's return to the Web Dev Simplified video, which has a great explanation of these rules.
Watch from 02:04 to 04:08. The video clearly explains why you can't put hooks inside conditional blocks and how React enforces this rule.
Updating State: Important Patterns
You now know how to set state to a new, specific value. But what if the new state depends on the previous state, like in our counter example?
The Functional Update Pattern
You might be tempted to write setCount(count + 1). While this works for simple cases, it can lead to subtle bugs in more complex scenarios because of how React batches state updates. The count variable might be "stale" and not reflect the very latest value.
The correct and safer way is to pass a function to your state setter. This function receives the previous state as its argument and should return the new state.

Let's see why this is so important.
Learn useState In 15 Minutes - React Hooks Explained
The Web Dev Simplified video demonstrates this concept perfectly.
Watch from 06:36 to 08:23. Pay close attention to the example where setCount is called twice. You'll see why setCount(count - 1) fails and setCount(prevCount => prevCount - 1) succeeds.
Key takeaway: Whenever your new state is calculated based on the previous state, always use the functional update pattern.
State with Objects and Arrays
Your state isn't limited to simple values like numbers or strings. It can also be an object or an array. However, there's a crucial difference compared to this.setState in older class components: useState's setter function replaces the state, it does not merge it.
If your state is an object and you only want to update one property, you must manually include the other properties from the old state. The modern way to do this is with the spread syntax (...).
const [user, setUser] = useState({ name: 'Alex', role: 'Developer' });

// To update only the role:
setUser(previousUser => {
  return { ...previousUser, role: 'Admin' };
});
// The new state is { name: 'Alex', role: 'Admin' }
Failing to spread the previousUser would result in the new state being { role: 'Admin' }, and the name property would be lost.
For a more detailed explanation and examples for both objects and arrays, the following article is an excellent resource.
useState in React: A complete guide
The article "useState in React: A complete guide" from the LogRocket Blog provides a thorough text-based explanation of how to handle complex state.
Read the sections titled "Updating objects and arrays in useState," "Implementing an object as a state variable with useState Hook," and "Managing React state: Multiple variables vs. One state object." These sections explain the concept of immutability and why spreading the previous state is necessary.
The last section you read also offers an important best practice: if you have multiple, unrelated pieces of state, it's often better to use several useState calls rather than one large state object. This keeps your update logic simpler and more organized.
Practice in Action
Let's see a simple, complete example that puts this all together. Here's a component that allows a user to click buttons to change the background color.
// A complete example component using useState
import React, { useState } from 'react';
import './App.css'; // Assume this file has .red, .blue, .yellow classes

function ColorPicker() {
  // 1. Initialize state with an empty string
  const [color, setColor] = useState('');

  return (
    // 2. Use the state variable to dynamically set a CSS class
    <div className={`app-container ${color}`}>
      <div className='centered-content'>
        <h1>Color Picker</h1>

        {/* 3. Update state on button click */}
        <button className='red' onClick={() => setColor('red')}>
          Red
        </button>
        <button className='blue' onClick={() => setColor('blue')}>
          Blue
        </button>
        <button className='yellow' onClick={() => setColor('yellow')}>
          Yellow
        </button>
      </div>
    </div>
  );
}

export default ColorPicker;
This tiny component demonstrates the full lifecycle:
- State is initialized with an initial value (
''). - The UI is rendered based on the current state (the
colorvariable is used in theclassName). - A user event (
onClick) triggers the state setter function (setColor). - React updates the state and re-renders the component, showing the new color.
Conclusion
Congratulations! You've just mastered the most fundamental hook in React. useState is the building block for all interactivity in your components.
Key Takeaways:
- Stateful Components:
useStategives functional components "memory," allowing them to be stateful. - Re-renders: Calling the state setter function triggers a component re-render with the updated value.
- The Rules of Hooks: Always call hooks at the top level of your component, not in loops or conditions.
- Functional Updates: When new state depends on the previous state, use the
setSomeState(prevState => ...)pattern to avoid bugs. - Immutability: State setters replace the old state. When working with objects or arrays, you must create a new object/array, typically using the spread syntax (
...) to copy over the old values.
Preview of Next Lesson:
We've introduced the functional updater pattern today as a crucial tool for safe state updates. In our next lesson, we will dive even deeper into this pattern. We'll explore more complex scenarios where it is essential and solidify your understanding of how to reliably update state based on its previous value.