Welcome to your next lesson in the Musculoskeletal Foundations module. In our previous sessions, we methodically built a comprehensive understanding of the muscles of the upper and lower limbs—the "motors" that generate movement. Today, we shift our focus from the motors to the mechanisms they operate: the synovial joints.
This lesson is dedicated to classifying these highly mobile joints and describing their movement in detail. We'll explore this at two crucial levels. First, we'll cover the classification of joints by their shape and the axes around which they permit motion. Second, we will delve into arthrokinematics—the subtle but essential movements occurring between the joint surfaces themselves. Mastering these concepts is fundamental for biomechanical analysis, clinical assessment of joint mobility, and understanding the rationale behind many manual therapy techniques, making it a high-yield topic for your MPT entrance exams.
1. Fundamentals of Joint Classification
Joints, or articulations, are the connection points between bones. While there are several types, our focus is on synovial joints, which are characterized by their capacity for movement. To properly classify them, we first need to understand their structure and the fundamental ways we describe their motion.
What Makes a Joint "Synovial"?
Synovial joints are diarthrodial, meaning they are freely movable. They are distinguished from fibrous (immovable) and cartilaginous (slightly movable) joints by a few key features.
The following video provides a clear and concise overview of what defines a synovial joint.
This video from Dr Matt & Dr Mike introduces the fundamental characteristics of all synovial joints.
Please watch the introductory segment that explains the core components: articulating cartilage, the joint capsule (fibrous layer and synovial membrane), and synovial fluid. Pay attention to the function of each component.
As the video explained, the key features are:
- A joint cavity containing synovial fluid, which lubricates the joint and nourishes the cartilage.
- Articular cartilage (typically hyaline cartilage) covering the ends of the bones, providing a smooth, low-friction surface.
- An articular capsule, consisting of an outer fibrous layer for stability and an inner synovial membrane that produces the synovial fluid.
Axes of Movement and Degrees of Freedom
To classify joints by their function, we describe their movement in relation to three cardinal planes: sagittal, frontal, and horizontal. The movement in each plane occurs around an axis of rotation. The number of independent planes a joint can move in is referred to as its degrees of freedom.
Getting Started - Clinical GateClinical Gate
This text from Kinesiology of the Musculoskeletal System formally defines the concepts of osteokinematics, planes of motion, and degrees of freedom, which are essential for classifying joint movement.
Start by reading the section titled Osteokinematics. Focus on the definitions of the three cardinal planes. Then, move to the subsection DEGREES OF FREEDOM and read the definition and its explanation.
Based on this, we can categorize joint motion as:
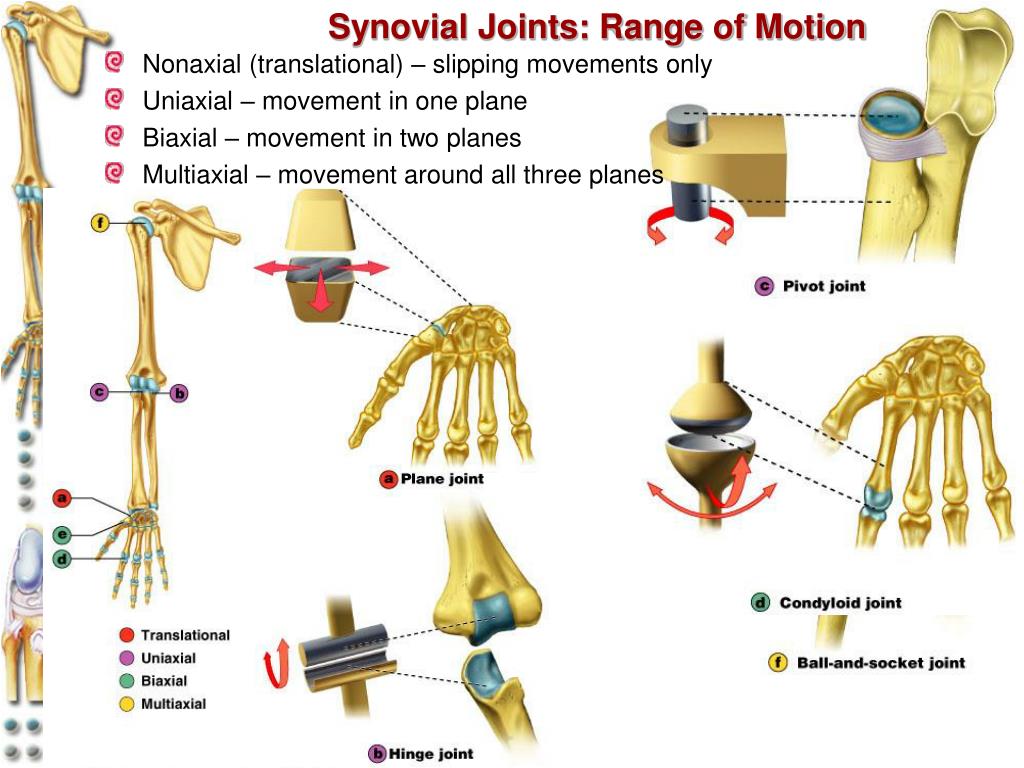
- Uniaxial: Movement in one plane around one axis (1 degree of freedom).
- Biaxial: Movement in two planes around two axes (2 degrees of freedom).
- Multiaxial: Movement in all three planes around three axes (3 degrees of freedom).
The image below provides a great visual summary of this classification, linking joint types to their axes of motion.
2. The Six Types of Synovial Joints
Synovial joints are further classified into six types based on the shape of their articulating surfaces. This shape dictates the type and extent of movement possible.
The following video introduces a helpful mnemonic to remember all six types and organizes them by their axes of movement. We will use it as our guide through this section.
This video presents a simple mnemonic, "Prince Harry pulled Charles's saddlebag," to remember the six types of synovial joints.
Watch the segment that introduces this mnemonic and links it to the uniaxial, biaxial, and multiaxial categories: six different types. Try to commit the mnemonic to memory.
Now, let's break down each type.
Uniaxial Joints (1 Degree of Freedom)
These joints allow motion in a single plane.
Let's examine the three types of uniaxial joints.
Watch the explanation for the planar, hinge, and pivot joints. Note the shape of the articulating surfaces and the specific anatomical example given for each.
- Plane Joint: Articular surfaces are flat or slightly curved, allowing for short, non-axial gliding or translational movements.
- Example: Intercarpal joints in the wrist, intertarsal joints in the foot.
- Hinge Joint: The cylindrical end of one bone fits into a trough-shaped surface on another, like a door hinge. Allows only flexion and extension.
- Example: Elbow joint (humeroulnar articulation), interphalangeal joints.
- Pivot Joint: The rounded end of one bone fits into a "sleeve" or ring of another bone (or ligament). Allows only rotation around its long axis.
- Example: Proximal radioulnar joint (pronation/supination), atlantoaxial joint (C1-C2 vertebrae, allowing head rotation).
Biaxial Joints (2 Degrees of Freedom)
These joints permit movement in two planes.
Now for the two types of biaxial joints.
Watch the segment covering the condylar and saddle joints. Notice the subtle difference in shape that allows for more movement in a saddle joint.
- Condyloid (Ellipsoidal) Joint: An oval-shaped articular surface of one bone fits into a complementary oval depression in another. Allows flexion/extension and abduction/adduction.
- Example: Radiocarpal (wrist) joint, metacarpophalangeal joints (knuckles).
- Saddle Joint: Each articular surface has both concave and convex areas, shaped like a saddle. Allows flexion/extension, abduction/adduction, and thus circumduction, with more freedom than a condyloid joint.
- Example: Carpometacarpal joint of the thumb. This unique joint is what allows for opposition.
Multiaxial Joints (3 Degrees of Freedom)
These joints allow movement in all three planes.
Finally, let's look at the most mobile type of synovial joint.
Watch the short explanation of the ball-and-socket joint, the only multiaxial type.
- Ball-and-Socket Joint: The spherical or hemispherical head of one bone articulates with a cuplike socket of another. This is the most freely moving type of synovial joint.
- Example: Shoulder (glenohumeral) joint, hip joint.
3. Arthrokinematics: Roll, Slide, and Spin
Now we move from the "what" (joint types) to the "how" (joint mechanics). Osteokinematics describes the gross movement of bones in space (e.g., flexion, abduction), which we can see. Arthrokinematics, on the other hand, describes the small, accessory motions between the joint surfaces that are necessary for normal movement to occur.
Getting Started - Clinical GateClinical Gate
This next section from the kinesiology text defines arthrokinematics and introduces the three fundamental movements between joint surfaces.
Please read the subsection Arthrokinematics. Start with the definition and then focus on the table and text defining the three fundamental movements: roll, slide, and spin.
As the text explains, these three movements are:
- Roll: Multiple points on one surface contact multiple points on another surface (like a tire rolling on pavement).
- Slide (or Glide): A single point on one surface contacts multiple points on another (like a skidding, locked tire).
- Spin: A single point on one surface rotates on a single point on another (like a spinning top).
The following short video from Physiotutors provides excellent animations to help you visualize these three movements.
Arthrokinematics: Roll, Glide, Spin, Traction & Compression
This video clearly illustrates the difference between osteokinematics and arthrokinematics, and then animates the concepts of roll, glide (slide), and spin.
Watch the entire video from the beginning until the end of the spin explanation. Pay close attention to how each movement is depicted.
The Convex-Concave Rule
In most joints, pure rolling would cause one bone to roll off the other. To prevent this and maintain joint congruency, rolling is almost always accompanied by a slide. The direction of this slide is predictable and follows a crucial principle known as the convex-concave rule. This is one of the most important concepts in orthopedic physiotherapy.

Let's read the formal principles.
Getting Started - Clinical GateClinical Gate
This final reading explains the convex-concave rule, which is a cornerstone of manual therapy and biomechanical analysis.
In the document, find the section titled PREDICTING AN ARTHROKINEMATIC PATTERN BASED ON JOINT MORPHOLOGY. Read this section carefully, paying special attention to the two principles highlighted in the "Arthrokinematic Principles of Movement" box, starting from the principles.
To summarize this critical rule:
- When a convex surface moves on a fixed concave surface, the roll and slide occur in opposite directions.
- Example: During shoulder abduction (osteokinematic movement), the convex humeral head rolls superiorly while simultaneously sliding inferiorly on the concave glenoid fossa.
- When a concave surface moves on a fixed convex surface, the roll and slide occur in the same direction.
- Example: During knee extension (tibia moving on the femur), the concave tibial plateau rolls and slides anteriorly on the convex femoral condyles.
4. Close-Packed and Loose-Packed Positions
Finally, it's useful to understand that the "fit" of a joint changes throughout its range of motion.
- Close-Packed Position: This is the position of maximal joint congruency, where the joint surfaces fit together best. Most ligaments and the capsule are taut, providing maximum stability. Accessory movements (joint play) are minimal. For the knee, this is full extension.
- Loose-Packed Position: Any position other than the close-packed position. The ligaments and capsule are relatively slack, allowing for more accessory movement. This is often the position of maximal comfort and is used when assessing joint play.
Conclusion
In this lesson, we have moved from the large-scale actions of muscles to the detailed mechanics of the joints they cross. Understanding this topic is not just academic; it directly informs how you will assess and treat joint dysfunction throughout your career.
Key Takeaways for Your Exam Revision:
- Synovial Joint Classification: Be able to list the 6 types (Plane, Hinge, Pivot, Condyloid, Saddle, Ball-and-Socket) and classify them as uniaxial, biaxial, or multiaxial, with a key anatomical example for each.
- Arthrokinematics vs. Osteokinematics: Understand the difference between the gross bone movement (osteo-) and the intricate joint surface movement (arthro-).
- Roll, Slide, Spin: Define and visualize these three fundamental motions.
- The Convex-Concave Rule: This is a high-yield clinical principle. Memorize it: convex-on-concave = opposite slide; concave-on-convex = same direction slide.
In our next lesson, we will build upon this kinematic foundation to explore kinetics. We will move from how things move to why they move by applying the principles of levers, force couples, and torque to analyze human movement.