Introduction
Following our last lesson on cardiopulmonary assessment, where we focused on identifying problems through auscultation, ABGs, and CXR interpretation, we now shift our focus to intervention. Once you've assessed a patient and identified an inefficient breathing pattern or dyspnea, what do you do next? This lesson provides the answer by focusing on cornerstone therapeutic techniques.
Today, we will address the learning outcome: Describe the principles and application of therapeutic breathing exercises (e.g., diaphragmatic, pursed-lip breathing). We will explore the "why" and "how" behind two of the most fundamental breathing exercises in physiotherapy. Our goal is to equip you with the knowledge to not only perform these techniques but also to understand their physiological principles, indications, and contraindications—all critical for your PGET exam and clinical practice.
General Principles of Breathing Retraining
Before we dive into specific techniques, it's crucial to understand why a physiotherapist would intervene to change a patient's breathing pattern. In healthy individuals, breathing is efficient and effortless at rest. However, in patients with pulmonary disease, post-surgical pain, or neuromuscular conditions, the work of breathing can increase dramatically, leading to the adoption of inefficient and fatiguing patterns, such as overuse of accessory muscles.
The primary goals of teaching controlled breathing are to restore an efficient pattern, reduce the work of breathing, and give the patient a tool to manage dyspnea. The following reading from the Clinical Gate textbook chapter provides an excellent overview of these foundational concepts.
Facilitating Ventilation Patterns and Breathing Strategies - Clinical GateClinical Gate
This text explains the rationale for breathing retraining and outlines the key goals of these interventions. It's essential for understanding the clinical reasoning behind the techniques we'll discuss.
Please read the following sections: Start with the section that answers why we change a patient's breathing pattern. Review the lists of indications and goals for controlled breathing. These are high-yield points for your exam.
A key distinction to make, as highlighted in the textbook, is the different approach for primary (obstructive) versus secondary (restrictive) pulmonary dysfunction:
- Primary Pulmonary Disease (e.g., COPD): The focus is often on relaxing overused accessory muscles, prolonging exhalation to combat air trapping, and facilitating a more efficient diaphragmatic pattern to reduce the work of breathing.
- Secondary Pulmonary Dysfunction (e.g., Spinal Cord Injury): The goal may be to strengthen and recruit weak accessory muscles to assist a weak diaphragm, thereby increasing vital capacity and improving cough effectiveness.
With this framework in mind, let's examine the two most common techniques.
Diaphragmatic Breathing (DB)
Diaphragmatic breathing aims to restore the function of the diaphragm as the primary muscle of inspiration. By doing so, it improves ventilatory efficiency, decreases oxygen consumption from overused accessory muscles, and can help with relaxation.
Principle: The diaphragm is a large, dome-shaped muscle at the base of the lungs. On contraction, it flattens and descends, increasing the vertical dimension of the thoracic cavity and drawing air into the lungs. This is the most efficient mechanism for breathing. In many pulmonary conditions, patients adopt a shallow, upper-chest breathing pattern, relying on neck and shoulder muscles (sternocleidomastoid, scalenes), which is far less efficient and leads to fatigue.
Application & Technique:
The best way to learn DB is to see it demonstrated and then practice it. The initial teaching is often done in a relaxed, gravity-assisted position like semi-Fowler's.

The following video provides a clear, step-by-step demonstration of the technique, including how to progress with resistance.
All Breathing Exercises | Diaphragmatic, Segmental, Pursed Lip, Glossopharyngeal Breathing
This video from Physio's Healing Touch demonstrates the standard technique for teaching diaphragmatic breathing, including hand placement for feedback and how to apply resistance for strengthening.
Watch the segment on diaphragmatic breathing from the beginning. Pay close attention to the therapist's instructions, hand placement, and the emphasis on keeping the upper chest and shoulders relaxed.
To solidify your understanding, here is a summary of the procedure based on the video and standard physiotherapy texts:
- Positioning: Place the patient in a relaxed, comfortable position (e.g., semi-Fowler's or supine with knees bent) to relax the abdominal muscles.
- Hand Placement: Place your hand (or the patient's own hand) on the upper abdomen, just below the ribs. Another hand can be placed on the upper chest for contrast.
- Instruction:
- Ask the patient to "breathe in slowly through your nose" and feel their "stomach rise into your hand."
- Cue them to "keep your chest and shoulders as still and relaxed as possible."
- Then, instruct them to "breathe out slowly through your mouth" and feel their stomach fall.
- Facilitation: If the patient struggles to engage the diaphragm, a "sniffing" action can be helpful. Quick, short inhalations through the nose naturally activate the diaphragm.
Improve Breathing: Exercises to Recover from Respiratory Infections | Exercise with MSK
This video from Memorial Sloan Kettering shows the "quick sniffles" exercise, an excellent facilitation technique for diaphragmatic breathing.
Watch the short demonstration of quick sniffles from this section. This is a useful trick to have in your clinical toolkit.
Progression: Once the patient masters DB in a supported position, it should be practiced in sitting, standing, and during functional activities like walking. Manual resistance or a small weight on the abdomen can be added to strengthen the diaphragm.
Pursed-Lip Breathing (PLB)
Pursed-lip breathing is a simple yet powerful strategy used primarily to relieve dyspnea, especially in patients with obstructive lung disease. Many patients with COPD adopt this pattern spontaneously.
Principle: PLB works by creating positive expiratory pressure (similar to PEEP - Positive End-Expiratory Pressure) within the airways. This gentle back-pressure helps to splint the small airways open during exhalation, preventing them from collapsing prematurely. This has two major benefits:
- It gives trapped air more time to escape, reducing hyperinflation.
- It slows the respiratory rate and prolongs the expiratory phase, promoting a more relaxed and controlled breathing pattern.
Application & Technique:
The key to effective PLB is a gentle, passive exhalation, not a forceful one.
The following video provides a concise demonstration.
All Breathing Exercises | Diaphragmatic, Segmental, Pursed Lip, Glossopharyngeal Breathing
This video quickly demonstrates the proper technique for pursed-lip breathing.
Watch the short segment on pursed-lip breathing from this clip. Note the emphasis on a slow inhalation followed by an even slower exhalation through pursed lips.
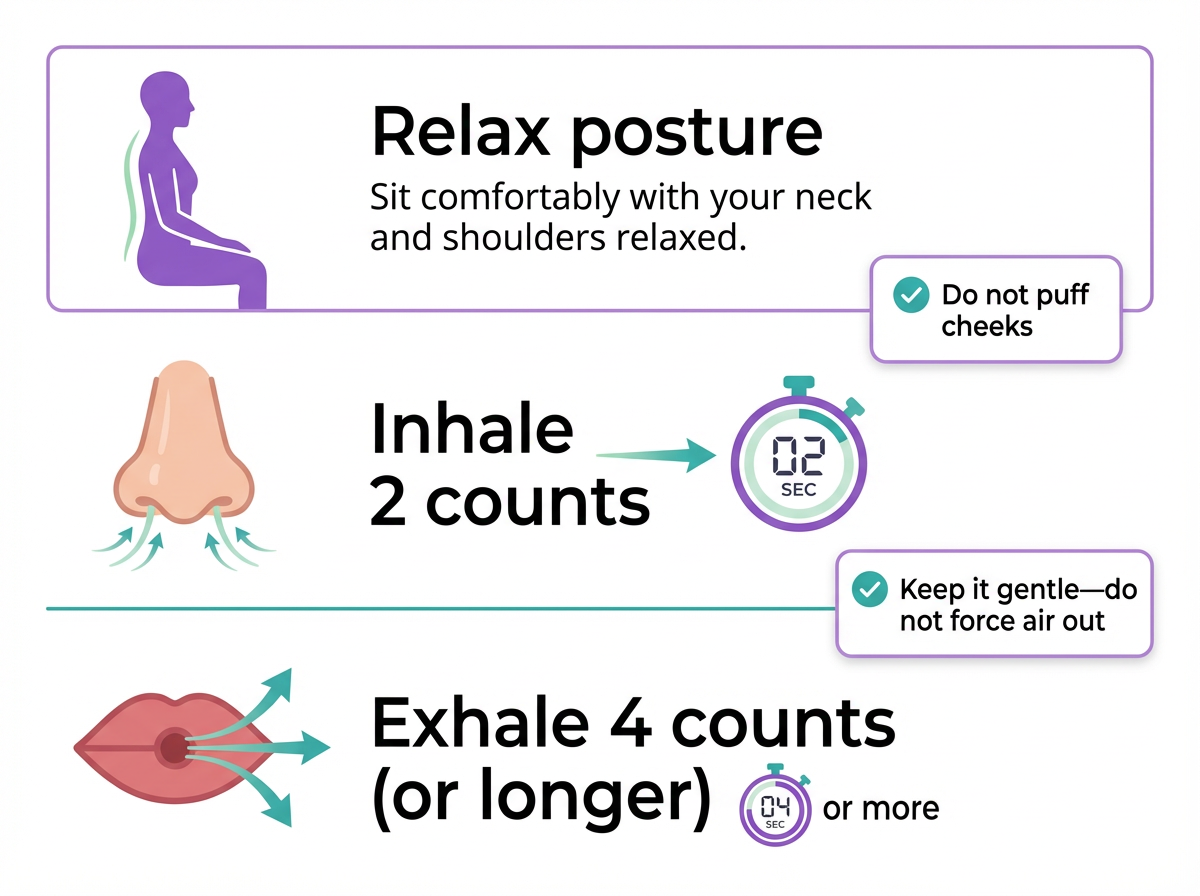
Here is a breakdown of the instructions you would give a patient:
- Relax: Sit comfortably, relaxing your neck and shoulder muscles.
- Inhale: Breathe in slowly through your nose for a count of two, keeping your mouth closed.
- Exhale: Pucker or "purse" your lips as if you were about to whistle or gently blow out a candle.
- Control: Breathe out slowly and gently through your pursed lips for a count of four or longer. The exhalation should be at least twice as long as the inhalation. Do not force the air out.
PLB is an excellent "rescue" technique for patients to use during episodes of shortness of breath, such as while walking, climbing stairs, or during other strenuous activities.
Integrating Breathing with Functional Activities
Finally, it's crucial to teach patients how to coordinate these breathing patterns with movement to avoid breath-holding (Valsalva maneuver) and improve functional endurance. A simple rule to remember and teach is:
- Inhale during the "opening" or extension phase of a movement. (e.g., reaching up, leaning back)
- Exhale during the "closing" or flexion phase of a movement, or during the effort. (e.g., bending forward, pushing up from a chair, lifting an object)
For example, when teaching a patient to stand up from a chair:
- Inhale while sitting upright.
- Exhale (with pursed lips if needed) while leaning forward and pushing up to a standing position.
- Inhale once standing tall.
Mastering this coordination is key to translating breathing exercises into improved daily function.
Conclusion
In this lesson, we have explored the principles and applications of two fundamental therapeutic breathing exercises. By understanding the "why" behind these techniques, you can better apply them in clinical practice and confidently answer related questions in your PGET.
Key Takeaways:
- Breathing retraining aims to improve ventilatory efficiency, decrease the work of breathing, and give patients control over dyspnea.
- Diaphragmatic Breathing (DB) focuses on re-engaging the diaphragm as the primary muscle of inspiration, promoting relaxation and reducing the use of inefficient accessory muscles.
- Pursed-Lip Breathing (PLB) is a technique for managing dyspnea, primarily in obstructive conditions, by creating positive back-pressure to keep airways open during a prolonged, gentle exhalation.
- Application is key: The ultimate goal is to integrate these controlled breathing patterns into functional daily activities to improve a patient's endurance and quality of life.
In our next lesson, we will build upon these interventions by focusing on techniques designed for airway clearance. We will cover postural drainage positions and the Active Cycle of Breathing Technique (ACBT), essential skills for managing patients with excessive secretions.