Hello! Welcome to your second lesson on Apache Kafka.
In our last session, we built a solid theoretical foundation by exploring Kafka's core architecture—brokers, topics, partitions, and the all-important consumer groups. You learned how partitions enable parallelism and how consumer groups coordinate to process data scalably and safely.
Today, we're moving from theory to practice. Your learning outcome is to implement a Kafka producer and a consumer using Spring for Kafka, demonstrating different offset management techniques. This is a highly practical skill and a common focus in technical interviews for senior roles, where demonstrating an understanding of data reliability is key. We'll build a simple message-passing system and then dive deep into how to control message processing to prevent data loss.
Let's get started!
1. The Big Picture: Producer and Consumer with Spring
Before we write any code, let's visualize the system we are about to build.
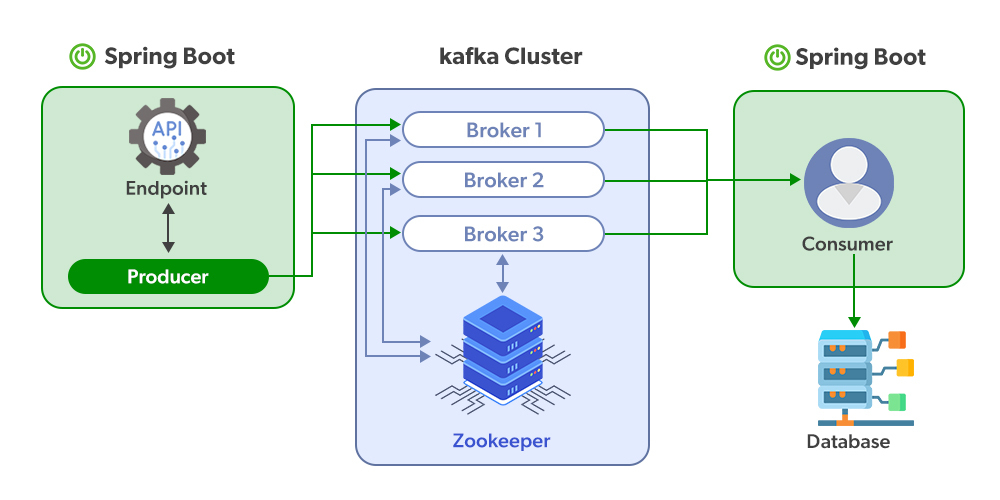
The spring-kafka project provides a powerful abstraction over the native Kafka client libraries, making it straightforward to integrate Kafka into a Spring application using familiar concepts like dependency injection and annotations.
2. Setting Up Your Kafka Environment
To develop our application, we first need a running Kafka instance. The easiest way to get one up and running locally is with Docker.
Preventing Data Loss With Kafka Listeners in Spring Boot
The following article provides a convenient docker-compose.yml file to start a single-node Kafka cluster with Zookeeper. It also includes the necessary commands to create a topic.
Follow the instructions in the section 'Run Apache Kafka'. Create the docker-compose.yml file, run docker-compose up, and then use the kafka-topics command to create a topic named demo. You can also use the kafka-console-producer to send a few test messages, which we'll consume later.
With Kafka running and a demo topic created, we're ready to build our Spring Boot application.
3. Implementing the Kafka Producer
Our first task is to create a component that can send messages to our demo topic. In Spring for Kafka, the primary tool for this is the KafkaTemplate.
Configuration
Spring Boot's auto-configuration makes setting up a producer incredibly simple. First, you'll need the spring-kafka dependency. In a Gradle project, your build.gradle would include:
implementation 'org.springframework.kafka:spring-kafka'
Next, you need to provide the producer configuration in your application.yml:
spring:
  kafka:
    producer:
      bootstrap-servers: localhost:9092
      key-serializer: org.apache.kafka.common.serialization.StringSerializer
      value-serializer: org.apache.kafka.common.serialization.StringSerializer
bootstrap-servers: The address of your Kafka broker(s).key-serializer/value-serializer: The classes used to convert your message's key and value from Java objects into bytes before sending them over the network. For now, we'll just send simple strings.
Behind the scenes, Spring Boot uses these properties to auto-configure a ProducerFactory and a KafkaTemplate bean for you.
Sending Messages with KafkaTemplate
Now you can inject the auto-configured KafkaTemplate into any Spring bean (like a service or a controller) and use it to send messages.
Intro to Apache Kafka with Spring
To understand how to use KafkaTemplate, let's refer to the 'Intro to Apache Kafka with Spring' guide from Baeldung. It provides a clear example of sending messages.
Watch the part of the video that corresponds to the 'Publishing Messages' section of the Baeldung article (you can find it by searching for that title). Focus on the code example that shows how to use kafkaTemplate.send() and, more importantly, how to handle the result asynchronously using CompletableFuture.
As the resource explains, the send method returns a CompletableFuture. While you can call .get() to block and wait for the result, this is an anti-pattern that negates the high-throughput nature of Kafka. The best practice is to handle the result asynchronously.
Here's a complete example of a simple producer service:
import org.slf4j.Logger;
import org.slf4j.LoggerFactory;
import org.springframework.kafka.core.KafkaTemplate;
import org.springframework.kafka.support.SendResult;
import org.springframework.stereotype.Service;
import java.util.concurrent.CompletableFuture;

@Service
public class KafkaMessageProducer {

    private static final Logger log = LoggerFactory.getLogger(KafkaMessageProducer.class);
    private final KafkaTemplate<String, String> kafkaTemplate;

    public KafkaMessageProducer(KafkaTemplate<String, String> kafkaTemplate) {
        this.kafkaTemplate = kafkaTemplate;
    }

    public void sendMessage(String topic, String message) {
        CompletableFuture<SendResult<String, String>> future = kafkaTemplate.send(topic, message);
        future.whenComplete((result, ex) -> {
            if (ex == null) {
                log.info("Sent message=[{}] with offset=[{}]", message, result.getRecordMetadata().offset());
            } else {
                log.error("Unable to send message=[{}] due to : {}", message, ex.getMessage());
            }
        });
    }
}
You can now create a simple CommandLineRunner or a REST controller to call this sendMessage method and publish messages to your demo topic.
4. Implementing the Kafka Consumer
Now for the other side: a component that listens for messages on the demo topic. This is where the @KafkaListener annotation comes in.
Configuration
First, let's configure the consumer in application.yml.
Preventing Data Loss With Kafka Listeners in Spring Boot
Let's return to the 'Preventing Data Loss' article, which has a concise configuration example for a basic consumer.
Review the 'application.yml' configuration in this section. Pay attention to the consumer properties, especially group-id and auto-offset-reset.
Your application.yml should look like this:
spring:
  kafka:
    consumer:
      bootstrap-servers: localhost:9092
      group-id: demo-group
      auto-offset-reset: earliest
      key-deserializer: org.apache.kafka.common.serialization.StringDeserializer
      value-deserializer: org.apache.kafka.common.serialization.StringDeserializer
group-id: This is a crucial property. It identifies the consumer group this instance belongs to. All consumers with the samegroup-idwill work together to process messages from a topic.auto-offset-reset: Defines what the consumer should do when there is no initial offset in Kafka for its group (e.g., when the group starts for the first time).earliest: Automatically reset the offset to the earliest offset. The group will start reading from the beginning of the topic.latest: Automatically reset the offset to the latest offset (the default). The group will only see new messages produced after it started.
Creating the Listener
With the configuration in place, creating the listener is as simple as annotating a method with @KafkaListener. You'll also need to add @EnableKafka to one of your @Configuration classes to enable the detection of these listeners.
import org.slf4j.Logger;
import org.slf4j.LoggerFactory;
import org.springframework.kafka.annotation.KafkaListener;
import org.springframework.stereotype.Component;

@Component
public class KafkaMessageConsumer {

    private static final Logger log = LoggerFactory.getLogger(KafkaMessageConsumer.class);

    @KafkaListener(topics = "demo", groupId = "demo-group")
    public void listen(String message) {
        log.info("Received message: {}", message);
        // Business logic to process the message would go here.
    }
}
Now, if you run your application and use the producer to send a message, you should see the "Received message" log from your consumer.
5. Mastering Offset Management for Reliability
So far, our consumer works, but it's operating under a default setting that is risky for production systems: automatic offset committing. This is a critical topic for interviews.
The Problem with Auto-Commit
By default, the Kafka consumer polls for messages and commits the last received offset back to Kafka in the background periodically (controlled by auto.commit.interval.ms). This can lead to two failure scenarios:
- Data Loss: Your consumer processes a message successfully, but then crashes before the background commit happens. When it restarts, it will re-process the same message. This is at-least-once delivery. More dangerously, if the offset is committed before you successfully process the message, and your application crashes, the message is lost forever. This is at-most-once delivery.
- Lack of Control: You have no fine-grained control over when the commit happens. If processing a message involves multiple steps (e.g., database write, calling another API), you want to commit the offset only after all steps are complete.
To solve this, we must take control of offset management ourselves.
Implementing Manual Acknowledgment
Spring for Kafka provides an elegant solution using manual acknowledgment. This gives you precise control over when a message is considered "done".
Preventing Data Loss With Kafka Listeners in Spring Boot
The 'Preventing Data Loss' article perfectly demonstrates how to switch from automatic to manual acknowledgment.
Carefully read the sections that explain and demonstrate manual acknowledgment. First, see how to update application.yml by setting enable.auto.commit to false and ack-mode to MANUAL. Then, study the updated @KafkaListener method, noting the new Acknowledgment parameter and the use of acknowledgment.acknowledge().
Let's walk through the steps to implement this:
Step 1: Update application.yml
Disable auto-commit and tell Spring you want to handle acknowledgments manually.
spring:
  kafka:
    consumer:
      # ... other properties
      enable-auto-commit: false
    listener:
      ack-mode: MANUAL_IMMEDIATE
(Note: The resource uses MANUAL, but MANUAL_IMMEDIATE is often preferred as it commits the offset immediately upon calling acknowledge()).
Step 2: Update the Listener Method
Modify your listener method to accept an Acknowledgment object. Then, call its acknowledge() method after you have successfully processed the message.
import org.apache.kafka.clients.consumer.ConsumerRecord;
import org.slf4j.Logger;
import org.slf4j.LoggerFactory;
import org.springframework.kafka.annotation.KafkaListener;
import org.springframework.kafka.support.Acknowledgment;
import org.springframework.stereotype.Component;

@Component
public class KafkaMessageConsumer {

    private static final Logger log = LoggerFactory.getLogger(KafkaMessageConsumer.class);

    @KafkaListener(topics = "demo", groupId = "demo-group")
    public void listen(ConsumerRecord<String, String> record, Acknowledgment acknowledgment) {
        try {
            log.info("Received message: {}", record.value());

            // Simulate business logic
            // e.g., saveToDatabase(record.value());

            // If we get here, processing was successful.
            log.info("Processing successful, acknowledging the message.");
            acknowledgment.acknowledge(); // This commits the offset to Kafka.

        } catch (Exception e) {
            log.error("Failed to process message: {}. Not acknowledging.", record.value(), e);
            // We do NOT call acknowledge(). When the consumer restarts or after a timeout,
            // Kafka will redeliver this message because its offset was not committed.
        }
    }
}
By wrapping your logic in a try-catch block and only calling acknowledgment.acknowledge() on success, you build a robust consumer that guarantees at-least-once processing. If your application crashes mid-process, the offset is never committed, and the message will be redelivered upon restart.
Test your understanding!
An interviewer asks you: "You have a Kafka consumer that reads a message, writes it to a database, and then calls an external REST API. How do you design this consumer to be resilient and avoid losing messages if the REST API call fails?"
How would you answer, based on what you've just learned?
Show answer
I would configure the Spring Kafka listener for manual acknowledgment. This involves three key steps:
-
Configuration: In
application.yml, I would setspring.kafka.consumer.enable-auto-committofalseandspring.kafka.listener.ack-modetoMANUAL_IMMEDIATE. This gives my code full control over when the offset is committed. -
Listener Implementation: My
@KafkaListenermethod would accept anAcknowledgmentobject as a parameter. -
Error Handling: I would wrap the entire business logic (database write and REST API call) in a
try-catchblock. Theacknowledgment.acknowledge()method would only be called at the very end of thetryblock, after both operations have succeeded. If the REST API call throws an exception, thecatchblock will be executed, andacknowledge()will not be called.
This ensures that if the API call fails, the message's offset is not committed. Kafka will then redeliver the message to a consumer in the group after a timeout, allowing for a retry of the entire process. This provides an "at-least-once" delivery guarantee.
Conclusion
In this lesson, you've bridged the gap from theory to practice by building a fully functional Kafka producer and consumer with Spring Boot. More importantly, you've tackled the critical concept of offset management, a cornerstone of reliable message processing.
Key Takeaways:
- Producer: Use the
KafkaTemplateprovided by Spring for Kafka to send messages. Handle theCompletableFutureresult asynchronously for best performance. - Consumer: Use the
@KafkaListenerannotation to create a message-driven POJO. - Configuration: Spring Boot makes configuration easy through
application.yml, handling the creation ofProducerFactory,ConsumerFactory, andKafkaTemplatebeans. - Offset Management: The default auto-commit behavior is risky. For reliable, at-least-once processing, disable auto-commit and use
ack-mode: MANUAL_IMMEDIATE, explicitly callingacknowledgment.acknowledge()upon successful message processing.
Preview of the Next Lesson:
So far, we've only sent simple String messages. Real-world systems exchange complex objects with structured data (e.g., User, Order). What happens when the structure of these objects needs to change? In our next lesson, you will explain the role of a schema registry and implement event versioning with Avro for schema evolution. This is a key technique for maintaining compatibility between producers and consumers in a large, evolving microservices landscape.