Hello! Welcome to the next lesson in our Microservices: Resilience & Observability module.
In our last session, you mastered client-side service discovery, enabling your services to find and communicate with each other dynamically. We solved the problem of hardcoded network locations. However, we've only moved the configuration problem around. Each of our services—the Eureka server, the api-service, the client-service—still has its own application.yml file. Imagine managing database credentials, feature flags, or timeout settings across dozens or even hundreds of services. It's a recipe for inconsistency, manual errors, and painful redeployments for simple configuration changes.
Today, we'll solve this by centralizing our configuration management. Your learning outcome is to implement centralized configuration for microservices using Spring Cloud Config. This is a fundamental pattern for building scalable, manageable distributed systems and a topic you can expect to discuss in a senior engineering interview.
1. The Problem: Configuration Chaos
As a system grows, managing configuration scattered across multiple services becomes a major operational bottleneck. The key challenges are:
- Duplication: The same properties (e.g., Kafka broker URLs, database credentials) are copied across many services.
- Inconsistency: It's easy for properties to get out of sync between services or environments (dev, staging, prod).
- Slow Changes: Updating a simple property requires changing code, rebuilding, and redeploying each affected service.
- Security Risks: Sensitive information like passwords and API keys might be checked into version control for each service.
Spring Cloud Config addresses these issues by externalizing configuration into a central location, completely decoupled from the application code.
🚀 Spring Cloud Config Explained | Centralized Config for Microservices (with Git + Refresh Demo)
To start, let's watch a short segment from the 'Spring Cloud Config Explained' video by CodeSnippet. It clearly articulates the problem and introduces the high-level solution.
Watch the first part of the video from 00:00 to 05:50. Focus on the real-world problem of managing configuration in multiple services and how externalizing it with a dedicated Config Server provides a solution.
2. Spring Cloud Config Architecture
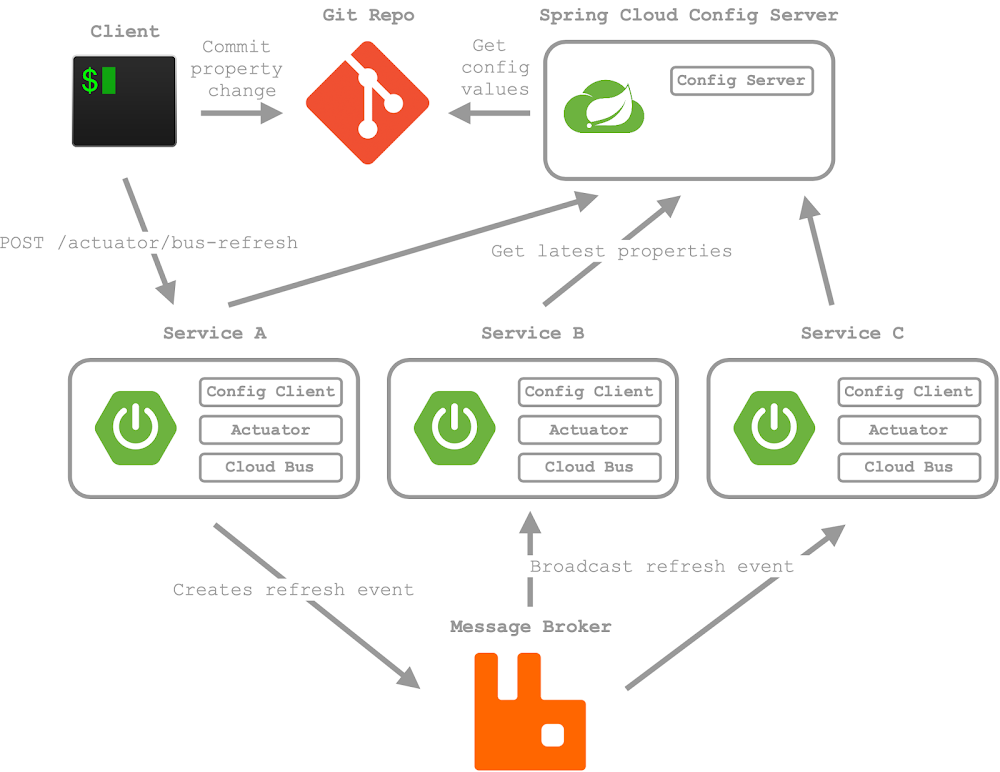
The architecture consists of three main parts, which are also shown in the broader system diagram below.

The key components are:
- Config Server: A standalone Spring Boot application that exposes HTTP endpoints from which clients can fetch their configuration.
- Backend Storage: A source of truth for the configuration properties. The most common and recommended backend is a Git repository (like GitHub or GitLab), as it provides versioning, history, and access control out of the box. Other backends like Vault or the local filesystem are also supported.
- Config Client: Any microservice that is configured to connect to the Config Server at startup to fetch its properties.
The flow is straightforward:
- On startup, the Config Client contacts the Config Server.
- The Config Server clones the Git repository (or reads from another backend) and finds the appropriate properties for the client based on its application name and active profiles.
- The properties are sent back to the client and integrated into its Spring
Environment, taking precedence over properties in the packagedapplication.yml.
Spring Cloud Config Documentation
The official Spring Cloud Config documentation provides the definitive overview of these concepts. Let's read the introduction to solidify our understanding.
Read the Quick Start and the introduction to the Spring Cloud Config Server section. Focus on how the server maps HTTP requests (/{application}/{profile}) to files in the Git repository and the role of the @EnableConfigServer annotation.
3. Hands-On: Building the Config Server
Let's build our centralized Config Server. This is a one-time setup that will serve all our other microservices.
Step 1: Create a Git Repository for Configuration
First, create a new public Git repository (on GitHub, for example). This will hold your configuration files. Inside it, create a file named application.yml with some default properties:
# application.yml
message: "Hello from the default configuration!"
And another file, let's say my-client-service-dev.yml, for a specific service and profile:
# my-client-service-dev.yml
message: "Hello from the DEV client configuration!"
Commit these files to your repository.
Step 2: Create the Config Server Application
Now, let's create the Spring Boot application for the server.
🚀 Spring Cloud Config Explained | Centralized Config for Microservices (with Git + Refresh Demo)
The 'Spring Cloud Config Explained' video demonstrates this setup clearly. We'll follow its lead to build and run the server.
Watch the segment from 09:05 to 14:20. This part covers: The dependencies needed (Config Server). The @EnableConfigServer annotation. Configuring the application.properties to point to your Git repository. Testing the server by accessing its endpoints.
To summarize the implementation:
- Dependencies: In your
pom.xml, addspring-cloud-config-server. - Enable the Server: In your main application class, add the
@EnableConfigServerannotation.@SpringBootApplication @EnableConfigServer public class ConfigServerApplication { public static void main(String[] args) { SpringApplication.run(ConfigServerApplication.class, args); } } - Configuration (
application.yml): Configure the server's port and the URI of the Git repository you just created.server: port: 8888 # The conventional port for a config server spring: cloud: config: server: git: uri: https://github.com/your-username/your-config-repo.git # Replace with your repo URL
Now, run this application. You can verify it's working by opening a browser or using curl to hit an endpoint corresponding to your config files, for example: http://localhost:8888/my-client-service/dev. You should see a JSON response containing the properties from your Git repository.
4. Hands-On: Integrating a Config Client
Next, let's modify one of our microservices to fetch its configuration from our new Config Server instead of its local file.
With modern Spring Boot, this is done using the spring.config.import property, which is processed very early in the application startup sequence.
🚀 Spring Cloud Config Explained | Centralized Config for Microservices (with Git + Refresh Demo)
Let's continue with the same video, which now shows how to create and configure a client application.
Watch from 14:20 to 19:56. This section covers: The client dependencies (Config Client, Web). The crucial spring.config.import property to connect to the server. Setting spring.application.name so the client identifies itself correctly to the server. Using @Value to inject a property fetched from the remote repository.
Here's a summary of the client setup:
-
Dependencies: Ensure your
pom.xmlincludesspring-cloud-starter-configandspring-boot-starter-web(for creating a test endpoint). -
Configuration (
application.yml): This is the most important part. You instruct the client where to find the Config Server.spring: application: # This name MUST match the file name in your Git repo (e.g., my-client-service.yml) name: my-client-service profiles: # This will be used to fetch profile-specific configs (e.g., my-client-service-dev.yml) active: dev config: # Tells the client to import configuration from the Config Server import: "optional:configserver:http://localhost:8888"Note: The
optional:prefix prevents the application from failing to start if the Config Server is unavailable. For production, you might remove it to enforce a "fail-fast" policy. -
Inject the Property: Create a simple REST controller to display the configured message.
import org.springframework.beans.factory.annotation.Value;
import org.springframework.web.bind.annotation.GetMapping;
import org.springframework.web.bind.annotation.RestController;

@RestController
public class MessageController {

    @Value("${message}") // Injects the property from the config server
    private String message;

    @GetMapping("/message")
    public String getMessage() {
        return this.message;
    }
}
Run the client application and navigate to http://localhost:8080/message. You should see "Hello from the DEV client configuration!"—a value that came all the way from your Git repository via the Config Server!
5. Dynamic Property Refreshing
We've solved centralization, but we still have the "redeployment" problem. By default, the client fetches configuration only once at startup. If you update a property in Git, the running client won't see the change. This is where dynamic refreshing comes in.
The key is to use the /actuator/refresh endpoint and the @RefreshScope annotation.
Dynamic Property Reload in Spring Boot with Spring Cloud Config
The article 'Dynamic Property Reload in Spring Boot' gives an excellent conceptual explanation of how the refresh mechanism works. It clarifies the roles of the Spring Environment and the @RefreshScope.
Read the sections 'How Dynamic Property Reload Works', 'Refreshing Beans with @RefreshScope', and 'How the Refresh Trigger Works'. This will give you the theoretical foundation for the code we're about to write.
Now let's implement it.
🚀 Spring Cloud Config Explained | Centralized Config for Microservices (with Git + Refresh Demo)
The final part of the 'Spring Cloud Config Explained' video provides a step-by-step demo of enabling and using the refresh feature.
Watch the final segment from 19:56 to 26:24. Pay close attention to: Adding the spring-boot-starter-actuator dependency. Exposing the refresh endpoint in application.yml. Crucially, adding the @RefreshScope annotation to the bean that uses the external property. The final end-to-end test: change the property in Git, POST to /actuator/refresh, and see the new value in the application without a restart.
Here's the refresh implementation summary:
- Add Actuator: Add
spring-boot-starter-actuatorto the client'spom.xml. - Expose Endpoint: In the client's
application.yml, expose the refresh endpoint.management: endpoints: web: exposure: include: refresh - Annotate the Bean: Add
@RefreshScopeto theMessageController. This tells Spring that this bean can be destroyed and re-created with new configuration when a refresh event occurs.import org.springframework.cloud.context.config.annotation.RefreshScope; // ... other imports @RestController @RefreshScope // This is the magic! public class MessageController { // ... same as before }
To test the full loop:
- Run your Config Server and Config Client. Check
http://localhost:8080/message. - Go to your Git repository, change the
messageproperty inmy-client-service-dev.yml, and commit/push the change. - Send an empty POST request to the client's refresh endpoint:
http://localhost:8080/actuator/refresh. - Refresh
http://localhost:8080/message. You will see the updated value instantly, without having restarted the application!
Test your understanding!
What happens if you have a property injected via @Value in a bean, you trigger a refresh, but you forgot to add @RefreshScope to that bean's class? Will the property value update?
Show answer
No, the property value will not update. The /actuator/refresh endpoint will successfully re-fetch the configuration from the Config Server and update the application's Environment. However, Spring beans are singletons by default and are created only once. Without @RefreshScope, Spring has no instruction to destroy and re-create the existing bean instance. The old bean will continue to exist, holding on to the old property value it was initialized with. @RefreshScope effectively puts a proxy around the bean, allowing it to be swapped out for a new instance after a refresh.
For systems with many instances of a service, POSTing to each /refresh endpoint is impractical. This is where Spring Cloud Bus comes in. It uses a message broker (like RabbitMQ or Kafka) to broadcast the refresh event to all subscribed services from a single command.
Interview Corner
Being able to explain this entire flow is a strong signal of seniority in a system design or Java-specific interview.
Question: "Your team needs to manage a feature flag that enables a new checkout algorithm across 50 microservices. How would you design a system to toggle this flag on and off in production without any downtime?"
A Strong Answer:
- Centralize Configuration: "I would use Spring Cloud Config to externalize our application properties. I'd set up a Config Server pointing to a Git repository that holds our configuration files."
- Property Definition: "In the Git repository, I'd define a property like
features.new-checkout.enabled=falsein a shared file likeapplication.ymlor a more specific one if needed." - Client Integration: "Each of the 50 microservices would be configured as a Config Client. They would use the
spring.config.importproperty to connect to the Config Server at startup and fetch their configuration." - Dynamic Refresh: "To enable dynamic updates, I'd include the Spring Boot Actuator in each client and expose the
/actuator/refreshendpoint. The beans that depend on this feature flag, for instance, aCheckoutServiceor a strategy factory, would be annotated with@RefreshScope." - The Toggle Mechanism: "When we need to enable the feature, a developer would commit and push the change
features.new-checkout.enabled=trueto the Git repository. Then, we would trigger a refresh. For a large number of services, I would integrate Spring Cloud Bus with a message broker like Kafka. This allows us to send a single command to/actuator/bus-refresh, which broadcasts a refresh event to all 50 services. Each service then pulls the updated configuration and re-instantiates its@RefreshScopebeans, activating the new feature flag—all with zero downtime."
Conclusion
You have now mastered a critical pattern for building and managing distributed systems. By centralizing configuration, you have made your architecture more consistent, maintainable, and agile.
Key Takeaways:
- Spring Cloud Config externalizes configuration, solving problems of duplication and inconsistency.
- The architecture consists of a Config Server, a Config Client, and a backend (usually Git).
- Clients connect to the server using
spring.config.import=configserver:<url>. - Dynamic updates are possible by using the
@RefreshScopeannotation on beans and triggering a refresh via the/actuator/refreshendpoint. - Spring Cloud Bus can automate the propagation of refresh events across many service instances.
Preview of the Next Lesson:
Our services can discover each other and share configuration. But when something goes wrong in this complex, distributed environment, how do we figure out what happened? The old approach of tail-ing a single log file no longer works. In our next lesson, we will dive into the three pillars of observability by learning how to implement distributed tracing in a multi-service application using Micrometer Tracing and Zipkin.