Hello! Welcome to the next lesson in our Microservices: Resilience & Observability module.
In our last session, we mastered how to make our services more resilient to transient failures using retry mechanisms and exponential backoff. We configured our client to retry calls to a known service address. However, in a modern microservices architecture, especially in cloud environments, service instances are ephemeral—they can be created, destroyed, or moved at any time. Hardcoding IP addresses and ports is therefore a fragile and unscalable approach.
Today, we will solve this fundamental problem. Your learning outcome is to implement client-side service discovery and load balancing using Spring Cloud. You will learn how a client service can dynamically discover the network locations of other services and distribute requests among them. This is a cornerstone pattern of microservice architectures and a frequent topic in senior engineering interviews.
1. The "Why": Understanding Service Discovery
In a monolithic application, components invoke each other through simple method calls. In a distributed system, they communicate over the network. The core problem is: how does Service A know the IP address and port for Service B, especially when there might be multiple instances of Service B running, and these instances can change?
The solution is Service Discovery. The central piece of this pattern is a Service Registry.
- Service Registry: Think of it as a phone book for your microservices. It's a database containing the network locations (IP and port) of all available service instances.
- Service Registration: When a new service instance starts up, it registers itself with the service registry, announcing its location and availability.
- Service Discovery: When one service wants to call another, it queries the service registry to get a list of available, healthy instances and their locations.
To get a clear conceptual overview, let's start with a short video.
Master Service Discovery in Microservices | Eureka and Java Spring Boot
The video 'Master Service Discovery in Microservices' by ByteMonk provides an excellent high-level explanation of the problem and the two primary discovery patterns.
Please watch these two short segments: Introduction to Service Discovery (00:00 - 02:01): Focus on why this pattern is necessary in a microservices architecture and the role of the service registry. Client-Side vs. Server-Side Discovery (02:01 - 03:44): Understand the difference between these two approaches. We will be implementing the client-side pattern today, where the client is responsible for querying the registry and choosing an instance.
As the video explains, in client-side discovery, the client takes on the responsibility of discovering service locations and balancing the load across them. Spring Cloud provides excellent support for this pattern. Our implementation will use Netflix Eureka as the service registry and Spring Cloud LoadBalancer for the client-side logic.
2. Building the Infrastructure
Let's set up the two main components: the Eureka Server (the registry) and a service provider that will register with it.
Step 1: The Eureka Service Registry
The Eureka Server is a standalone Spring Boot application whose only job is to act as our service registry.
Spring Tips: Spring Cloud Loadbalancer #SpringFramework #WithMe
The 'Spring Tips: Spring Cloud Loadbalancer' video by the official SpringDeveloper channel starts by quickly setting up a Eureka server. This is a practical, code-first demonstration.
Watch the segment from 00:22 to 02:45. It covers: The Spring Initializr dependencies for a Eureka Server (Eureka Server). Applying the @EnableEurekaServer annotation to the main application class. The essential application.properties configuration to make it run as a standalone registry.
To summarize the key steps shown in the video:
- Dependencies: In your
pom.xml, addspring-cloud-starter-netflix-eureka-server. - Enable the Server: Add
@EnableEurekaServerto your main Spring Boot application class.@SpringBootApplication @EnableEurekaServer public class EurekaServerApplication { public static void main(String[] args) { SpringApplication.run(EurekaServerApplication.class, args); } } - Configuration: In
application.properties(or.yml), configure the server.# Run the server on the standard Eureka port server.port=8761 # These two properties tell this instance not to behave like a client. # It's a server, so it shouldn't try to register itself. eureka.client.register-with-eureka=false eureka.client.fetch-registry=false
Once you run this application, you can navigate to http://localhost:8761 to see the Eureka dashboard. Initially, it will be empty.
Step 2: The Service Provider (API Service)
Next, we need a microservice that will register itself with Eureka. Let's call it api-service.
Spring Tips: Spring Cloud Loadbalancer #SpringFramework #WithMe
Continuing with the 'Spring Tips' video, the next section shows how to create a simple service and configure it as a Eureka client.
Watch from 02:45 to 05:00. Focus on: The dependencies for a Eureka Client (Eureka Discovery Client). The crucial application.properties settings: spring.application.name and the Eureka server URL.
Key takeaways for creating a Eureka client:
- Dependencies: Add
spring-cloud-starter-netflix-eureka-client. - Configuration: This is where the magic happens. In
application.properties:
With# This logical name is the Service ID. It's how other services will find this one. spring.application.name=api-service # The port this service will run on server.port=8081 # The location of the service registry eureka.client.service-url.defaultZone=http://localhost:8761/eureka/spring-cloud-starter-netflix-eureka-clienton the classpath, Spring Boot's autoconfiguration handles the registration automatically. The@EnableEurekaClientannotation is no longer required.
Now, if you run the Eureka Server first, and then this api-service, you should see API-SERVICE appear on the Eureka dashboard after about 30 seconds.
3. Implementing the Client with Load Balancing
Now for the main event: creating a client-service that can find and call our api-service without knowing its host:port. We will use Spring Cloud LoadBalancer, the modern, non-blocking load balancer in the Spring ecosystem that has replaced Netflix Ribbon.
Our goal is to make an HTTP call to a logical URL like http://api-service/greetings and have Spring Cloud automatically resolve api-service to a healthy instance (e.g., http://localhost:8081).
The most common and idiomatic way to achieve this is by using a @LoadBalanced WebClient.Builder.
Spring Tips: Spring Cloud Loadbalancer #SpringFramework #WithMe
The 'Spring Tips' video provides a clear, three-stage demonstration of using Spring Cloud LoadBalancer. We'll focus on the final, most practical approach.
Watch the segment from 15:49 to 18:00. This demonstrates the @LoadBalanced annotation approach, which is the most common and what you'd likely use in a real project. Pay attention to: How a WebClient.Builder bean is annotated with @LoadBalanced. The property to disable the legacy Ribbon load balancer. How the WebClient call is made using the service name (api) in the URL.
Here's the implementation breakdown for your client-service:
-
Dependencies: Add
spring-cloud-starter-netflix-eureka-client(to find the registry) andspring-cloud-starter-loadbalancer(for the load balancing logic). -
Configuration (
application.yml):spring: application: name: client-service # This is crucial! It tells Spring Cloud to use the new LoadBalancer, not the old Ribbon. cloud: loadbalancer: ribbon: enabled: false server: port: 8082 eureka: client: service-url: defaultZone: http://localhost:8761/eureka/ -
Create the
@LoadBalancedWebClientBean:
In a@Configurationclass, define a bean for theWebClient.Builderand annotate it with@LoadBalanced. This annotation instructs Spring Cloud to add a special filter that understands how to resolve service names.import org.springframework.cloud.client.loadbalancer.LoadBalanced; import org.springframework.context.annotation.Bean; import org.springframework.context.annotation.Configuration; import org.springframework.web.reactive.function.client.WebClient; @Configuration public class WebClientConfig { @Bean @LoadBalanced // The magic happens here! public WebClient.Builder loadBalancedWebClientBuilder() { return WebClient.builder(); } } -
Use the
WebClientto Call the Service:
Now you can inject and useWebClient(or its builder) to make calls using the logical service ID.@Service public class ApiClient { private final WebClient webClient; // Spring injects a WebClient instance built from our @LoadBalanced builder public ApiClient(WebClient.Builder webClientBuilder) { this.webClient = webClientBuilder.build(); } public Mono<String> callApiService() { // Note the URL: we use the service ID "api-service", not a hostname. return this.webClient.get() .uri("http://api-service/greetings") .retrieve() .bodyToMono(String.class); } }
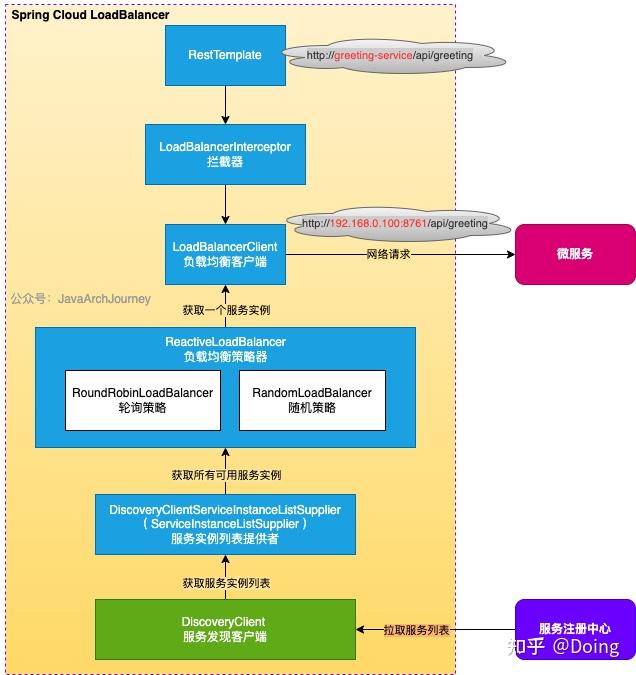
When callApiService() is executed, the @LoadBalanced mechanism intercepts the request. It queries its local copy of the Eureka registry for all instances of api-service, chooses one (by default, using a round-robin algorithm), and transparently rewrites the URL to the actual host:port before sending the request.
This diagram helps visualize the flow. While it shows RestTemplate, the principle is identical for WebClient: the LoadBalancerInterceptor (or in our case, ReactorLoadBalancerExchangeFilterFunction) works with the LoadBalancerClient to resolve the service ID to a concrete instance.
Test your understanding!
What would happen if you used a regular, non-load-balanced WebClient instance to make a call to http://api-service/greetings? What kind of error would you expect?
Show answer
You would get an UnknownHostException (or a similar DNS resolution error). The operating system's DNS resolver has no idea what api-service means; it's a logical name understood only by the Spring Cloud service discovery mechanism. The @LoadBalanced annotation is what enables WebClient to translate this logical name into a physical IP address by consulting the service registry.
4. Interview Focus: Explaining the End-to-End Flow
A common senior-level interview question is to explain this entire process. Your ability to articulate the interaction between components demonstrates a deep understanding of distributed systems.
Question: "You have a ShoppingCartService that needs to call a ProductService. How would you implement resilient communication using client-side service discovery in Spring Cloud?"
A Strong Answer:
-
Service Registry: "First, I'd set up a service registry, like Netflix Eureka, using
@EnableEurekaServer. This acts as a central directory for all my services." -
Service Registration: "The
ProductServicewould be configured as a Eureka client. By including theeureka-clientdependency and setting itsspring.application.nametoproduct-service, it will automatically register its IP and port with the Eureka server on startup." -
Client-Side Discovery & Load Balancing: "In the
ShoppingCartService, I would include theeureka-clientandspring-cloud-loadbalancerstarters. I'd then define aWebClient.Builderbean and annotate it with@LoadBalanced." -
Making the Call: "When calling the
ProductService, I would use the configuredWebClientto make a request to the logical URL,http://product-service/products/{id}. I would also disable the legacy Ribbon load balancer viaspring.cloud.loadbalancer.ribbon.enabled=falseto ensure I'm using the modern, reactive stack." -
The "Under the Hood" Mechanics: "When the call is made, the
@LoadBalancedfilter intercepts it. It uses theDiscoveryClientto get a list of all healthyproduct-serviceinstances from its local cache of the Eureka registry. TheSpring Cloud LoadBalancerthen applies a load-balancing strategy—by default, round-robin—to select one instance. Finally, it rewrites the URL to that instance's physical address (e.g.,http://10.0.1.23:8080/products/{id}) and sends the request. This makes the client resilient to individual instance failures and allows theProductServiceto be scaled out transparently."
You can also showcase further knowledge by mentioning advanced features from the Spring Cloud LoadBalancer documentation (LINK), such as instance caching, health checks, or pluggable load-balancing algorithms (e.g., Random vs. Round-Robin).
Conclusion
Congratulations! You have just implemented one of the most critical patterns in a microservices architecture. You've moved from brittle, hardcoded communication to a dynamic and resilient system where services can discover and adapt to each other.
Key Takeaways:
- Service Discovery is essential in dynamic environments to locate service instances.
- Netflix Eureka is a popular choice for a Service Registry in the Spring ecosystem.
- Spring Cloud LoadBalancer provides modern, reactive client-side load balancing.
- The
@LoadBalancedannotation on aWebClient.Builderis the key to enabling this behavior, allowing you to call services by their logicalspring.application.name. - Always remember to disable Ribbon (
spring.cloud.loadbalancer.ribbon.enabled=false) to use the current-generation load balancer.
Preview of the Next Lesson:
Our services can now find each other, but each one still has its own application.properties or application.yml file. What happens when you have dozens of services and need to change a shared property, like a database URL or a feature flag? Managing this manually is error-prone and slow. In our next lesson, we will tackle this by learning to implement centralized configuration for microservices using Spring Cloud Config.