Following our selection of the ESP32-S3 as the computational heart of our smart glasses, our next step is to choose its "eyes." This lesson focuses on evaluating stereo-compatible camera modules to capture the visual information our AI model will use to understand the world. We will dissect the key characteristics of cameras—resolution, frame rate, interface, and cost—to make a decision that aligns with both the capabilities of our microcontroller and the stringent budget of our project. By the end of this lesson, you will understand the critical trade-offs involved in camera selection for an embedded AI system and have a clear strategy for our project's vision hardware.
Key Camera Characteristics for Embedded Vision
Before diving into specific models, it's essential to understand the parameters that define a camera's performance, especially for a real-time, wearable application. The context is not professional photography, but rather providing sufficient data for a machine learning model on a highly constrained device.
The Camera Basics for Visual SLAM | Kudan global
This article from Kudan, a company specializing in computer vision, provides a concise and practical overview of the most important camera specifications for applications involving motion, like our smart glasses.
Please read the following three sections. First, focus on the descriptions of frame rate, field of view, and dynamic range. Then, read the section Global shutter over rolling shutter to understand this critical distinction for moving cameras. Finally, review the section on Resolution, which makes a crucial, counter-intuitive point about its role in embedded systems.
As you've just read, the ideal camera for our purpose is not simply the one with the highest numbers. Let's crystallize these concepts in the context of our project:
- Resolution: For our AI model, which will likely operate on very small input images (e.g., 96x96 pixels) to run efficiently on the ESP32-S3, multi-megapixel resolutions are not only unnecessary but detrimental. Processing high-resolution images consumes significant memory and computational cycles, increasing latency. A sensor capable of a clean VGA (640x480) or even QVGA (320x240) resolution is more than sufficient.
- Frame Rate (FPS): Since the user of the glasses will be moving, a higher frame rate (e.g., 15-30 FPS) is desirable to ensure a fluid representation of the environment and reduce motion blur between frames. However, the actual FPS we can achieve will be limited by the processing time of our entire pipeline (image capture, preprocessing, inference).
- Shutter Type: A global shutter, which exposes the entire sensor at once, is vastly superior for capturing motion without distortion. However, these sensors are significantly more expensive. Most budget-friendly camera modules use a rolling shutter, which scans the image line by line, causing a "jello" effect or skew with fast motion. Given our budget, we will likely have to accept a rolling shutter and mitigate its effects in software or through system design where possible.
- Field of View (FoV): A wider FoV (ideally >100°) is beneficial for an obstacle detection system as it allows the glasses to "see" more of the periphery. The stock lenses on many cheap modules have a narrow FoV (~65°), so seeking out wide-angle variants is an important consideration.
- Interface: This is a hard-technical constraint. The camera module must have a physical and logical interface compatible with the ESP32-S3. The ESP32 family has strong support for the DVP (Digital Video Port) parallel camera interface, and can also use the SPI bus, albeit at lower bandwidth. It notably lacks the high-speed MIPI-CSI interface found on platforms like the Raspberry Pi.
The Stereo Challenge on a Microcontroller
Implementing stereo vision adds another layer of complexity. We need to capture synchronized images from two cameras. There are two primary ways to approach this with our ESP32-S3 platform.
1. The Dedicated Stereo Module: These are integrated boards that feature two synchronized image sensors and associated circuitry. They often output a combined side-by-side image or handle the complexity of synchronization internally.
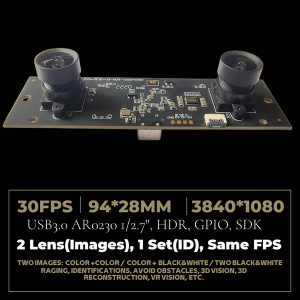
2. The DIY Stereo Rig: This approach involves using two separate, standard camera boards and synchronizing them ourselves. For a microcontroller platform, this often means using two complete MCU+camera boards and coordinating them over a wired or wireless link.

A crucial parameter in either setup is the baseline—the distance between the centers of the two camera lenses.
The Camera Basics for Visual SLAM | Kudan global
Let's return to the Kudan article for a quick look at the importance of the baseline.
Please read the short section Baseline is another important element. Pay attention to the trade-off between long and short baselines.
For our glasses, we'll be mounting the cameras roughly at the width of human eyes (around 6-7cm), which is a good baseline for perceiving depth in the near-to-mid range where obstacles are most relevant. The DIY approach gives us complete control over this parameter.
Evaluating Our Options
Let's analyze the available camera types through the lens of our project's constraints (ESP32-S3 compatibility, stereo vision, and sub-$100 total budget).
Option 1: The Workhorse — Dual ESP32-CAMs
The most common and cost-effective method for adding vision to an ESP32 is the ESP32-CAM board. These boards are incredibly cheap and typically come paired with an OV2640 camera sensor.
ESP32-CAM: The Complete Machine Vision Guide - Blog - Arducam
This guide from Arducam provides a thorough overview of the popular ESP32-CAM board and the ecosystem around its camera, the OV2640.
First, read the quick sum-up and the discussion on the onboard camera's limitations. Note the low cost and the stock lens's narrow FoV. Next, look at the tables showing Arducam's lens and cable options. Finally, scan the list of other compatible sensors. This shows the flexibility of the ESP32's camera driver.
The ESP32-CAM approach, using two boards to form a stereo pair, is highly compelling for several reasons:
- Cost: At ~$7-10 per board, two units are well within our budget.
- Interface: The OV2640 and similar sensors use the parallel interface natively supported by the ESP32.
- Ecosystem: As the Arducam article shows, there's a healthy market for alternative lenses (wide-angle) and longer cables, giving us the physical flexibility needed to build the glasses.
- Sufficiency: The OV2640's 2MP resolution is far more than we need, and it can be configured to output lower-resolution formats (like CIF, VGA, SVGA) at acceptable frame rates for our AI model.
The main challenge, as depicted in the ESP32 Stereoscopic Camera image, is that we'll need to devise a software/firmware strategy to trigger the cameras simultaneously. This is a non-trivial but solvable engineering problem that fits well within the scope of our project.
Option 2: The "AI Camera" Distraction
In recent years, "AI cameras" with onboard processors (NPUs) have become available. These offload the AI workload from the host computer.
This video from DroneBot Workshop clearly explains the concept of an AI camera and compares two popular models. We're interested in the concept and the high-level comparison.
First, watch the conceptual explanation from the beginning to understand how an AI camera differs from a standard one. Then, skip to the final comparison where the host discusses the practical differences, including price.
While fascinating, these cameras are not a fit for our project for three main reasons:
- Interface Incompatibility: Most of these cameras, like the Raspberry Pi AI Camera, use a MIPI-CSI interface, which our ESP32-S3 lacks. Others, like the Arducam PINSIGHT, use USB, which would require the ESP32-S3 to act as a USB host—a complex task that adds significant software overhead.
- Prohibitive Cost: With prices starting around $70, a single AI camera would consume most of our project's entire budget, and we need two for stereo vision.
- Architectural Redundancy: We specifically chose the ESP32-S3 for its integrated AI acceleration. Using an AI camera would make this key feature of our microcontroller redundant. It's more efficient to use a "dumb" camera and leverage the "smart" processor we already have.
The Megapixel Myth
It is tempting to be drawn to cameras advertising massive resolution. However, as we've discussed, this is counterproductive for our needs. Let's drive this point home.
In this video, Jeff Geerling reviews a 64-megapixel camera for the Raspberry Pi. While the review is for a different platform, his core argument about image quality is universally applicable.
Please watch the segment from this timestamp. He makes an excellent point about why megapixel count in isolation is a meaningless metric and that the entire system pipeline determines the final image quality.
Geerling's point is fundamental to engineering trade-offs. The quality of a vision system is not defined by a single specification but by the synergy of its components—lens, sensor, and the processing unit. For our project, the pipeline is bottlenecked by the ESP32-S3's compute capability, not the camera's megapixel count. A low-resolution sensor with a decent lens is far more valuable to us than a high-resolution sensor whose data we cannot process in real time.
Conclusion and Decision
After evaluating the criteria and available options, the path forward becomes clear. The high cost and interface incompatibility of dedicated stereo modules and AI cameras rule them out. The most practical, flexible, and budget-conscious approach is to build a DIY stereo rig using two ESP32-CAM boards, likely equipped with OV2640 sensors.
Key Takeaways:
- Camera selection for embedded AI is a game of "good enough." We need a sensor that provides adequate data for the model, not the highest specifications possible.
- The primary constraints are the interface compatibility with the host processor (ESP32-S3's DVP/SPI) and the processor's ability to handle the data stream in real-time.
- For our project, a dual ESP32-CAM setup provides an unbeatable combination of low cost, hardware flexibility (custom baseline, lens options), and sufficient performance for our obstacle detection goal. The main challenge will be software-based frame synchronization, which we will tackle in a later module.
In our next lesson, we will address the final component of our core hardware selection: the power system. Having chosen our compute and vision components, we can now calculate their power requirements and select a suitable battery to make our smart glasses truly portable.