Introduction
Welcome back! In our last lesson, you created parsers to transform raw source code and commit logs into structured data—specifically, a JSON file of function definitions and a CSV of classified commits. You've successfully implemented the "Fetch" and "Parse" stages of our data pipeline, giving us a solid, versioned foundation of processed data.
Today, we're tackling the third and final data preparation stage: Preprocess. Our learning outcome is to build a preprocessing pipeline that transforms your parsed data into a model-ready feature set. Machine learning models, particularly those in scikit-learn, require numerical input. Our current data, with its mix of text (commit_type), numbers (code_churn), and booleans, isn't quite ready.
We will use scikit-learn's powerful Pipeline and ColumnTransformer objects to build a robust, repeatable, and production-ready workflow. This is a crucial skill for moving from exploratory notebooks to building reliable ML systems. By the end of this lesson, you will have a script that takes your parsed data and outputs a numerical feature matrix, ready for training a model.
Why Use a Preprocessing Pipeline?
Before we start coding, let's understand the "why." You've likely performed preprocessing steps before—imputing missing values, scaling numerical features, or one-hot encoding categorical ones. However, doing these steps manually can lead to several problems:
- Data Leakage: You might accidentally fit a scaler on your entire dataset before splitting it, allowing information from the test set to "leak" into the training process. This leads to an overly optimistic evaluation of your model's performance.
- Repetitive Code: You have to apply the exact same steps to your training, validation, and test sets, and then again in production. This is error-prone.
- Complexity: As the number of preprocessing steps grows, the code becomes harder to manage and debug.
scikit-learn pipelines solve these problems by encapsulating your entire workflow into a single object. Let's get familiar with the key components.
How to Improve Machine Learning Code Quality with Scikit-learn
This article from freeCodeCamp provides a clear introduction to the two main tools we'll use: Pipeline and ColumnTransformer. It explains how they work together to create a streamlined workflow.
Please read the first three sections: 'What is the Scikit-learn Pipeline?', 'What is the Scikit-learn ColumnTransformer?', and 'What's the Difference between the Pipeline and ColumnTransformer?'. Focus on understanding that a Pipeline chains steps sequentially, while a ColumnTransformer applies different steps to different columns in parallel.
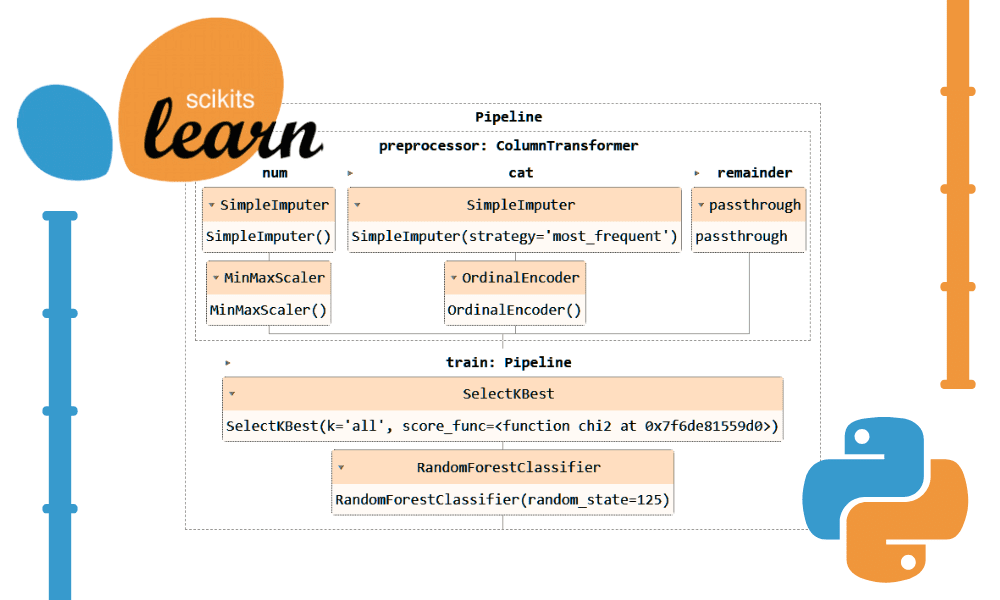
In short, we will use a ColumnTransformer to define how to handle our numerical and categorical columns separately. Then, we can place this ColumnTransformer inside a larger Pipeline that might include a model as the final step.
This diagram gives a great high-level view of what a complete pipeline can look like.
Building the Preprocessing Pipeline
Let's get practical and build a script that embodies this concept. We'll create a preprocess.py script that reads some of the data we've been working with, engineers a few features, and then uses a ColumnTransformer to prepare it for a model.
For this exercise, we'll imagine we're building a model to predict if a commit is a bug fix. We'll use the commits_classified.csv file you created in the last lesson and engineer some additional features from it.
Part 1: Feature Engineering with Pandas
First, we need a dataset with a mix of feature types. Let's write a function that takes our raw commit DataFrame and engineers some new columns. This process is a great example of transforming parsed data into features.
Analyzing Your Git Commit Patterns with Python & Scikit-learn
This article provides an excellent, self-contained example of creating features from raw commit data using Pandas. We will use similar logic to prepare our DataFrame before feeding it into the scikit-learn pipeline.
Read 'Step 2: Feature Engineering with Pandas'. Pay attention to how the create_features function uses Pandas to transform the raw data into meaningful inputs like hour, day_of_week, and commits_on_day. We will write a similar function.
Part 2: Your Task: Create the preprocess.py Script
Now, let's combine feature engineering with a scikit-learn pipeline.
-
Create the Script:
In yoursrc/directory, create a new file namedpreprocess.py. -
Add the Code:
Paste the following code intosrc/preprocess.py. Read through the comments carefully to understand what each part does.import pandas as pd import numpy as np import joblib import sys from sklearn.compose import ColumnTransformer from sklearn.impute import SimpleImputer from sklearn.pipeline import Pipeline from sklearn.preprocessing import StandardScaler, OneHotEncoder def engineer_features(df): """ Engineers features from the parsed commit data. Args: df (pd.DataFrame): DataFrame with parsed commit info. Returns: pd.DataFrame: DataFrame with engineered features and a target variable. """ # Ensure 'date' column is in datetime format df['date'] = pd.to_datetime(df['date'], utc=True) # Feature 1: Message length df['msg_len'] = df['msg'].str.len() # Feature 2: Day of the week df['day_of_week'] = df['date'].dt.dayofweek # Monday=0, Sunday=6 # Feature 3: Is it a weekend? df['is_weekend'] = df['day_of_week'].isin([5, 6]).astype(int) # Target Variable: Is this a bugfix? df['is_bugfix'] = (df['commit_type'] == 'bugfix').astype(int) # Select features and target features = [ 'msg_len', 'day_of_week', 'is_weekend', 'commit_type' # Keep the original for encoding ] target = 'is_bugfix' # Drop rows where essential data might be missing df.dropna(subset=features + [target], inplace=True) return df[features], df[target] if __name__ == "__main__": if len(sys.argv) != 4: print("Usage: python src/preprocess.py <input_csv> <output_features_path> <output_pipeline_path>") sys.exit(1) input_file = sys.argv[1] output_features_file = sys.argv[2] output_pipeline_file = sys.argv[3] print("1. Loading and engineering features...") df = pd.read_csv(input_file) X, y = engineer_features(df) # Define which columns are which type numeric_features = ['msg_len', 'day_of_week', 'is_weekend'] categorical_features = ['commit_type'] print("2. Defining preprocessing pipelines...") # Create a pipeline for numeric features: impute missing values then scale. numeric_transformer = Pipeline(steps=[ ('imputer', SimpleImputer(strategy='median')), ('scaler', StandardScaler()) ]) # Create a pipeline for categorical features: impute then one-hot encode. categorical_transformer = Pipeline(steps=[ ('imputer', SimpleImputer(strategy='most_frequent')), ('onehot', OneHotEncoder(handle_unknown='ignore')) ]) # Combine preprocessing steps with a ColumnTransformer preprocessor = ColumnTransformer( transformers=[ ('num', numeric_transformer, numeric_features), ('cat', categorical_transformer, categorical_features) ], remainder='passthrough' # Keep other columns if any (none in this case) ) print("3. Fitting the preprocessing pipeline...") # For this script, we fit on all available data. # In the next lesson, we'll integrate this into a train-test split. X_processed = preprocessor.fit_transform(X) print(f" - Original features shape: {X.shape}") print(f" - Processed features shape: {X_processed.shape}") print(f"4. Saving processed data and pipeline object...") # Save the processed features and target np.savez(output_features_file, features=X_processed, target=y.to_numpy()) # Save the fitted preprocessor object for later use joblib.dump(preprocessor, output_pipeline_file) print(f"\nPreprocessing complete.") print(f" - Processed data saved to: {output_features_file}.npz") print(f" - Fitted pipeline saved to: {output_pipeline_file}")
Part 3: Running and Understanding the Script
Now, let's execute the script and see what it does.
-
Run from the Command Line:
Execute the script from your project's root directory. We'll usedata/processed/commits_classified.csvas input and save the outputs to a newdata/features/directory (you may need to create this).python src/preprocess.py data/processed/commits_classified.csv data/features/commit_features.npz data/features/preprocessor.joblib -
Analyze the Output:
You will see two new files indata/features/:commit_features.npz: A compressed NumPy file containing your model-ready numerical feature matrix (X_processed) and the corresponding target vector (y).preprocessor.joblib: This is your fitted pipeline object. It has learned the median and standard deviation for your numerical columns and the unique categories for your categorical columns. This object is critical because you will use it to apply the exact same transformation to any new data before making a prediction.
This process of creating and saving a reusable pipeline object is the essence of building a production-ready ML system. The freecodecamp article provides a great walkthrough of the full sequence, from defining transformations to fitting the final pipeline and saving it.
How to Improve Machine Learning Code Quality with Scikit-learn
To see the complete pattern we just implemented, let's refer back to the freecodecamp article. It walks through a similar example from start to finish.
Review the coding sections starting from 'How to Create a Pipeline' up to 'Pass Data through the Pipeline'. Notice the structure: define column sets, create pipelines for each set, combine them with ColumnTransformer, add a model (which we'll do next lesson), and finally fit the pipeline. Our script follows this exact pattern for the preprocessing part.
Extending with Custom Transformers
What if you need a preprocessing step that scikit-learn doesn't provide out-of-the-box? For example, what if you wanted to create a feature based on the number of arguments in a function, using the frame_functions.json file you created in the previous lesson?
You can create your own transformers by making a class that inherits from scikit-learn's base classes. This makes your custom logic fully compatible with the Pipeline framework.
How to Improve Machine Learning Code Quality with Scikit-learn
The scikit-learn pipeline is highly extensible. This final reading shows you how to create your own custom transformation class, which is an advanced but extremely useful technique.
Read the section 'How to Add a Custom Transformation'. Focus on the structure of the Encode class: it inherits from TransformerMixin and has __init__, fit, and transform methods. Understanding this pattern allows you to integrate any custom Python code into your ML pipelines.
Conclusion
Excellent work today! You have now implemented the "Preprocess" stage of our ML pipeline, which is often the most complex part of the data preparation workflow. You've gone from structured, mixed-type data to a fully numerical, model-ready feature set.
Key Takeaways:
- Preprocessing Pipelines are essential for creating robust, repeatable, and leak-proof ML workflows.
ColumnTransformeris the key to applying different transformations (e.g., scaling, encoding) to different columns of your data.- The workflow involves defining transformers for numerical and categorical data, combining them into a preprocessor object, and then fitting it to your data.
- Crucially, you must save the fitted pipeline object (
preprocessor.joblib) so you can apply the exact same data transformation to new data in the future.
Preview of the Next Lesson:
The data is now ready. In our next lesson, we will finally bring everything together to train and validate your model on the prepared dataset. We will load the commit_features.npz and preprocessor.joblib files, split the data, train a classifier like RandomForest, and evaluate its performance. You are now just one step away from having a complete, end-to-end "Fetch -> Parse -> Preprocess -> Train" pipeline.