Introduction
Welcome to the implementation phase of your project! In the previous module, you did the essential work of a project architect: you defined your MVP scope, sketched the end-to-end pipeline, and, most importantly, set clear, measurable success criteria. That blueprint will now guide us as we start building.
This lesson marks our first major step into writing code for the project. We'll be tackling the very first block in your pipeline diagram: obtaining the raw data. The learning outcome for this lesson is to create a script to fetch and version the primary raw data source for your chosen project.
Whether your project is Flake Detection, Technical Debt Prioritization, or Test Case Generation, the raw data—commit histories, test execution logs, or the source code itself—originates from a software repository. Our focus today will be on programmatically extracting this data from a Git repository and establishing a robust system to version it, setting a solid foundation for the rest of your MLOps pipeline.
Part 1: Fetching Raw Data from Git Repositories
Your first task is to get the data out of a Git repository. While you could use Git commands in a shell script or interact directly with the GitHub API, a more powerful and Python-native approach is to use a library designed for mining software repositories.
For this, we will use PyDriller. It's a Python framework that simplifies the process of analyzing Git repositories by providing an easy-to-use API to access commits, diffs, and file changes.
[PDF] Developing a git Repository Mining Tool
To understand the role and power of PyDriller, let's read a brief section from a thesis that developed a repository mining tool using it. This will show you how simple it is to get started.
Please read section '2.2.1 PyDriller' (page 9). Focus on the core idea: PyDriller provides an easy interface for mining Git data, and the code snippet shows how to traverse all commits in a repository in just a few lines.
As you saw, PyDriller handles the complexity of either cloning a remote repository or reading a local one, allowing you to iterate through commits as simple Python objects.
Your First Fetching Script
Let's write a script that fetches the commit history from a public repository and saves it into a commits.csv file. This script will serve as the first component of your data pipeline. Given your experience with Pandas, we will use it to structure the data cleanly.
Here is a starter script. Create a file named fetch_data.py:
import pandas as pd
from pydriller import Repository


# --- Configuration ---
# Use a well-known public repo for this example.
# You can change this to any other public repo URL.
REPO_URL = "https://github.com/pandas-dev/pandas.git"
OUTPUT_FILE = "commits.csv"


# ---------------------

def fetch_commit_data(repo_url):
    """
    Fetches commit history from a Git repository and returns it as a list of dicts.
    """
    print(f"Fetching commits from {repo_url}...")


    # Using PyDriller to mine the repository
    repo_miner = Repository(repo_url)

    commit_list = []
    for commit in repo_miner.traverse_commits():
        commit_data = {
            "hash": commit.hash,
            "msg": commit.msg,
            "author_name": commit.author.name,
            "author_email": commit.author.email,
            "author_date": commit.author_date,
            "committer_name": commit.committer.name,
            "committer_email": commit.committer.email,
            "committer_date": commit.committer_date,
            "files_changed": len(commit.modified_files),
        }
        commit_list.append(commit_data)


        # Optional: Print progress for large repos
        if len(commit_list) % 1000 == 0:
            print(f"  ...processed {len(commit_list)} commits")

    print(f"Total commits fetched: {len(commit_list)}")
    return commit_list

if __name__ == "__main__":


    # Fetch the data
    all_commits = fetch_commit_data(REPO_URL)


    # Convert to a Pandas DataFrame
    df = pd.DataFrame(all_commits)


    # Ensure datetime format for date columns
    df['author_date'] = pd.to_datetime(df['author_date'])
    df['committer_date'] = pd.to_datetime(df['committer_date'])


    # Save the data to a CSV file
    df.to_csv(OUTPUT_FILE, index=False)

    print(f"\nSuccessfully saved {len(df)} commits to {OUTPUT_FILE}")
    print("\nData preview:")
    print(df.head())
This script provides a solid starting point. PyDriller's Repository object can also be configured to filter commits by date, branch, or file type, which will be useful as you refine your data collection.
Part 2: Versioning Your Data
Now that you have a script that generates a data file (commits.csv), we need to address a critical question: how do you keep track of it? Committing large data files directly to Git is a bad practice; it makes the repository slow and difficult to manage.
The standard solution in MLOps is to use a Data Version Control (DVC) tool. DVC works alongside Git to version your data and models without checking the large files themselves into your Git history.
This diagram illustrates the concept perfectly:

So, how does this work in practice? The process is straightforward and mirrors the Git commands you already know.
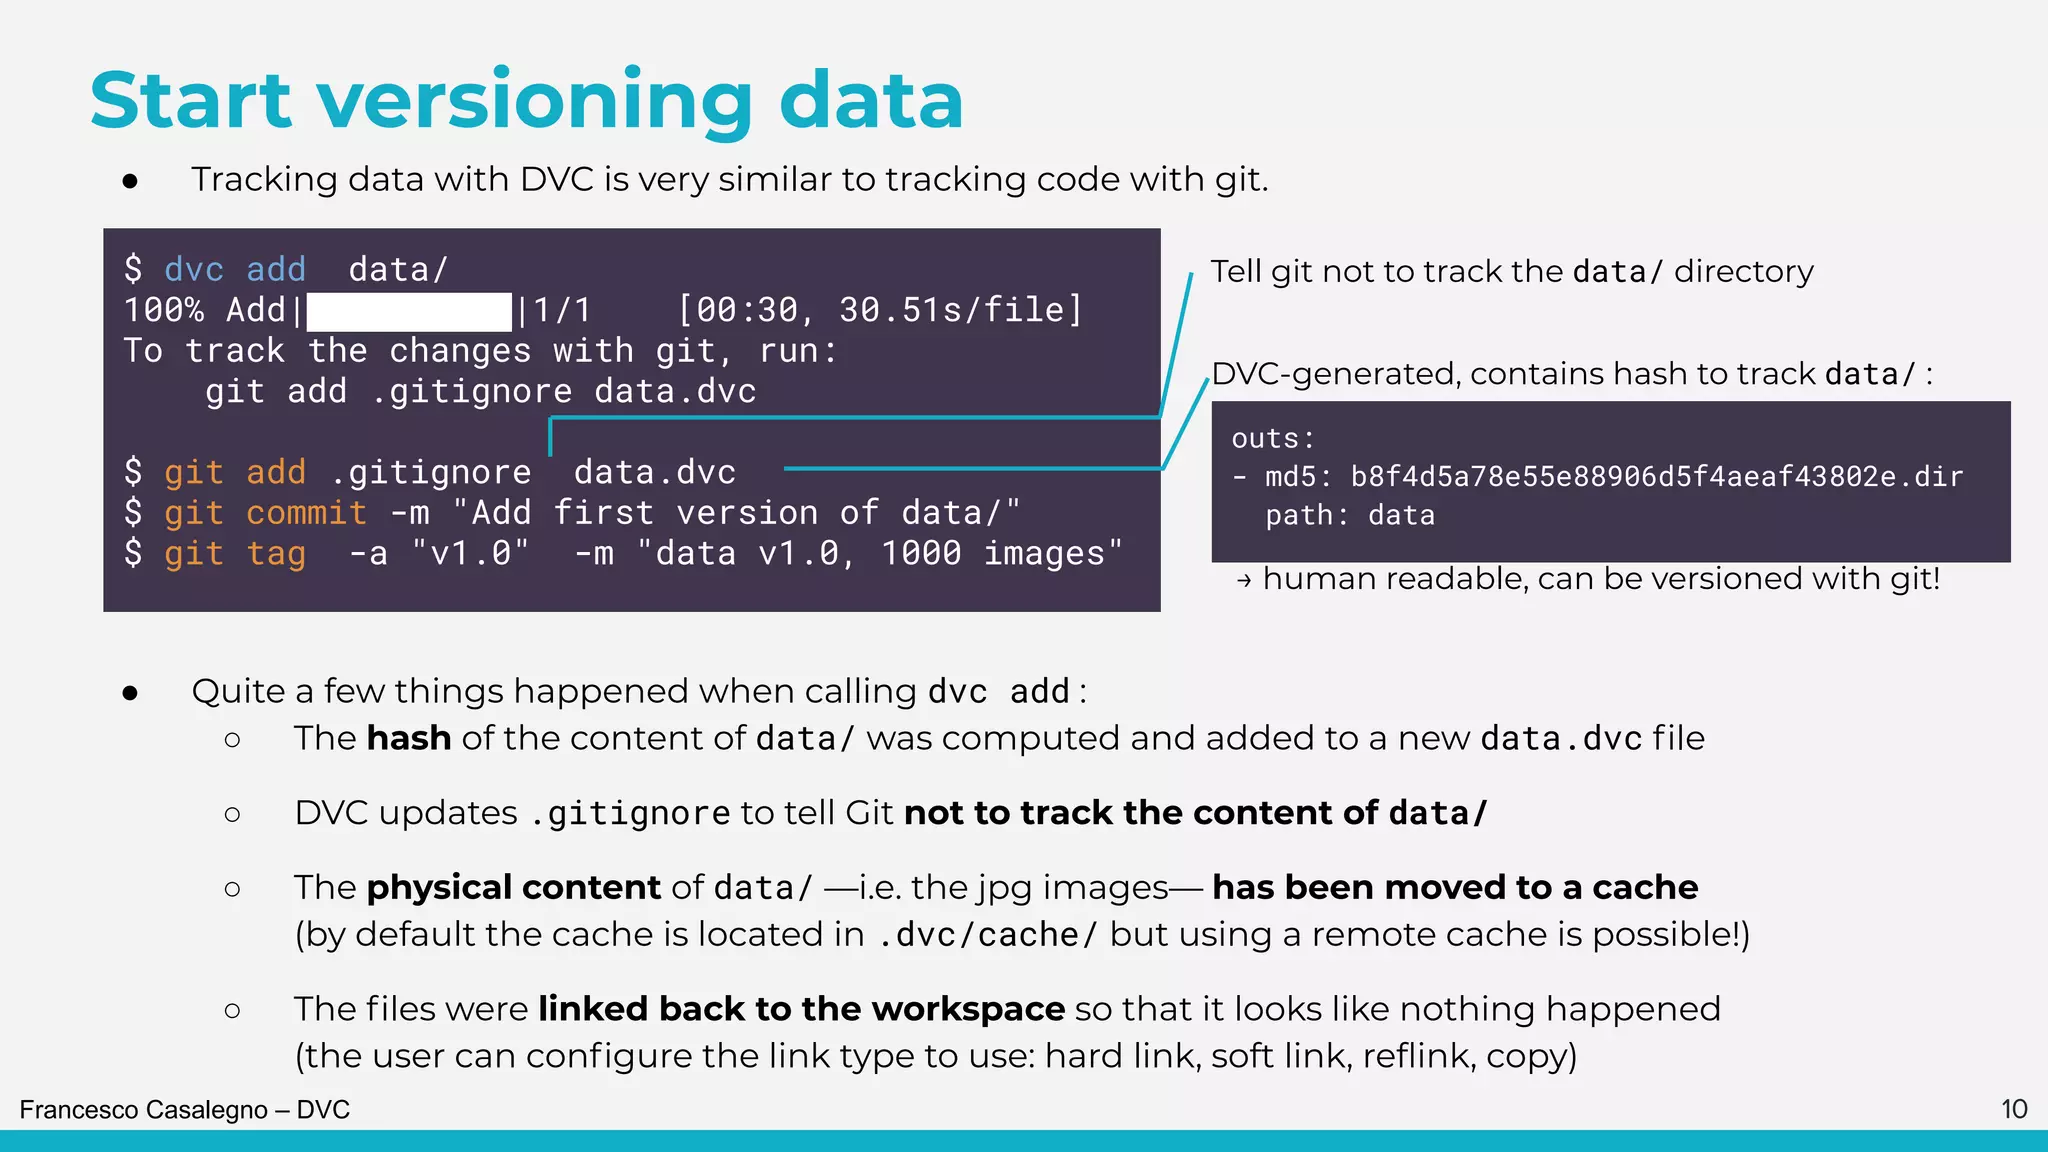
Setting up DVC in Your Project
Let's walk through the steps to version the commits.csv file you just created.
Step 1: Install DVC
If you haven't already, install DVC using pip. It's best to do this in your project's virtual environment.
pip install dvc
Step 2: Initialize DVC in Your Git Repository
Navigate to your project's root directory in your terminal (where your .git folder is) and run:
dvc init
This command creates the necessary DVC infrastructure (.dvc directory) and configures your Git repository to work with it. You'll see it creates a few files; you should commit these to Git.
Step 3: Track Your Data File
First, run your fetch_data.py script to generate the commits.csv file. Once it exists, tell DVC to start tracking it:
dvc add commits.csv
This command does three things:
- Adds
commits.csvto your.gitignorefile. - Moves the content of
commits.csvinto DVC's cache. - Creates a small pointer file named
commits.csv.dvc. This file contains the hash of the data and acts as a placeholder.
Step 4: Commit to Git
The final step is to commit the changes to Git. Notice that you are not committing the large commits.csv file. Instead, you're committing the small pointer file that DVC created.
git add commits.csv.dvc .gitignore
git commit -m "feat: Add and version initial commit data"
Now, anyone who clones your repository can run dvc pull to retrieve the exact version of commits.csv that you used, ensuring full reproducibility.
Your Task: Build the Foundation
It's time to put these pieces together and create the foundation for your project.
- Create a Project Structure:
- Create a new directory for your project.
- Initialize a Git repository in it (
git init).
- Implement the Fetch Script:
- Save the
fetch_data.pyscript from this lesson into your project directory. - For your project, you might want to analyze a different repository. Feel free to change the
REPO_URLto a repository that interests you (e.g.,scikit-learn/scikit-learn,pallets/flask). - Run the script to generate your
commits.csvfile. Be patient, as cloning and analyzing a large repository can take several minutes.
- Save the
- Version the Data:
- Install
dvcif you haven't already. - Initialize DVC in your repository (
dvc init). Commit the new DVC files. - Use
dvc addto track yourcommits.csvfile. - Commit the resulting
.dvcfile to Git.
- Install
By the end of this task, you will have a Git repository containing a Python script and a DVC-tracked data file—a reproducible starting point for your ML pipeline.
Conclusion
Excellent work today! You have successfully taken the first and most critical step in building your ML tool. You've moved from planning to execution by creating a script to fetch your primary raw data and, crucially, establishing a professional workflow to version that data.
Key Takeaways:
- PyDriller is a powerful Python library that dramatically simplifies the process of mining data from Git repositories.
- DVC (Data Version Control) is the industry-standard tool for versioning large data files and models in a way that integrates seamlessly with Git.
- The standard MLOps workflow for raw data is to (1) write a script to fetch it, (2) use
dvc addto version the resulting data artifact, and (3) commit the script and the DVC pointer file to Git.
Preview of the Next Lesson:
With your raw data fetched and versioned, the next step in your pipeline diagram is to make sense of it. In the next lesson, we will implement parsing logic to extract relevant information from the raw data. We will take the commits.csv file you created today and begin transforming it into the structured features needed to train your model.