Introduction
Welcome to the final lesson of this module! In our last session, you took a significant step towards productionizing your model by creating build_pipeline.py. This script bundled your preprocessor and classifier into a single scikit-learn Pipeline and persisted this entire object as bugfix_pipeline.joblib. This self-contained artifact is the key to making your model usable outside of your training environment.
Today, we'll complete the cycle by putting that artifact to work. The learning outcome for this lesson is to implement a prediction function or class that encapsulates the full inference pipeline. We will create a script that loads your saved pipeline and uses it to make predictions on new, unseen data. This is the core logic that will eventually power your final tool, whether it's a command-line interface or a web API.
Part 1: From Training to Inference
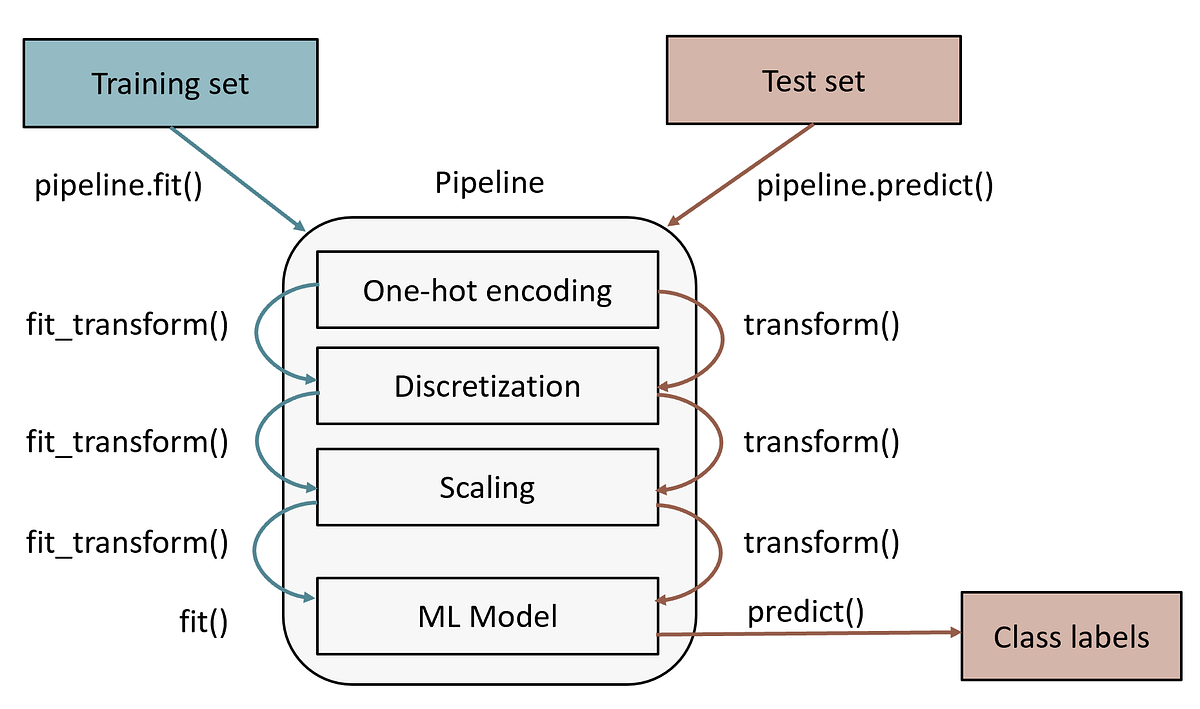
When you trained your pipeline, you used the .fit() method. This method learns from the data by first calling .fit_transform() on the preprocessing steps and then passing the result to the model's .fit() method.
For inference—the process of making predictions on new data—the pipeline behaves differently. When you call .predict(), it only applies the .transform() method of the preprocessors (using the parameters learned during training) before passing the result to the model's .predict() method.
The beauty of the scikit-learn Pipeline object is that it manages this distinction for you. You don't need to manually keep track of which method to call; the pipeline handles the correct sequence of operations for both training and inference.
Part 2: Implementing the Inference Script
Let's start by creating a script to perform inference. This script will load the bugfix_pipeline.joblib artifact and use it to predict whether new, unseen commits are bug fixes.
Your Task: Create predict.py
Your main task is to create a new script, src/predict.py, that loads the pipeline and makes predictions on new data. To simulate "new data," you can create a small CSV file.
-
Create a Sample Data File: Create a file named
data/unseen/new_commits.csvwith the same headers as your original dataset. Add a few mock commit messages. Make sure one looks like a bug fix and another doesn't, so you can sanity-check the output.data/unseen/new_commits.csvExample:commit_hash,commit_author,commit_date,commit_message,is_bugfix abc123,test-user,2024-08-01T12:00:00Z,"Fix: Corrected a null pointer exception in the login module.", def456,test-user,2024-08-01T13:00:00Z,"Feat: Added new caching layer for performance improvement.",(Note: The
is_bugfixcolumn can be left empty or omitted for the input data, as it's the target we are predicting). -
Write the
predict.pyScript: In yoursrc/directory, createpredict.py. This script should:- Accept the pipeline path and input data path as command-line arguments.
- Load the pipeline using
joblib. - Load the new data using
pandas. - Use the pipeline's
.predict()and.predict_proba()methods on the new data. - Print the results in a readable format.
Here is the code for
src/predict.py. Add it to your project.import pandas as pd import joblib import sys def main(): """ Main function to run the prediction script. """ if len(sys.argv) != 3: print("Usage: python src/predict.py <pipeline_path> <input_data_path>") sys.exit(1) pipeline_path = sys.argv[1] input_data_path = sys.argv[2] print("1. Loading pipeline and input data...") try: # Load the entire pipeline object pipeline = joblib.load(pipeline_path) # Load the new data for prediction input_df = pd.read_csv(input_data_path, parse_dates=['commit_date']) except FileNotFoundError as e: print(f"Error loading file: {e}") sys.exit(1) print("2. Making predictions...") # The pipeline handles all preprocessing and prediction steps predictions = pipeline.predict(input_df) probabilities = pipeline.predict_proba(input_df) print("3. Displaying results...") # Add predictions and probabilities to the DataFrame for easy viewing input_df['is_bugfix_prediction'] = predictions input_df['bugfix_probability'] = probabilities[:, 1] # Probability of the 'True' class print("\nPrediction Results:") print(input_df[['commit_message', 'is_bugfix_prediction', 'bugfix_probability']].to_string()) if __name__ == "__main__": main() -
Run the Script: Execute it from your project's root directory.
# Ensure the unseen data directory exists
mkdir -p data/unseen


# (Make sure you've created new_commits.csv inside data/unseen/)


# Run the prediction script
python src/predict.py artifacts/bugfix_pipeline.joblib data/unseen/new_commits.csv
You should see an output that shows each commit message along with its predicted label (True/False) and the model's confidence (probability).
Part 3: Encapsulating the Inference Logic
The script works well, but for reuse in other parts of an application (like a CLI or an API), it's better to encapsulate the core logic into a function. This makes the code more modular, testable, and easier to integrate.
A well-designed prediction function should ideally take raw data in a simple format (like a dictionary or a string) and return a prediction. Our Pipeline makes this straightforward.
Notice that the main function in our script already acts as a wrapper. The key lines are:pipeline = joblib.load(pipeline_path)predictions = pipeline.predict(input_df)
In a real application, you would load the pipeline once when the application starts and then call the prediction logic many times. This is far more efficient than loading the model from disk for every single prediction.
Let's look at a guide that reinforces why using scikit-learn Pipeline is so powerful for deployment.
A Comprehensive Guide For scikit-learn Pipelines
The article 'A Comprehensive Guide For scikit-learn Pipelines' by Mahmoud Yusof explains the practical benefits of this approach. While you've already implemented most of this, reviewing it will solidify your understanding of why this is a best practice.
Please read the sections 'Adding the model to the pipeline' and 'Saving and Loading Pipelines'. These sections show how to combine the preprocessor and model, and then how to persist and load the complete object with joblib. This mirrors exactly what you've done in the last two lessons and confirms you're on the right track for building a deployable model.
Part 4: The "All-in-One" Model and Preparing for Deployment
What you have created with bugfix_pipeline.joblib is effectively an "all-in-one" model. It's a single file that contains not just the trained algorithm, but also all the necessary preprocessing logic. This is a modern, robust approach to packaging models for inference.
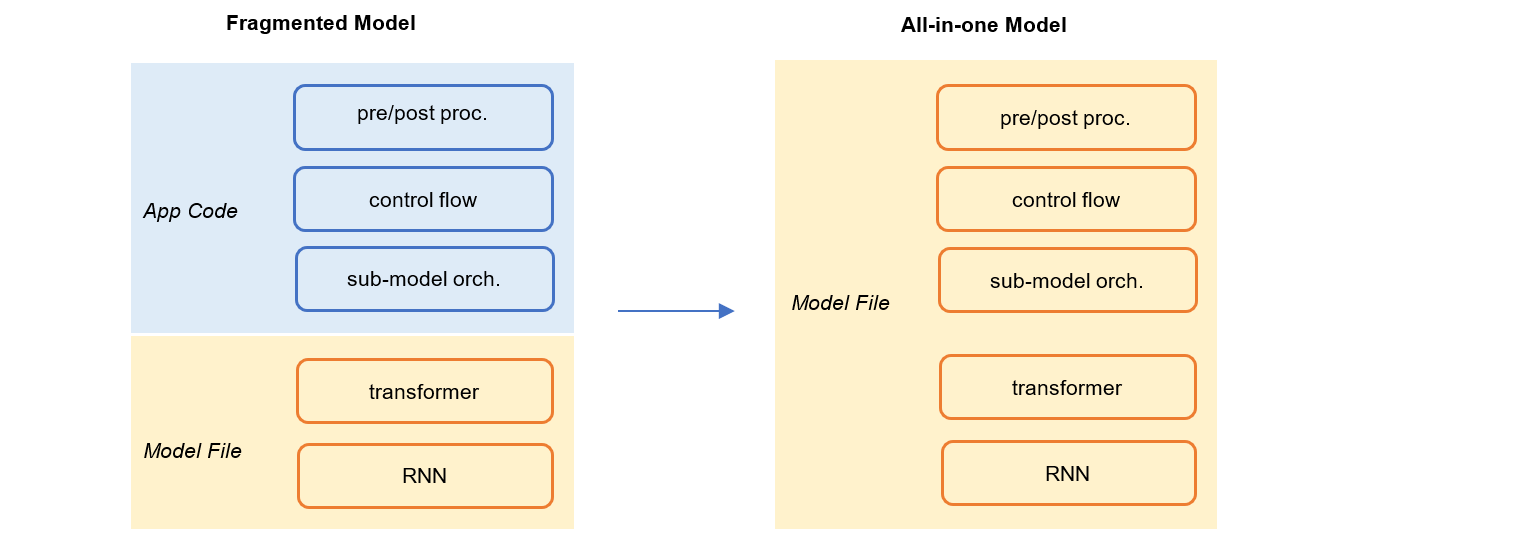
Your encapsulated prediction logic is now ready to be served. The next step in "shipping" your project is to expose this functionality to an end-user. Two common ways are:
- A Command-Line Interface (CLI): A tool the user runs from their terminal.
- A REST API: A web service that other applications can call over the network.
The following article gives a great overview of the full journey from a notebook to a deployed API. We won't read it all, but I want you to see how your work fits into the bigger picture.
How to build production-ready ML Systems - From Jupyter to AWS
The article 'How to build production-ready ML Systems' provides an end-to-end view of deploying a model. We'll focus on the parts that are immediately relevant to our next steps.
Please read the section 'Phase 5: Modularise pipelines' to understand the importance of turning notebook code into reusable Python scripts, which you've already started. Then, skim 'Phase 7: Deploy (AWS) & Serve (FastAPI)' and pay close attention to the subsection '7.1 FastAPI Endpoint'. Notice the @app.get('/predict') endpoint—this is where a function like the one we've just built would live in a web service.
The /predict endpoint mentioned in the article is the ultimate destination for our inference logic. It would load the bugfix_pipeline.joblib file and use it to serve predictions in real-time.
Conclusion
Congratulations on completing this module! You've successfully built an end-to-end machine learning pipeline. You can now take raw data, process it, train a model, persist the entire workflow into a single artifact, and use that artifact to make predictions on new data.
Key Takeaways:
- An inference script's primary job is to load a persisted model and call its
.predict()method on new data. - Your
scikit-learnPipelineartifact automatically handles the correct sequence oftransformandpredictoperations. - Encapsulating inference logic into a function or class is a critical step for creating modular, reusable, and testable code.
- This encapsulated prediction function is the core component you will deploy, whether in a CLI or an API.
Preview of the Next Module:
You've built the engine; now it's time to build the car around it. In the next module, "Deployment: Shipping Your Tool," we will start by taking the predict.py script's logic and wrapping it in a polished command-line interface. This will make your tool directly usable by anyone from their terminal, marking your first major step in "shipping" a real product.