Hello! Welcome back to our module on "Data Collection: Mining Software Repositories."
In our last lesson, we built a script to extract commit history and code churn metrics from a Git repository using GitPython. This gave us valuable metadata about which files are changing and how often. However, to truly understand the quality of the software, we need to look inside those files.
Today, we'll do just that. Our learning outcome is to parse Python source code into Abstract Syntax Trees (AST) using the ast module. This powerful technique allows us to convert raw source code into a structured format that we can programmatically analyze. It's the foundation for calculating code complexity, identifying anti-patterns, and gathering the deep insights needed for your technical debt and flaky test detection projects.
What is an Abstract Syntax Tree?
Before we dive into code, let's understand the core concept. An Abstract Syntax Tree (AST) is a tree representation of the syntactic structure of source code. Each node in the tree represents a construct in the code, like a function definition, an if statement, or a mathematical operation.
Think of it like diagramming a sentence in English. The sentence "The quick brown fox jumps" can be broken down into a subject ("fox"), a verb ("jumps"), and adjectives ("quick," "brown"). An AST does the same for code.
For example, a simple line of Python:one_plus_two = 1 + 2
...is not just a string of text to the Python interpreter. It is parsed into a structure like this:

This tree structure is how a program "understands" your code, and by accessing it, so can we. For a more detailed introduction, the following article provides a great overview.
Introduction to Abstract Syntax Trees in Python
To start, let's read a brief introduction to the concept of an AST from the Earthly Blog.
Please read the section 'Understanding AST'. It explains the role of an AST as an intermediate representation of code and how a parser generates it.
Generating an AST in Python
Python's standard library includes the ast module, which makes it incredibly easy to generate an AST from source code. The two main functions you'll use are:
ast.parse(source_code): Takes a string of Python code and returns the root node of its AST.ast.dump(node): Takes an AST node and returns a formatted string describing the tree structure. This is invaluable for inspection and debugging.
The next reading will show you exactly how to use these functions.
Introduction to Abstract Syntax Trees in Python
Let's see this in action. The same Earthly Blog post provides a clear, practical example of parsing code and printing the resulting tree.
Read the section titled 'Generating Code with AST in Python'. Pay close attention to the code snippets demonstrating ast.parse() and ast.dump(). Try running the code yourself to see the output.
After working through that reading, you can see that even a simple print("Hello, " + name + "!") call expands into a detailed tree of Call, BinOp, Constant, and Name nodes.
Dissecting the AST: Nodes and Attributes
The output of ast.dump() can be dense, but it's highly structured. Every element is a specific type of ast node, representing a piece of Python's grammar. Common node types include:
Module: The root of any Python file. Itsbodycontains a list of statements.FunctionDef: A function definition, with attributes likename,args, and abody.ClassDef: A class definition. Your QA background will appreciate that test suites are often classes full of test methods.Assign: An assignment statement (e.g.,x = 10).Call: A function call (e.g.,print('hello')).If: An if-statement, with atestcondition andbodyandorelseblocks.
The image below shows the AST for a simple unittest class, which should look familiar given your experience.
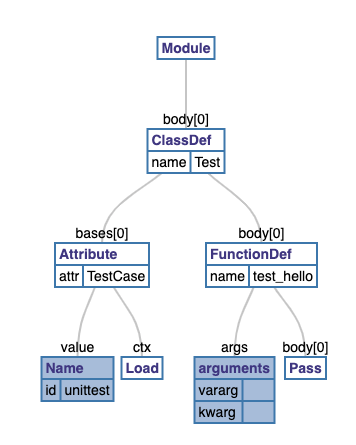
To better understand the relationships between different node types, the following resource provides an excellent, detailed breakdown.
Learn Python ASTs by building your own linter
The DeepSource blog has an in-depth article that breaks down a more complex example and explains the difference between statements and expressions in the context of an AST.
Read the sections 'All the Nodes' and 'Expressions vs. Statements'. Focus on how an if statement is represented and how the article distinguishes between syntax that performs an action (a statement) and syntax that evaluates to a value (an expression).
A Critical Detail: The ctx Attribute
As you looked through the AST examples, you probably noticed ctx=Load() or ctx=Store() attached to Name nodes. This "context" (ctx) is a crucial detail that tells you how a variable is being used.
Load(): The variable's value is being read or accessed (e.g.,print(x)).Store(): The variable is being assigned a new value (e.g.,x = 10).Del(): The variable is being deleted (e.g.,del x).
Understanding the context is essential for any analysis that involves tracking variable usage. The same DeepSource article has a fantastic section dedicated to this.
Learn Python ASTs by building your own linter
Let's clarify what ctx means. This is one of the most important and initially confusing parts of working with ASTs.
Read the section 'What's a ctx?'. It provides clear examples of when Load, Store, and Del contexts are used and why they are necessary.
Practical Application: Building a Simple Code Analyzer
Now, let's put this knowledge to work. We'll build a simple tool that analyzes a Python file and reports the functions defined and modules imported.
To do this, we need to "walk" or "visit" the nodes in the tree. The ast module provides a NodeVisitor class that makes this easy. We can create our own class that inherits from ast.NodeVisitor and define visit_<NodeType> methods for the nodes we care about.
Here is a complete script. Create a new Python file named analyze.py and add this code:
import ast

class CodeAnalyzer(ast.NodeVisitor):
    """
    A NodeVisitor class that walks the AST and collects information
    about function definitions and imported modules.
    """
    def __init__(self):
        self.functions = []
        self.imports = set() # Use a set to automatically handle duplicates

    def visit_FunctionDef(self, node):
        """Called when a FunctionDef node is visited."""
        self.functions.append(node.name)


        # We must call generic_visit to ensure that we visit
        # any nested functions inside this one.
        self.generic_visit(node)

    def visit_Import(self, node):
        """Called when an 'import module' statement is visited."""
        for alias in node.names:
            self.imports.add(alias.name)
        self.generic_visit(node)

    def visit_ImportFrom(self, node):
        """Called when a 'from module import name' statement is visited."""
        if node.module:
            self.imports.add(node.module)
        self.generic_visit(node)

    def report(self):
        """Prints a summary of the analysis."""
        print("--- Analysis Report ---")
        print(f"Functions defined: {self.functions}")
        print(f"Modules imported: {sorted(list(self.imports))}")


# --- Example Usage ---


# Create a dummy Python file to analyze.
# In a real scenario, you would read an existing file.
source_to_analyze = """
import pandas as pd
import numpy as np
from collections import Counter

def process_data(df):


    # A dummy function
    print("Processing data...")
    summary = summarize_column(df['A'])
    return df.dropna()

def summarize_column(series):


    # Another dummy function
    return Counter(series)

class MyClass:
    def __init__(self):
        self.value = 0

    def get_value(self):
        import os # Example of an import inside a function
        return self.value
"""


# 1. Parse the source code into an AST
try:
    tree = ast.parse(source_to_analyze)


    # You can uncomment the next line to see the full AST structure
    # print(ast.dump(tree, indent=4))
except SyntaxError as e:
    print(f"Could not parse the code due to a syntax error: {e}")
    exit()


# 2. Create an instance of our analyzer and visit the tree
analyzer = CodeAnalyzer()
analyzer.visit(tree)


# 3. Print the report
analyzer.report()
Run this script. The output should be:
--- Analysis Report ---
Functions defined: ['process_data', 'summarize_column', 'get_value']
Modules imported: ['collections', 'numpy', 'os', 'pandas']
This simple script demonstrates the core workflow of static analysis: parse, visit, and report. You now have a programmatic way to inspect the structure of any Python code.
Conclusion
In this lesson, we've unlocked a new dimension of code analysis. You've moved beyond file-level metadata and learned how to peer into the code's very structure.
Here are the key takeaways:
- An Abstract Syntax Tree (AST) is a hierarchical representation of source code.
- Python's built-in
astmodule provides the tools to work with them, primarilyast.parse()to create the tree andast.dump()to inspect it. - ASTs are composed of different node types (e.g.,
FunctionDef,Call,Assign) that represent Python's grammar. - The
ctxattribute (Load,Store,Del) is crucial for understanding how variables are being used. - You can systematically analyze a tree by creating a custom class that inherits from
ast.NodeVisitor.
Preview of the Next Lesson:
We now have the foundational skill to extract features from source code. In the next lesson, "Compute code complexity metrics, such as cyclomatic complexity, from an AST," we will build directly on our NodeVisitor. We'll use it to count branching statements (if, for, while) within functions to calculate a concrete and widely-used measure of technical debt.