Introduction
In our last session, we dissected an R Markdown document into its three core components: the YAML header for metadata, the narrative text for your story, and the R code chunks for your analysis. This structure is the foundation for creating reproducible reports. Your goal is to produce high-quality analyses for academic theses and publications, and a crucial part of that is presenting your work in a clear, professional, and well-structured format.
This lesson focuses on the "narrative text" component. We will dive into Markdown, the simple but powerful syntax used to format this text. You will learn how to create headers to structure your document, use emphasis to highlight key points, organize information with lists, and embed links to external resources. Mastering these skills will allow you to transform a plain script into a polished document, ready for an audience.
What is Markdown?
At its core, Markdown is a lightweight markup language designed to be as readable as possible in its raw, plain-text form. Instead of complex tags or formatting buttons, you use simple punctuation characters to indicate how text should be styled. When you "knit" your R Markdown file, these characters are translated into beautifully formatted elements in your final HTML, PDF, or Word document.
This approach has a major advantage for reproducible research: the formatting instructions live right alongside your text and code, making the entire document a self-contained, version-controllable file.
The image below, an excerpt from an R Markdown cheatsheet, gives you a great visual overview of the relationship between Markdown syntax on the left and the rendered output on the right.
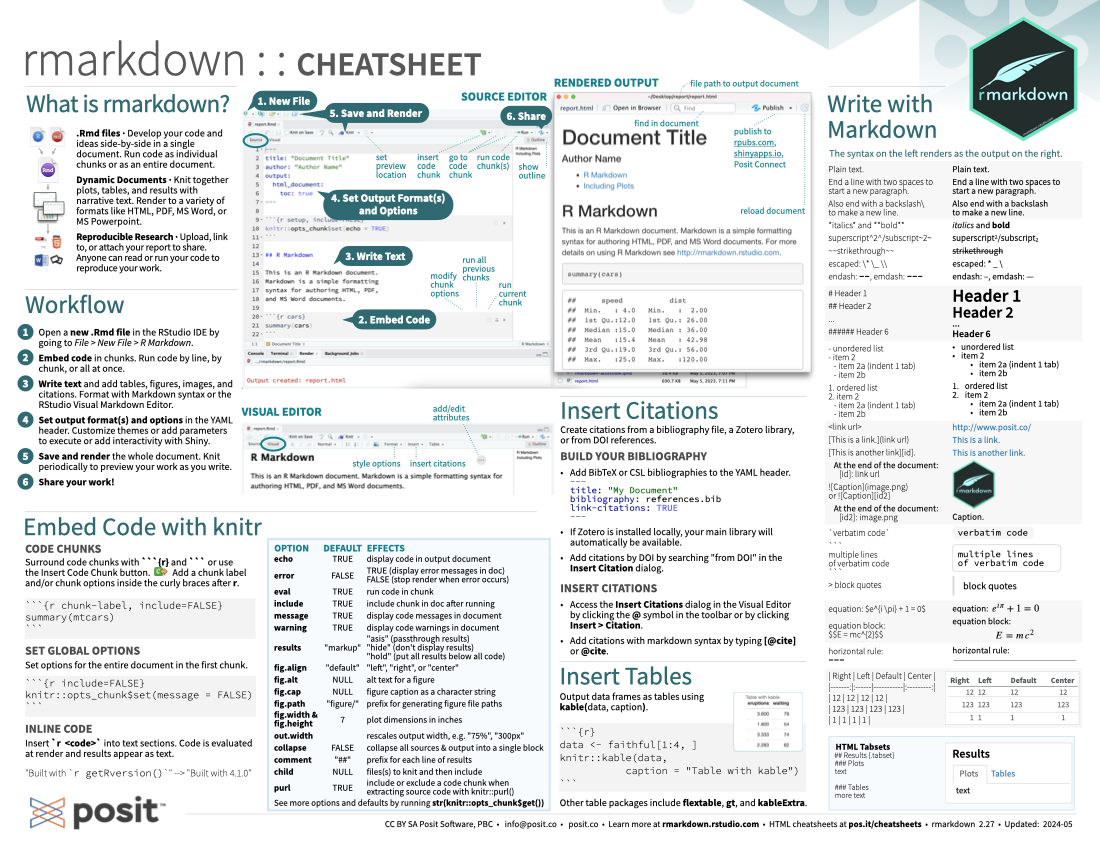
We will now work through the most essential of these formatting tools.
Structuring Your Report: Headers and Emphasis
Just like in a research paper or thesis, a well-structured report uses headings and subheadings to guide the reader through the different sections (e.g., Introduction, Methods, Results, Conclusion). In Markdown, this is achieved using the hash symbol (#).
# Heading 1(typically for a main section title)## Heading 2(for a subsection)### Heading 3(for a sub-subsection)- ...and so on, up to
###### Heading 6.
You can also add emphasis to your text to draw attention to important terms or findings. Surrounding text with single asterisks (*text*) or underscores (_text_) creates italics, while double asterisks (**text**) or underscores (__text__) create bold text.
The following resource, designed for authoring scientific publications, provides an excellent walkthrough of these fundamental syntax rules.
Authoring scientific publications with R Markdown
This guide from The Carpentries provides a practical introduction to Markdown syntax in the context of academic writing. We'll read it in two parts. First, focus on how to structure your document with headers and add emphasis.
Start reading from the section titled "Creating Headings and Subheadings". Read through this part to understand how # symbols are used. Pay attention to the best practices mentioned, such as leaving a space after the #. Then, skip down to the page titled "R Markdown Syntax: Emphasis, Formulas & Footnotes". Read the subsection Adding Emphasis to see how asterisks and underscores are used for italics and bolding.
Organizing Information: Lists, Links, and Images
Beyond structure and emphasis, you'll often need to present information in more specific ways. Lists are perfect for itemizing steps in a methodology or summarizing key findings. Links allow you to reference websites, datasets, or other online resources.
- Unordered (bulleted) lists are created using asterisks (
*), hyphens (-), or plus signs (+) at the beginning of a line. - Ordered (numbered) lists are created by starting a line with a number followed by a period (e.g.,
1.). - Hyperlinks use the syntax
[Text to display](https://www.example.com). - Images use a very similar syntax:
.
The ability to include links is particularly useful for citing sources or pointing to supplementary materials, while images are essential for including figures that weren't generated by R code (like diagrams or photographs).
Let's return to the same guide to see how these elements are created.
Authoring scientific publications with R Markdown
Now let's explore how to create lists and add links to your document.
Go back to the first page, "R Markdown Syntax: Headings & Lists". This time, focus on the section on lists. Note how you can create both bulleted and numbered lists, as well as sub-lists. Next, navigate to the page titled "R Markdown Syntax: Hyperlinks, Images & Tables". Read the sections on creating hyperlinks and inserting images. Notice the similarity in syntax between links and images.
To see all these concepts demonstrated in a live RStudio session, the following video provides a concise walkthrough.
R Markdown TUTORIAL | A powerful tool for LEARNING R (IN 45 MINUTES)
This video from the "R for Ecology" channel provides a practical demonstration of the Markdown syntax we've just discussed.
Watch the segment from this timestamp. The presenter covers headings, bold/italic text, numbered and bulleted lists, and how to create a hyperlink, all within an R Markdown file.
Time to Practice
Now it's your turn to apply what you've learned. This hands-on exercise will help solidify your understanding of Markdown syntax.
- Open RStudio.
- Create a new R Markdown file (
File > New File > R Markdown...). You can leave the title and author as the defaults. - Delete all the default text below the YAML header (the block of text between the
---lines). - In the blank document, type the following content, applying Markdown formatting as described in the comments. Your goal is to make your rendered document look like the target output.
Your Task: Recreate the text below using Markdown in your .Rmd file.
# This should be a level 1 heading: Methods


## This should be a level 2 heading: Data Collection

Data was collected according to the study protocol. The primary objective was to assess the *efficacy and safety* of the new intervention. Our team followed established guidelines to ensure **data integrity**.

Key procedural steps included:
- This should be a bullet point: Obtaining informed consent from all participants.
- This should be a bullet point: Randomizing participants into control and treatment groups.
- This should be a bullet point: Collecting baseline and follow-up measurements.

For more details on the statistical analysis plan, please visit the [Open Science Framework](https://osf.io/).
- Once you've entered and formatted the text, click the Knit button in RStudio to see your formatted HTML output. Compare it with the instructions to see if you matched the formatting correctly.
This simple exercise simulates the process of documenting the methods section of a research paper—a common task in your field of interest.
Conclusion
In this lesson, you've acquired the fundamental skills to format the narrative portion of your R Markdown reports. You now have the tools to create a structured, readable, and professional-looking document directly from RStudio. This is a significant step towards your goal of producing publication-ready analyses.
Key Takeaways:
- Markdown is a simple syntax for formatting plain text within an
.Rmdfile. - Headings (
#,##, etc.) provide structure to your document. - Emphasis (
*italics*,**bold**) helps highlight important information. - Lists (
*or1.) are used to organize items and steps. - Hyperlinks (
[text](url)) allow you to reference external web content.
Preview of the Next Lesson:
So far, we've focused on the narrative. But the real power of R Markdown comes from integrating that narrative with live analysis. In the next lesson, we will explore the final core component: R code chunks. You will learn how to embed R code directly into your report and control its execution and output using essential chunk options like echo and eval.