Introduction
In our last lesson, you mastered the pipe operator (%>%), the "grammar" that allows you to chain data manipulation steps into a clear and readable workflow. Now that you understand how to connect operations, we'll begin learning the core "verbs" of data transformation from the dplyr package.
This lesson focuses on the essential task of managing the columns in your dataset. You will learn how to use select() to choose, remove, and reorder columns, and rename() to give them more intuitive names. These are often the very first steps in any analysis, especially when dealing with complex datasets like those from clinical research, which may contain hundreds of variables. Mastering these two functions will enable you to create focused, tidy datasets that are easier to work with.
1. Selecting Columns You Want with select()
When you import a dataset, it often contains more columns than you need for a specific analysis. The select() function is your primary tool for creating a new data frame containing only the columns you are interested in.
The basic idea is to pipe your data frame into select() and then list the names of the columns you want to keep.
# A conceptual example
my_data %>%
  select(column_A, column_B, column_C)
This takes my_data and returns a new data frame that contains only column_A, column_B, and column_C in that order.
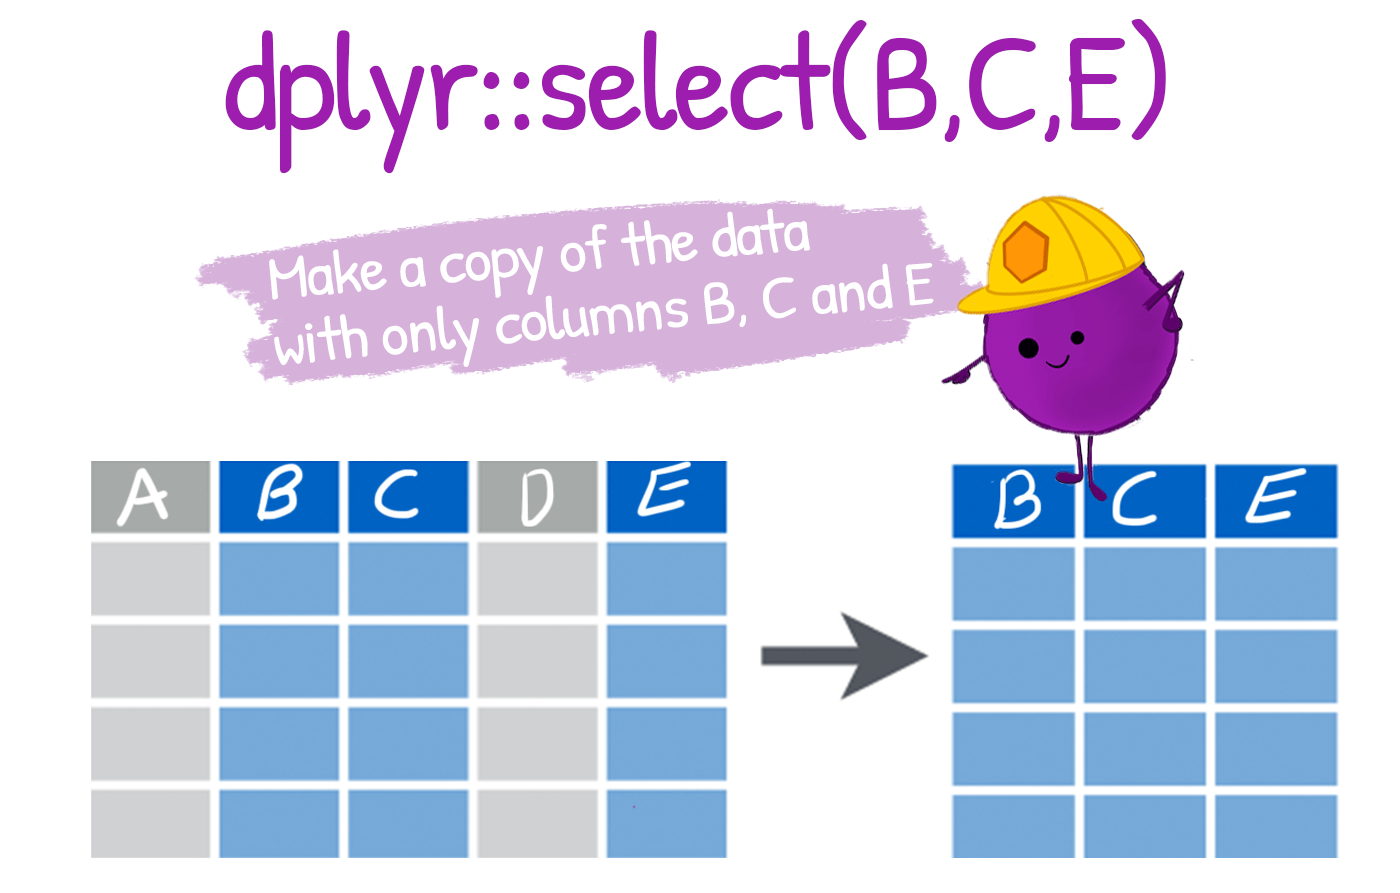
select() is more powerful than just picking columns by name. You can also:
- Select a range of columns: Use the colon (
:) to select all columns between a start and end point (e.g.,column_A:column_D). - Exclude columns: Use the negation operator (
!) to keep all columns except the ones you specify (e.g.,!column_to_remove). You may also see the minus sign (-) used for this in older code, but!is the modern standard.
The following reading, from a book on reproducible medical research, provides excellent examples of these techniques using a dataset relevant to your interests.
This chapter from "Reproducible Medical Research with R" provides a practical guide to column manipulation. The examples use data from the medicaldata package, which we will use later in this lesson.
Please read the following sections: "Selecting a Column Variables": Focus on the general format for using select() with column names, ranges using the colon (:), and excluding columns using the negative sign. Notice the examples like selecting by name and range and negative selection. "Selecting Columns that are Not Contiguous": This section shows how you can mix and match selection styles and even reorder columns on the fly.
2. Powerful Selections with Helper Functions
What if your dataset has 200 columns and you want to select all variables related to "blood pressure"? Typing them all out would be tedious and error-prone. To solve this, select() works with a set of "tidyselect" helper functions that let you choose columns based on patterns in their names.
The most common helpers are:
starts_with("preop_"): Selects columns whose names begin with "preop_".ends_with("_days"): Selects columns whose names end with "_days".contains("bp"): Selects columns that have "bp" anywhere in their name.
You can combine these helpers to build sophisticated selections. For instance, select(patient_id, starts_with("treatment_"), contains("score")) would create a dataset with the patient ID, all treatment-related columns, and all score-related columns.
Let's return to the "Reproducible Medical Research with R" chapter to see these helpers in action.
Read the section "Tidyselect Helpers in R". Pay close attention to the list of examples, as they clearly illustrate how each helper function works. The where() helper is particularly powerful for selecting columns based on their data type (e.g., all numeric columns).
3. Renaming Columns with rename()
Clear column names are crucial for readable code and understandable results. You'll often find that raw data uses cryptic abbreviations (e.g., Pt_ID, wbc_k) that need to be clarified. The rename() function is designed for this.
Unlike select(), which discards columns you don't mention, rename() keeps all columns and simply changes the names of the ones you specify.
The syntax is rename(new_name = old_name). It is critical to remember this order: the new name comes first.
my_data %>%
  rename(patient_id = Pt_ID,
         white_blood_cell_count = wbc_k)
You can also rename columns as part of a select() call. This is useful when you want to select and rename in a single step: select(patient_id = Pt_ID, diagnosis). This would select the Pt_ID and diagnosis columns, renaming the first one to patient_id in the process.
The following video provides a clear, step-by-step demonstration of both selecting and renaming columns.
R programming for beginners: Rename variables and reorder columns. Data cleaning and manipulation.
This video from the R Programming 101 channel offers a beginner-friendly walkthrough of select and rename using a built-in R dataset.
Watch the following segments: Setup: From the beginning, the presenter shows how to load the necessary package and data. Select: From this point, see how to use the pipe with select() to choose a subset of columns. Rename: Finally, watch from here to see the rename() function in action and learn its new_name = old_name syntax.
4. Let's Practice
It's time to combine these functions in a practical exercise. We'll use the blood_storage dataset from the medicaldata package, which contains data from a study on the effect of red blood cell storage duration on patient outcomes.
Open your clinical-trial-practice RStudio Project and create a new R script named 08-select-rename.R.
-
Load packages and data. Add this code to your script and run it. We'll need
tidyversefordplyrandmedicaldatafor the dataset.library(tidyverse) library(medicaldata) # You may need to install this first: install.packages("medicaldata") # Look at the raw data glimpse(blood_storage)Take a moment to look at the column names. You'll notice some are clear (like
Age) while others are more cryptic (likeRBC.Age.Group). -
Your Task: Select and Rename Columns.
Your goal is to create a new, cleaner data frame calledblood_storage_clean. This new data frame should be the result of a single piped sequence that does the following:- Starts with the original
blood_storagedata. - Selects only the columns from
RecurrencetosGS, theAgecolumn, and all columns that contain "Therapy". - Excludes the
BNcolumn from the selection. - Renames the following columns:
RBC.Age.Grouptorbc_age_groupPreopPSAtopreop_psaPreopTherapytopreop_therapy
Add your code to the script to perform these steps.
Click here to see the solution
blood_storage_clean <- blood_storage %>%
  select(Recurrence:sGS, Age, contains("Therapy"), !BN) %>%
  rename(
    rbc_age_group = `RBC.Age.Group`, # Note the backticks for names with special characters like '.'
    preop_psa = PreopPSA,
    preop_therapy = PreopTherapy
  )


# View the result
glimpse(blood_storage_clean)
A note on the backticks (
dplyris often flexible, it's a good practice to surround such names with backticks to avoid ambiguity. - Starts with the original
This exercise mirrors a common workflow: taking a raw dataset, focusing on the variables of interest, and cleaning up the names to prepare for analysis.
Conclusion
In this lesson, you've learned two of the most fundamental dplyr verbs for shaping your data. By thoughtfully selecting and renaming columns, you create a dataset that is not only smaller and more manageable but also far more intuitive to work with.
Key Takeaways:
select()subsets your data frame by choosing columns to keep. It can select columns by name, by range (:), or by exclusion (!).- Helper functions like
starts_with(),ends_with(), andcontains()makeselect()incredibly powerful for working with large datasets. rename()changes column names while keeping all columns. The syntax isrename(new_name = old_name).- These functions, when chained together with the pipe
%>%, form the basis of a clean and readable data wrangling workflow.
Preview of the Next Lesson:
Now that you can manage your columns, the next step is to manage your rows. In the next lesson, we will explore the filter() function, which allows you to subset observations (rows) based on specific conditions. This will give you the ability to ask questions like "Which patients are over 65?" or "Which observations have no missing data?".