Introduction
In our last lesson, you saw how to combine dplyr::mutate() and purrr::map() to apply functions across data, even when that data was nested into complex list-columns. The functions we used were powerful but simple. To build truly intelligent and robust analysis pipelines, our functions need the ability to make decisions.
This lesson introduces one of the most fundamental concepts in all of programming: conditional logic. You will learn how to use if, else if, and else statements to control which parts of your code execute based on specific conditions. We will focus on implementing this logic within functions, transforming them from rigid assembly lines into adaptive tools that can handle the variability inherent in real-world data, a critical skill for clinical research analysis.
Visually, you can think of conditional logic as a fork in the road, as illustrated in this flowchart. A "Test Expression" (your condition) determines which path the program follows.
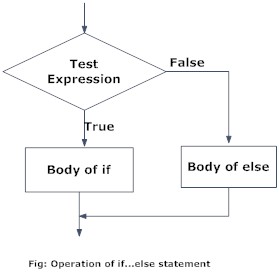
A flowchart showing how a logical test directs program flow to one of two different code blocks.
1. The Anatomy of a Conditional Statement
The foundation of decision-making in R is the if/else structure. It allows your code to respond dynamically to different inputs or states. The logic flows sequentially:
if: R evaluates a logical condition. If it'sTRUE, the code inside the following curly braces{}is executed, and the entire block is finished.else if: If the firstifcondition wasFALSE, R moves to theelse ifand evaluates its condition. IfTRUE, its code is executed, and the block is finished. You can have as manyelse ifstatements as you need.else: If all precedingifandelse ifconditions wereFALSE, the code inside the finalelseblock is executed. This is a catch-all for any other case.
The following reading from "Introduction to Programming with R" breaks down the syntax for each part of this structure.
Chapter 7 Conditional Execution | Introduction to Programming with R
This chapter provides a formal introduction to conditional statements in R. Focus on the structure and syntax of these control flow constructs.
First, read section 7.2 on If statements to understand the simplest form of conditional execution. Next, move to section 7.3 on If-else statements to see how to provide an alternative path for when the if condition is FALSE. Finally, study section 7.5 on Multiple if-else statements. This demonstrates how to chain conditions together with else if to handle multiple distinct cases, which is the most common and versatile pattern.
A classic example is assigning categories based on a continuous value. Imagine you're working with Body Mass Index (BMI) data. An if-else if-else chain is perfect for classifying each value:
# A variable holding a single BMI value
bmi <- 28.5

if (bmi < 18.5) {
  category <- "Underweight"
} else if (bmi >= 18.5 && bmi < 25) {
  category <- "Normal weight"
} else if (bmi >= 25 && bmi < 30) {
  category <- "Overweight"
} else {
  category <- "Obesity"
}

print(category)
# [1] "Overweight"
Notice the use of logical operators like < and && (logical AND) to define the conditions. This structure is evaluated from top to bottom, and as soon as a TRUE condition is found, its code is executed and the rest of the chain is skipped.
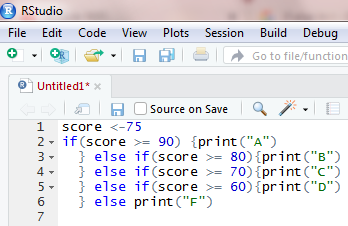
An RStudio screenshot showing a similar if-else if-else chain used to assign letter grades based on a numerical score.
2. Encapsulating Logic in Functions
While useful on their own, these conditional statements become truly powerful when they are placed inside functions. This allows you to package a piece of decision-making logic and reuse it throughout your analysis.
The process is straightforward: you define a function with arguments that serve as inputs to your conditional logic, place the if/else block inside the function's body, and use a return() statement to output the result.
This video provides an excellent, step-by-step walkthrough of this exact process.
Using if/else if/else Statements Inside of Functions in R
The video "Using if/else if/else Statements Inside of Functions in R" from the weecology channel clearly demonstrates how to turn a standalone conditional block into a reusable function.
Watch from the beginning to understand the motivation for using functions. Pay close attention to how the function is defined and the if/else logic is placed inside it during this segment. Note how volume and veg_type become function arguments and return(mass) is added at the end. Finally, see how the function is called with different arguments to produce different results, and listen to the step-by-step execution trace.
As the video shows, wrapping your logic in a function like est_mass(volume, veg_type) is far more efficient and less error-prone than copying and pasting the if/else block and changing the input variables manually each time.
3. An Essential Practice: Input Validation
To write "industry ready" code for research, your functions must be robust. They should not fail unexpectedly or produce incorrect results when given improper inputs. A key use of if statements is to perform "sanity checks" on the arguments at the very beginning of a function.
If an input is invalid, you can use the stop() function to halt execution and provide a helpful error message to the user. This prevents the function from proceeding with bad data.
The "Conditional Execution" chapter you read earlier has a perfect example of this.
Chapter 7 Conditional Execution | Introduction to Programming with R
This section demonstrates a critical real-world application of if statements for creating robust functions.
Please read section 7.8 on Sanity checks. Focus on the custom_sqrt function. Notice how it uses three separate if statements at the top, each checking a different property of the input x and calling stop() with an informative message if a check fails.
This practice of input validation is a hallmark of high-quality, reliable code. It makes your functions easier to debug and safer for you and others to use, which is essential in a research context where correctness is paramount.
4. Handling Vectors: ifelse()
A standard if/else statement is designed to work with a single logical value (TRUE or FALSE). If you pass it a vector of logicals, it will only use the very first element and give you a warning. This is a common point of confusion.
x <- c(-10, 5, 20)

# This does NOT work as you might expect
if (x > 0) {
  "positive"
} else {
  "not positive"
}
# [1] "not positive"
# Warning message:
# In if (x > 0) "positive" else "not positive" :
#   the condition has length > 1 and only the first element will be used
For situations where you need to perform a conditional check on every element of a vector, R provides a specialized, vectorized function: ifelse(). Its syntax is ifelse(test, yes, no), where test is a logical vector, yes is the value to return for elements where test is TRUE, and no is the value for elements where test is FALSE.
The ifelse() function is particularly powerful when used inside dplyr::mutate() to create new columns based on conditions in other columns. This video demonstrates a clear, practical example.
The video "If-else statements in R" by Equitable Equations shows the syntax of ifelse() and a powerful application within a dplyr workflow.
First, watch the introduction to the if_else function (the video refers to the base R ifelse but the principle is identical for dplyr::if_else, which you'll typically use). Then, watch the practical example where the presenter uses if_else inside mutate to create new columns. He wants to create a name_best column that uses a 2017 name if available, and falls back to an older name if the 2017 one is missing (NA). This is a very common task in data cleaning.
This pattern—mutate(new_col = if_else(condition, value_if_true, value_if_false))—is a cornerstone of data transformation in the tidyverse and one you will use frequently.
Conclusion
You have now added a crucial tool to your programming toolkit: conditional logic. By mastering if/else statements within functions, you can move beyond simple, linear scripts and start writing code that is intelligent, flexible, and robust—an essential step on your path to performing sophisticated data analysis for research.
Key Takeaways:
- Conditional Control Flow: The
if/else if/elsestructure allows you to create branching paths in your code, executing different blocks based on logical conditions. - Flexible Functions: Placing conditional logic inside functions allows you to create powerful, reusable tools that can adapt their behavior based on the arguments you provide.
- Robust Programming: Use
ifstatements withstop()at the beginning of your functions to perform "sanity checks." This validates inputs and prevents errors, making your code more reliable. - Vectorized Logic: When you need to apply conditional logic to an entire vector, such as within a
dplyr::mutate()call, use the vectorizedifelse()or its stricter tidyverse cousin,dplyr::if_else().
Preview of the Next Lesson:
With this lesson, we conclude our module on functional programming and core R tools. You now have a solid foundation in data manipulation and programming logic. In the next module, we will shift our focus to the "extravagant build"—communication. We will begin exploring ggplot2, the premier visualization library in R, starting with the powerful philosophy that underpins it: the Grammar of Graphics.