Introduction
In your journey with R so far, you've become proficient at using functions from powerful packages like dplyr and tidyr to manipulate data. You've used filter(), mutate(), pivot_longer(), and pivot_wider() to perform complex data transformation tasks. But what happens when you need to perform a specific, repetitive task for which no pre-built function exists? The answer is to write your own.
This lesson marks a pivotal step in your programming journey. You will learn how to write your own custom functions with arguments and return values. This skill is fundamental to creating efficient, readable, and error-resistant code. By bundling repetitive code into a function, you adhere to the "Don't Repeat Yourself" (DRY) principle, which is a cornerstone of good programming. For your goal of providing high-quality data analysis services, mastering functions is non-negotiable, as it allows you to build a personal toolkit of reusable analysis components.
1. The Anatomy of a Function
At its core, a function is a named block of code that takes some inputs, performs a series of operations, and produces an output. Think of it as a recipe: it has a name (e.g., "Chocolate Cake"), a list of ingredients (inputs/arguments), a set of instructions (the body), and a finished product (the output/return value).
This diagram provides a clear visual breakdown of a function's structure in R.
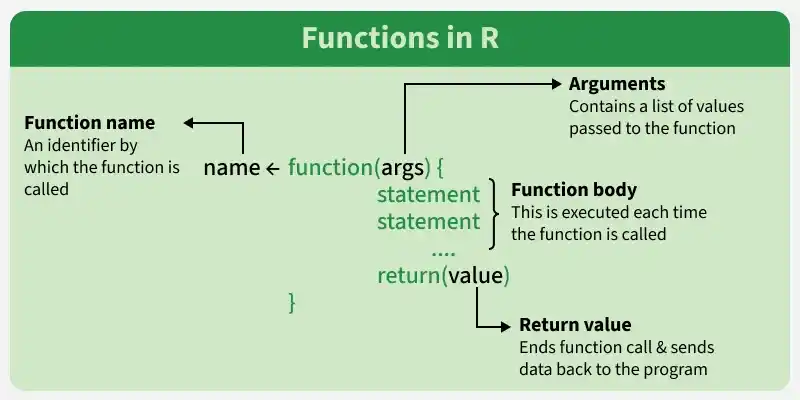
To see this structure in action and understand the syntax, the following video provides a concise and practical walkthrough.
Writing Your Own Functions in R: Introduction
This video from the weecology channel introduces the basic syntax for defining a function and then demonstrates it by creating a simple function to calculate the volume of a shrub.
First, watch the segment that explains the general structure of a function definition. Pay attention to the role of the assignment operator (<-), the function keyword, the parentheses for arguments, the curly braces {} for the body, and the return() statement. Next, watch the shrub volume example. This will solidify your understanding of how to define a function with multiple arguments (length, width, height), perform calculations inside its body, and call it to get a result.
A function's arguments are its interface to the outside world. The next video delves into the practical details of how to work with them, including how to set default values, which can make your functions more convenient to use.
A tutorial for writing functions in R (CC177)
This video from the Riffomonas Project uses a simple Celsius-to-Fahrenheit converter to explain key concepts about function arguments and how functions return values.
Watch the segment on function arguments. This part covers positional matching (R assumes arguments are in order), named arguments (explicitly stating argument = value), and setting default values for arguments (e.g., freezing = 32). Then, watch the section on multi-line bodies and return values. Note the difference between a function implicitly returning the last evaluated expression and explicitly using return(). Using return() is a clearer and more robust practice.
2. The Process: From Repetition to Reusability
One of the main motivations for writing a function is to avoid copying and pasting the same block of code multiple times. The best way to learn this is to follow a typical development process: first, get the code working for a single case, and then generalize it into a function.
This approach is detailed in the STAT 545 course materials, which advocate for building a simple, working "skateboard" before attempting to engineer a complex "car".
Chapter 18 Write your own R functions, part 1
This resource from STAT 545 at the University of British Columbia outlines a practical, step-by-step process for function writing that is highly effective.
Please read the sections Get something that works and turn it into a function. The key idea is to start with code that you've tested interactively for a representative example before you wrap it in the function syntax.
Let's apply this process. Imagine in your research you frequently need to calculate the coefficient of variation (CV), which is a standardized measure of dispersion defined as the standard deviation divided by the mean (). It's often expressed as a percentage.
Let's say you have a small dataset of biomarker measurements.
biomarker_a <- c(12.5, 14.1, 11.9, 13.0, 15.2, NA)
biomarker_b <- c(25.3, 24.8, 26.1, 25.5, 24.9)
To calculate the CV for biomarker_a, you'd write:sd(biomarker_a, na.rm = TRUE) / mean(biomarker_a, na.rm = TRUE)
And for biomarker_b:sd(biomarker_b, na.rm = TRUE) / mean(biomarker_b, na.rm = TRUE)
You can already see the repetition. This is a perfect candidate for a function. The resource R for Data Science provides a clear mental framework for this conversion.
25 Functions – R for Data Science (2e)
This chapter by Hadley Wickham et al. explains how to analyze repeated code to identify the parts that vary and the parts that are constant, which is the key to defining a function's arguments and body.
Read the section Writing a function. Focus on the three steps: Choosing a name. Identifying the arguments (the parts that vary). Defining the body (the repeated code).
Following this process for our CV calculation:
- Name: A good, descriptive verb-based name is
calculate_cv. - Arguments: The part that varies is the vector of data. We'll call this argument
x. - Body: The repeated code is
sd(x, na.rm = TRUE) / mean(x, na.rm = TRUE).
Now, we can write our function:
calculate_cv <- function(x) {


  # Calculate the mean, removing missing values
  mean_val <- mean(x, na.rm = TRUE)


  # Calculate the standard deviation, removing missing values
  sd_val <- sd(x, na.rm = TRUE)


  # Calculate the CV
  cv_val <- sd_val / mean_val


  # Return the final value
  return(cv_val)
}
Now, instead of re-typing the formula, you can simply call your function:calculate_cv(biomarker_a)calculate_cv(biomarker_b)
3. Practice and Refinement
Let's practice this process. In clinical data, it's very common to calculate the proportion of missing values (NA) for a variable. The code to do this for a vector x is mean(is.na(x)).
Your Task:
- Open a new R script and name it
17-custom-functions.R. - Create a function named
proportion_nathat takes one argument, a vectorx. - The body of the function should calculate the proportion of
NAs inx. - The function should
return()this proportion. - Test your function with the
biomarker_avector from the previous section. The result should be0.1666667.
Click here to see the solution
# Define the test vector
biomarker_a <- c(12.5, 14.1, 11.9, 13.0, 15.2, NA)


# Define the function
proportion_na <- function(x) {
  prop <- mean(is.na(x))
  return(prop)
}


# Test the function
proportion_na(biomarker_a)
Making Functions Robust
Writing a function that works is the first step. Writing a function that is robust—one that handles unexpected inputs gracefully—is what elevates your code to a professional standard. What would happen if someone passed a data frame or a character vector to your calculate_cv function? It would produce a cryptic error.
A better approach is to check the validity of arguments inside your function and provide a clear, helpful error message.
Chapter 18 Write your own R functions, part 1
This resource demonstrates how to add checks to your function to ensure the inputs are valid, a practice known as "defensive programming".
Read the section Check the validity of arguments. Pay close attention to the if(!is.numeric(x)) { stop(...) } pattern. This is a powerful and common way to make your functions safer and more user-friendly.
Let's add this check to our calculate_cv function:
calculate_cv <- function(x) {


  # Check if the input is a numeric vector
  if (!is.numeric(x)) {
    stop("Input must be a numeric vector. You provided an object of class: ", class(x)[1])
  }

  mean_val <- mean(x, na.rm = TRUE)
  sd_val <- sd(x, na.rm = TRUE)
  cv_val <- sd_val / mean_val

  return(cv_val)
}


# This works
calculate_cv(biomarker_b)


# This now fails with a clear error message
# calculate_cv("some_text")
This practice of adding checks, or assertions, is crucial for reliable analysis. In fact, a package you expressed interest in, assertthat, is designed specifically for this purpose and is something we will explore later in the course.
Conclusion
You have now learned one of the most powerful concepts in programming: creating your own functions. This skill moves you from being a consumer of R code to a creator. You can now encapsulate logic, automate tasks, and build a library of tools tailored to your specific analytical needs, whether it's for clinical research, statistical modeling, or any other domain.
Key Takeaways:
- Purpose: Functions help you write code that is more modular, reusable, and readable by following the DRY (Don't Repeat Yourself) principle.
- Anatomy: An R function consists of a name, arguments (inputs), a body (code inside
{}), and areturn()value (output). - Process: The most effective way to write a function is to first develop and test your code interactively, then wrap it in the function syntax.
- Robustness: Good functions are defensive. They check that their inputs are valid and fail with clear, informative error messages using constructs like
if/stop().
Preview of the Next Lesson:
Now that you can create functions, the next logical question is: how can you apply a function to many things at once? For instance, how could you efficiently run your calculate_cv function on every numeric column in a data frame? The next lesson will introduce you to functional programming with purrr::map(), which allows you to do exactly that, enabling powerful and scalable data analysis workflows.