Welcome back. In our last lesson, we took the crucial first step toward creating reproducible R projects by using renv::init() to establish an isolated, project-specific library. You learned that this command shields your project from changes in your main R environment, a foundational practice for the reliable, publication-quality analyses you aim to produce.
Now, we will address the next logical step. Having an isolated library is only half the battle; we need a way to precisely record its contents so that it can be perfectly recreated later. This lesson focuses on creating that record. You will learn how to use renv::snapshot() to capture the state of your project's dependencies in a special file called a "lockfile." This action is the key to ensuring that you, or a collaborator, can restore your project's environment to its exact working state, anytime and anywhere.
From Library to Lockfile: Capturing Your Environment
In the renv workflow, init() builds the house, but snapshot() creates the blueprint. This blueprint, the renv.lock file, is what makes your project truly portable and reproducible.

You should take a "snapshot" whenever you make a meaningful change to your project's R environment. The most common scenarios are:
- After installing a new package.
- After updating an existing package.
- After removing a package you no longer need.
Each snapshot updates the renv.lock file to reflect the new state of your library.
The Snapshot Workflow in Action
Let's walk through the process. Imagine you're working on your renv-enabled project and realize you need to install a new package to perform a specific task.
1. Install the Package
First, you install the package as you normally would. For example, let's say we need ggplot2 for plotting.
install.packages("ggplot2")
Because renv is active, this package is installed into your project's private library (e.g., my_project/renv/library/...), leaving your global R library untouched.
2. Check the Project Status
How do we know the state of our project's library relative to its lockfile? The renv::status() command is your diagnostic tool. After installing ggplot2, running renv::status() would show that your project is out of sync.
The following reading describes this exact scenario. It demonstrates how renv::status() reports that ggplot2 is installed in the library but not yet recorded in the lockfile.
01: Managing R dependencies with renv | An R reproducibility toolkit for the practical researcher
This guide provides a clear, practical walkthrough of the snapshot process.
Focus on the part of the text that begins after the "Use ggplot2" heading. Read from the explanation of the status message to see how renv reports the inconsistency after a new package is installed.
As the text explains, renv has detected that ggplot2 and its dependencies are now in your library but are not yet part of the official "blueprint" in renv.lock.
3. Take the Snapshot
To resolve this and record the new packages, you run renv::snapshot().
renv::snapshot()
RStudio will then present an interactive prompt in the console, listing all the changes it proposes to make to the lockfile.
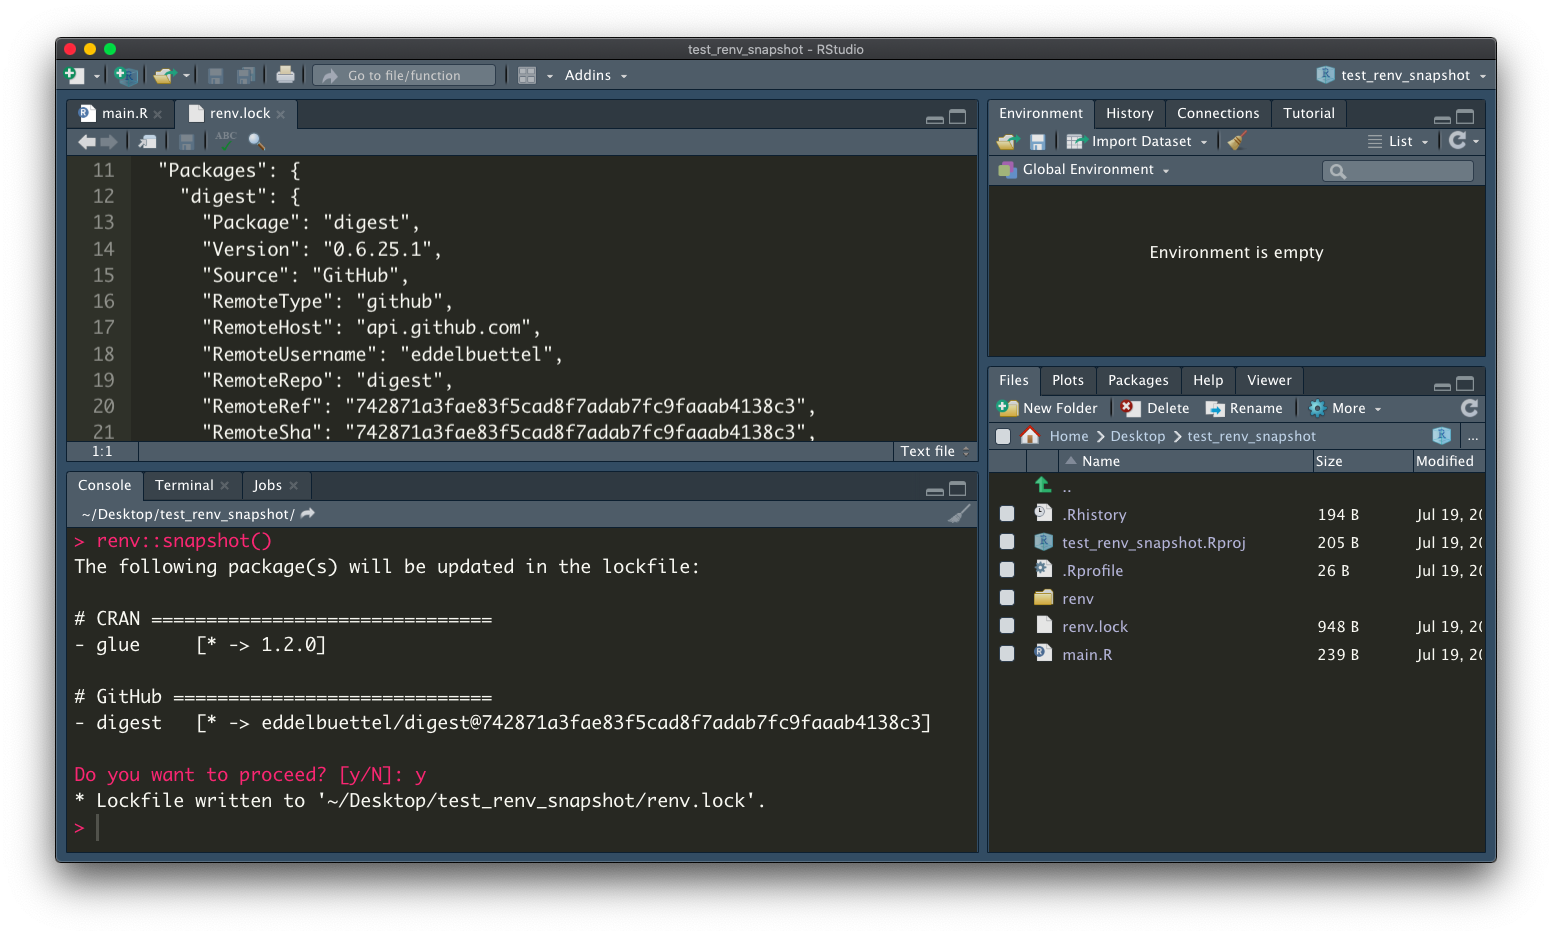
You'll typically see new packages marked with a + or *. After you confirm by typing y and pressing Enter, renv updates renv.lock with the new package information. If you run renv::status() again, it will report that your project is now in a consistent state.
A Crucial Detail: renv Only Records What You Use
A common point of confusion for new renv users is running snapshot and seeing nothing happen. renv is designed to be efficient and keep your projects lean. By default, it operates in an "implicit" mode: it scans your project's R scripts (.R files) and R Markdown documents (.Rmd files) for evidence of package use, such as library(your_package) or require(your_package).
If you install a package but never actually use it in a saved script, renv::snapshot() will ignore it.
This prevents your lockfile from getting cluttered with packages you might have installed for a quick experiment but aren't essential to the final analysis. The following video provides an excellent demonstration of this behavior.
Robust R Code That Will Work Forever With {renv}
This clip from a video by Albert Rapp clearly illustrates the "implicit" snapshot behavior, which is a key concept for using renv effectively.
Watch the segment from 06:38 to 07:52. The presenter installs the here package but snapshot initially does nothing. Only after adding library(here) to a script and saving it does the snapshot command work as expected.
This "implicit" scanning is a powerful feature that helps ensure your lockfile is an accurate and minimal representation of your project's true dependencies. It reinforces a good habit: your code should explicitly declare the packages it needs.
renv::snapshot() and Version Control
The renv.lock file is a simple text file, but it's the most important file for reproducibility. Therefore, it must be committed to your version control system (e.g., Git). When you share your project, others will use this file to recreate your exact environment.
Conversely, the renv/library folder, which contains the actual downloaded package files, can be very large and is specific to your machine. This folder should never be committed to version control. renv helps you with this automatically: when you run renv::init(), it creates a .gitignore file inside the renv directory, telling Git to ignore the library subfolder.
This separation is key:
- You commit the blueprint (
renv.lock). - You ignore the heavy materials (
renv/library).
[PDF] Renv for Version Control and Environment Reproducibility
This document highlights the role of the lockfile in a shareable project.
First, review step 4, Create a snapshot, which explicitly states that the renv.lock file should be committed. Then, scroll down to the "INTEGRATION OF RENV WITH VERSION CONTROL SYSTEMS" section and read the paragraph starting with "As mentioned previously". This explains why the library itself is ignored.
Your Turn: Snapshot a New Dependency
It's time to put this into practice. We'll continue with the renv-test project you created in the last lesson.
- Open your
renv-testRStudio Project. - Install a new package that is likely not yet in your project, such as
lubridatefor working with dates and times. In the console, run:
install.packages("lubridate") - Run
renv::status()to see thatrenvhas detected an inconsistency. - Create a new R script in your project (
File > New File > R Script). Add the following line to it:
library(lubridate) - Save the script with a name like
analysis.R. This step is critical! - Now, run
renv::snapshot()in the console. When prompted, review the changes and typeyto proceed. - Run
renv::status()one last time. It should now report that "the project is in a consistent state." - As a final check, open the
renv.lockfile in your project directory and find the entry forlubridate. You'll see its version and source have been recorded.
You have successfully updated your project's blueprint to include a new dependency.
Conclusion
In this lesson, you've mastered the second core command of the renv workflow. You now understand how to capture the precise state of your project's library, ensuring that your environment's "recipe" is always up-to-date and accurate. This is a vital step toward creating robust, shareable, and truly reproducible research.
Key Takeaways:
renv::snapshot()records the state of your project's package library into therenv.lockfile.- The best practice is to run
snapshotafter you install, update, or remove any packages. - By default,
renvonly records packages that are explicitly used within your saved project scripts. - The
renv.lockfile is the key to reproducibility and should always be tracked with version control (Git), while therenv/libraryfolder should be ignored. renv::status()is your tool for checking if the library and lockfile are in sync.
You can now create an isolated environment (init) and save its state (snapshot). In our next and final lesson on this topic, we will complete the circle by learning how to use the renv.lock file to rebuild an environment from scratch with renv::restore().