In our last discussion, we explored why package management is essential for creating analyses that stand the test of time, especially in fields like clinical research where reproducibility is non-negotiable. You learned that relying on a single, shared R package library is fragile, as updating a package for one project can inadvertently break another. The solution, as we established, is to give each project its own isolated, private library.
This lesson transitions from the "why" to the "how." We will take the first practical step in using renv, the tool that makes project-specific libraries possible. Your goal for this lesson is to use renv to initialize a project-specific library. By the end, you'll be able to activate renv in any RStudio Project, creating a self-contained environment for your analysis—a foundational skill for the publication-quality work you aim to produce.
The renv Workflow: An Overview
The renv package revolves around a few core functions that manage the entire lifecycle of your project's environment. While we will focus on the first one today, it's helpful to see the whole picture.
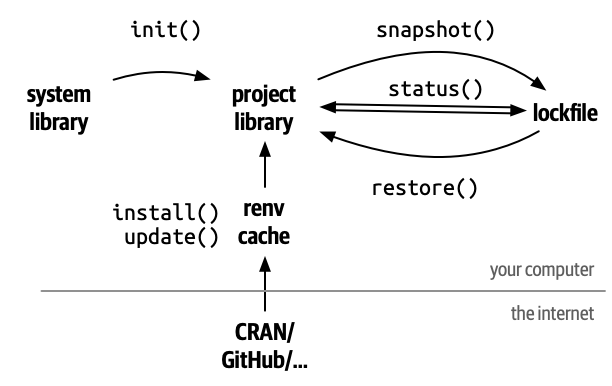
The three key verbs in the renv vocabulary are:
renv::init(): This is the command you run once to initializerenvin a project. It creates the private library and performs a first scan to see what packages you're already using.renv::snapshot(): After installing, updating, or removing packages, you use this command to take a "snapshot" of the library's current state. It records the exact versions of all packages into a special file calledrenv.lock.renv::restore(): When you (or a collaborator) open the project on a new machine, this command reads therenv.lockfile and restores the private library to the exact state you snapshotted, installing the correct package versions.
Today, our entire focus is on that first, crucial step: renv::init().
Activating renv in a Project
There are two primary ways to start a project with renv. The most explicit method, and the one we'll focus on, is to activate it within an existing RStudio Project.
First, you need to have the renv package itself installed in your main R library, just like any other package. You only need to do this once.
install.packages("renv")
With renv installed, you can now activate it for a specific project. Open any RStudio project (or create a new one), and run the following command in the console:
renv::init()
This single command kicks off a series of important actions. The video below, from renv developer Albert Rapp, provides a clear demonstration of this process.
Robust R Code That Will Work Forever With {renv}
This video demonstrates the initialization process and explains the console output you'll see.
Watch the segment from 01:40 to 02:08. Pay close attention to the messages renv prints in the console as it scans your project for dependencies and creates the "lockfile."
As you saw, renv::init() does the following:
- Scans for Dependencies: It looks through your project's R scripts for calls to
library()orrequire()to discover which packages you are currently using. - Creates a Private Library: It creates a new folder,
renv/library, inside your project directory. It then copies the packages it discovered from your global library into this new private library. - Writes a Lockfile: It creates
renv.lock, a file that records the R version and the exact versions of every package (and their dependencies) now in your private library. - Activates the Project: It creates a special file named
.Rprofilein your project's root directory. This file contains a single line of code that ensuresrenvis activated every time you open this specific project.
After running renv::init(), renv will prompt you to restart your R session. This is a critical step, as it allows the new .Rprofile to take effect and properly activate the isolated environment.
A Shortcut for New Projects
RStudio provides a convenient shortcut for this process when you're starting from scratch. When creating a new project, you can simply check a box.

Ticking this box tells RStudio to automatically run renv::init() for you as soon as the project is created. This is a great time-saver, but understanding the manual renv::init() process is essential for knowing how to activate renv in projects that already exist.
Under the Hood: How Isolation Works
You might be wondering how renv actually intercepts R's normal behavior. How does opening this one project cause R to use a different library than all your other projects? The mechanism is both simple and clever, and it relies on two key pieces: the .Rprofile file and R's library paths.
The following video from the Riffomonas Project channel provides an excellent explanation of how renv alters the library paths.
Using renv to track the version of your packages in R (CC229)
This clip provides a clear, side-by-side comparison of R's library paths with and without renv active.
Please watch from 09:43 to 11:19. The presenter runs the .libPaths() command in two different projects—one with renv and one without—to demonstrate exactly how renv prioritizes the project's private library.
As the video shows, renv uses the .Rprofile script to reorder R's library search path. When you open an renv-activated project, the renv/library folder inside your project directory is placed at the very top of the list. When you call library(dplyr), R looks in that private library first. When you open a different project without renv, R uses its default user library, and the two environments remain completely separate.
To understand the files renv creates, you can read the following summary.
This text describes the specific files and folders renv adds to your project directory when you run renv::init().
Please read the section titled Under the hood of renv. It provides a concise summary of the purpose of .Rprofile, the renv folder, and the renv.lock file.
One final, important detail is the renv cache. To save disk space, renv doesn't actually make a full copy of a package for every single project. Instead, it maintains a central cache of packages. When you initialize a project, renv creates links from your project's private library to the packages stored in this central cache. This way, if you have ten projects that all use dplyr version 1.1.4, you only have one copy of it on your hard drive, but each project has its own isolated link to it.
Your Turn: Initialize a Project
Now it's time to put this into practice.
- Open RStudio and create a new, blank RStudio Project. Call it something like
renv-test. Do not check the "Use renv with this project" box. - In the R console of your new project, ensure
renvis installed by runninginstall.packages("renv"). If it's already installed, R will let you know. - Initialize the project by running
renv::init(). renvwill discover any base packages, create the lockfile, and ask you to restart the R session. Do so by going toSession > Restart Rin the RStudio menu.- After the session has restarted, type
.libPaths()into the console and press Enter.
You should see a path pointing to the renv/library folder inside your renv-test project directory listed first. This confirms that your project is now successfully using its own private, isolated library. You have successfully fire-walled this project's R environment from the rest of your system.
Conclusion
In this lesson, you've moved from theory to practice by taking the first and most fundamental step in using renv. You now have a working tool to create the self-contained, reproducible environments that are critical for auditable and reliable research.
Key Takeaways:
- The command
renv::init()activatesrenvfor an R project, creating a private library for its packages. - This process creates three key components: a
.Rprofilefile to activate the environment, arenvfolder to house the library, and arenv.lockfile to record package versions. renvachieves isolation by modifying R's library search path (.libPaths()), forcing R to look inside the project's private library first.- You can initialize
renvmanually withrenv::init()or automatically by checking a box when creating a new RStudio Project.
You have now successfully created an isolated environment. But what happens when you install a new package, or want to share your analysis with a colleague? That is where the lockfile comes in. In our next lesson, we will explore the renv.lock file in more detail and learn how to use renv::snapshot() to save the state of your library, making your project truly portable and reproducible.