Welcome to the final lesson in our focused look at the renv package. In our previous sessions, we established a robust foundation for reproducibility. First, you learned to create an isolated project library with renv::init(), protecting your work from outside changes. Then, you learned to create a precise "blueprint" of that library using renv::snapshot(), saving the exact versions of your packages into the renv.lock file.
Today, we complete this powerful workflow. We will focus on renv::restore(), the command that brings your blueprint to life. You will learn how to use a renv.lock file to perfectly recreate a project's package library from scratch. This is the crucial step that enables seamless collaboration and ensures your analysis can be run by anyone, anywhere, at any time—a cornerstone of the high-quality, publishable research you aim to produce.
The Payoff: Rebuilding Your Environment
So far, we have been the creator of the renv environment. Now, we will act as the consumer. The renv::restore() command is the payoff for the careful work of initializing and snapshotting your project. It solves two common and critical problems in data analysis:
- Collaboration: A colleague, or perhaps a journal reviewer, needs to run your analysis. Instead of sending a list of packages and hoping they install the correct versions, you simply provide them your project folder. They can use
renv::restore()to build the exact same environment you used. - Continuity and Disaster Recovery: You switch to a new computer, or you need to return to a project months later. You might even accidentally delete your project's library. As long as you have the
renv.lockfile,renv::restore()can rebuild your project's dependencies perfectly.
Let's look at our workflow diagram one last time. We've covered init() and snapshot(). Now, our focus is on the final arrow: using the lockfile to restore() the project library.
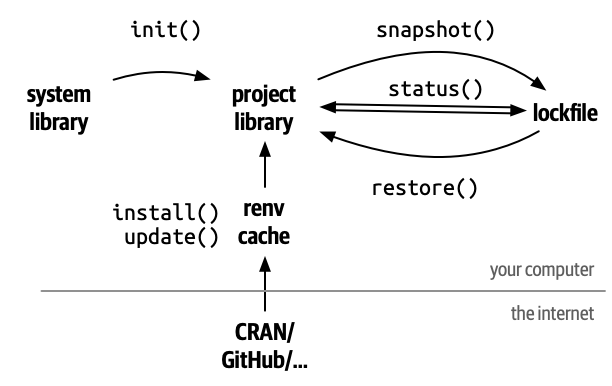
How renv::restore() Works
When you execute renv::restore(), renv performs a series of intelligent steps:
- Reads the Blueprint: It parses the
renv.lockfile to get a definitive list of all required packages and their exact versions. - Checks the Cache: Before downloading anything,
renvchecks its global package cache. This is a central storage area on your computer whererenvkeeps a copy of every package version it has ever downloaded. If the required package version is already in the cache, it doesn't need to be downloaded again. - Downloads if Necessary: If a package isn't in the cache,
renvdownloads it from the source specified in the lockfile (e.g., CRAN or GitHub). - Links to the Project: Finally,
renvcreates links from the global cache to your project's private library (your-project/renv/library). This is highly efficient, as it avoids making multiple copies of the same package files on your hard drive.
The following document gives a concise overview of this process.
[PDF] Renv for Version Control and Environment Reproducibility
This guide provides a clear walkthrough of the restoration process, both as a quick-start guide and with a more detailed explanation.
First, read the "QUICK START: RESTORING A PROJECT ENVIRONMENT" section to see the high-level steps for a new user. Then, read the "UNDERSTANDING ENVIRONMENT RESTORATION" section, focusing on the numbered list that details the four steps renv takes during restoration. Also, note the concept of "transactional" restores, which protects your library from partial, failed updates.
Restoration in Action: The Collaborative Scenario
Imagine you've cloned a project from a collaborator's GitHub repository. When you open this RStudio Project for the first time, renv is automatically activated (via the .Rprofile file we discussed earlier). It immediately compares the packages listed in renv.lock with what's actually installed in your (currently empty) project library.
Recognizing the discrepancy, renv will often prompt you directly in the console to restore the environment.
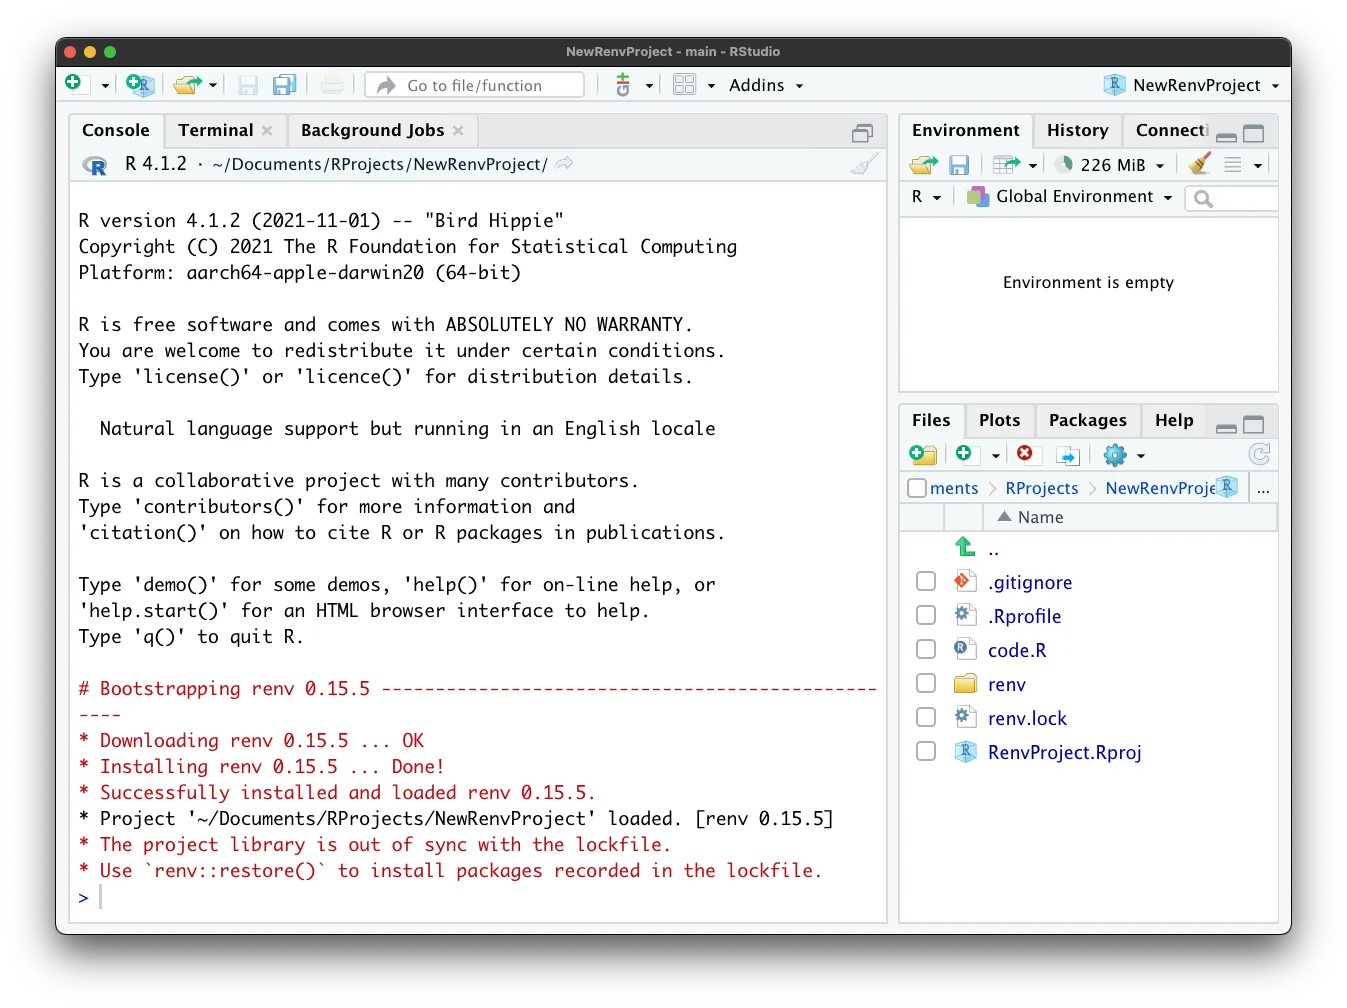
This automatic prompt makes joining a project incredibly smooth. A collaborator just needs to open the project and agree to the restoration. The following video demonstrates this exact scenario.
Using renv to track the version of your packages in R (CC229)
This video by the Riffomonas Project concludes with a perfect real-world demonstration of the collaboration workflow.
Watch the segment from 16:15 to 17:48. The presenter simulates being a new user by cloning a fresh copy of a repository. Observe how RStudio starts up and immediately prompts him to run renv::restore() to synchronize the project.
Your Turn: Simulating a Project Recovery
Now, let's put this into practice by simulating a "disaster recovery" scenario with the renv-test project you've been working on. We will manually delete the project library and then use renv::restore() to bring it back. This exercise will solidify your understanding of how restore works.
The following reading describes this exact process, which we will follow step-by-step.
This article includes an excellent section on testing the restoration process, which we will use as a guide for our hands-on exercise.
Read the section titled "Test R packages restoration". Pay close attention to the sequence: copy the project (we'll just use our existing one), delete the renv/library folder, and then use renv::restore().
Ready? Let's follow those steps:
- Close Your Project: If your
renv-testRStudio Project is open, close it completely (File > Close Project). This ensures no files are locked. - Delete the Library: Using your computer's file explorer (Finder on macOS, File Explorer on Windows), navigate to your
renv-testproject folder. Inside it, find therenvfolder. Open therenvfolder and delete thelibrarysubfolder entirely. This simulates a corrupted or missing environment. - Re-open the Project: Now, go back to RStudio and re-open the
renv-test.Rprojfile. - Observe the Prompt: Just as in the image and videos, you should see a message in the R console stating that the project is out of sync and that you should use
renv::restore(). - Restore the Library: In the console, type the following command and press Enter:
renv::restore()renvwill list the packages it's about to install from yourrenv.lockfile. When prompted, typeyand press Enter to confirm. You will seerenvefficiently linking the packages from its cache into your project's library. - Verify the Status: Once the process is complete, check that everything is back in order by running:
The output should confirm that "the project is in a consistent state." You have successfully rebuilt your project's environment from its blueprint.renv::status()
This short video clip provides another excellent visual of this manual deletion and restoration process.
Robust R Code That Will Work Forever With {renv}
This clip from Albert Rapp's tutorial provides a concise demonstration of manually restoring a library.
Watch from 08:38 to 10:04. The presenter explains the purpose of restore and then demonstrates it by deleting the renv/library directory and running the command to rebuild it.
Conclusion
You have now mastered the complete, fundamental renv workflow. This trio of commands—init, snapshot, and restore—forms a powerful system for managing project dependencies, which is a non-negotiable skill for reproducible data science.
Key Takeaways:
renv::restore()rebuilds a project's private library based on the packages and versions recorded inrenv.lock.- This command is the key to ensuring collaborators and future-you can perfectly replicate your analysis environment.
renvis smart: it often prompts you to restore when it detects an out-of-sync library, and it uses a global cache to make restoration fast and efficient.- You can simulate a project recovery by deleting the
renv/libraryfolder and runningrenv::restore()to rebuild it.
You now have the tools to manage your project's dependencies. In the next module, we will build on this foundation by introducing workflowr, a tool that helps you manage your project's structure and publish your analyses as a version-controlled website. By combining renv and workflowr, you will be well on your way to creating the kind of transparent, robust, and professional analysis workflows required in academic and clinical research.