In the previous lesson, you learned why a structured and reproducible workflow is the gold standard for trustworthy scientific research, especially in clinical settings. We discussed the common pitfalls that lead to irreproducible results and established that a robust project workflow must involve scripted analysis, dependency management, and a standardized organization.
Now, we move from the "why" to the "how." This lesson introduces workflowr, an R package designed to implement these principles directly. You will learn how to initialize a new analysis project with a standardized, version-controlled directory structure using the workflowr::wflow_start() function. This single step lays the foundation for the transparent and efficient workflow you're aiming to build.
What is workflowr?
At its core, workflowr is an opinionated framework that bundles several tools and best practices you've already learned into a single, cohesive system. It intelligently combines:
- R Markdown for literate programming (Module 6)
- Git for version control (Module 7)
- A standardized directory structure for organization
- A project website for publishing and sharing your findings
By using workflowr, you are not just organizing files; you are creating a complete research compendium where each result is automatically linked to the version of the code and data that produced it.
Getting started with workflowr • workflowr
The official workflowr documentation provides a concise overview of the package's philosophy and components.
Read the introduction and the "Overview" section. Focus on the two key components of a workflowr project: the R Markdown website and the Git repository. This will give you a clear mental model of what you are about to create.
Initial Setup: Configuring Git
Before creating your first project, you need to perform a one-time configuration to tell Git who you are. This is the same concept you learned in Module 7, but workflowr provides a convenient function to do it from within R. This information is attached to every change (commit) you make, creating a clear audit trail.
You only need to do this once per computer. If you have already configured Git on your machine for command-line use or with another tool, you can likely skip this step, but it does no harm to run it again.
Getting started with workflowr • workflowr
This next section of the documentation walks you through the initial setup.
Find the "Start the project" section. The first step is to run wflow_git_config(). Please run the following code in your R console, replacing "Your Name" and "email@domain" with your actual name and the email address associated with your GitHub account. The code is provided in the documentation.
With Git configured, you are ready to create your first workflowr project.
Creating a Standardized Project
There are two primary ways to initialize a workflowr project: through the RStudio user interface or directly from the R console. Both achieve the same result.
Method 1: The RStudio Project Template (Recommended)
The most intuitive way to start is by using RStudio's "New Project" wizard.
- Navigate to
File->New Project.... - Choose
New Directory. - Scroll through the project types and select
workflowr project. - You will see a dialog box like the one below. Choose a name for your project (e.g.,
my-first-analysis) and the location on your computer where you want to save it. - Ensure that "Use Git for version control" is checked.
- Click
Create Project.
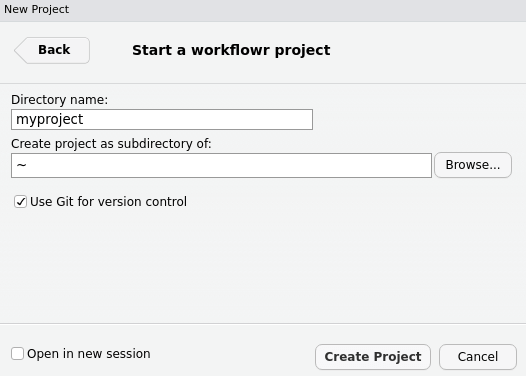
RStudio will then create the new project and open it for you. This action is running the workflowr::wflow_start() command behind the scenes.
Method 2: Using the wflow_start() Function
Alternatively, you can create the project by running a command directly in the R console. This is useful if you are not using RStudio or prefer a programmatic approach.
The function wflow_start() takes the name of the project directory as its argument. For example, to create a project named my-first-analysis, you would run:
workflowr::wflow_start("my-first-analysis")
This command creates the folder, sets up the directory structure, initializes a Git repository, and makes the first commit for you.
The Anatomy of a workflowr Project
Whether you used the GUI or the console, you now have a new folder with a specific, standardized structure. This structure is the backbone of your reproducible workflow, providing a logical place for every component of your analysis.
Let's examine the purpose of each directory and file.
Getting started with workflowr • workflowr
The workflowr documentation provides a detailed guide to the project structure it creates.
Read the text following the directory tree diagram, which explains the role of each component. Pay close attention to the descriptions of the required and optional directories.
Here is a summary of the key components:
analysis/: This is where you live as an analyst. It contains your R Markdown (.Rmd) files, which document your analysis. It also contains_site.yml, which controls the appearance of your project website.data/: This directory is for your raw data files (e.g., CSV, SPSS files). The principle here is that data in this folder should be read-only; your scripts should never modify files indata/.code/: For any supplemental R scripts that are not part of your main R Markdown reports. This could include scripts for extensive data cleaning or long-running simulations.output/: This is the designated location for any files your scripts generate, such as cleaned datasets or intermediate results. This clear separation between raw data (data/) and processed data (output/) is crucial for preventing errors.docs/: This directory contains the rendered HTML files that form your project website. You should never edit files in here directly.workflowrautomatically populates this folder when you "build" your analysis files..Rprojfile: The RStudio Project file. As you learned in Module 1, this file anchors your project, making it a self-contained environment._workflowr.yml: A configuration file that controlsworkflowr-specific settings.
This structure automatically solves the "disorganized project" problem we discussed in the last lesson. It provides a logical, predictable, and professional layout for your research.
Relative Paths: The Key to Portability
Now that your project has a defined home, we can revisit a critical concept for reproducibility: file paths. When you are inside an RStudio Project, the working directory is always the project's root folder (the one containing the .Rproj file). This allows you to use simple, relative paths to refer to your files.
This practice is essential. Using a full path like C:/Users/MyName/Documents/my-project/data/clinical_data.csv will break your script on any other computer (or even your own, if you move the project). A relative path like data/clinical_data.csv will always work, as long as the code is run from within the project. workflowr is built around this principle.
Reproducible research with workflowr • workflowr
This tutorial provides an excellent, practical explanation of why relative paths are fundamental to reproducible work.
Please read the section titled Understanding paths. The example of saving the ToothGrowth dataset clearly illustrates the difference between fragile "full paths" and robust "relative paths" and reinforces why the project-based workflow is so powerful.
Conclusion
In this lesson, you took the first practical step towards building a fully reproducible analysis pipeline. You have learned how to use workflowr::wflow_start() to instantly create a project with a professional, standardized structure that is already under version control.
Key Takeaways:
workflowrintegrates R Markdown, Git, and a standardized file system to create a reproducible research compendium.- The
wflow_start()command (or the RStudio template) initializes a new project with a logical directory structure. - Key directories include
analysis/for.Rmdfiles,data/for raw data, anddocs/for the final website. - Working within an RStudio Project allows you to use robust relative paths (e.g.,
data/mydata.csv), making your analysis portable and shareable.
You have created the skeleton of your project. In the next lesson, you will learn how to add flesh to these bones by creating your own analysis file and using workflowr::wflow_build() to render it into the project website.