Introduction
In our last lesson, you transformed your RStudio Project into a Git repository, activating the version control system and making the Git pane appear in your interface. This was the foundational step of placing your project under Git's surveillance. Now that Git is watching, it's time to learn how to tell it precisely what to save and when.
This lesson dives into the most fundamental and frequently used workflow in version control: staging and committing changes. You'll learn how to take a "snapshot" of your project's state and save it to your local history with a descriptive note. This two-step process is the heartbeat of Git, allowing you to build a clear and meaningful timeline of your project's development. By the end of this lesson, you will be able to save your work in logical, annotated chunks, creating a robust history of your analysis.
The "Why": Commits as Meaningful Snapshots
Before we look at the mechanics, it's important to understand why version control uses this system. When working on a project, you often make changes to multiple files for different reasons simultaneously. Simply "saving" everything at once would be like throwing all your notes from a week of classes into a single, unorganized pile.
A commit is a deliberate, recorded snapshot of your project. By choosing which changes to include in each commit, you can group related modifications together. For example, fixing a typo in your report and adding a new analysis function are two separate logical changes. Version control lets you save them as two distinct commits, each with its own explanation. This approach replaces the chaotic habit of creating files like analysis_v2_final.R or commenting out large blocks of old code.
To get a better sense of the problems that commits solve, let's start with a short reading.
4 Version control with git and GitHub
This article from a workshop at the NCEAS provides an excellent "motivating example" that illustrates why the discipline of committing changes is so powerful for reproducible science.
In the article, please read the introductory section and the subsection titled A Motivating Example. As you read, think about times you might have used filenames or comments to track different versions of your own work.
As you just read, Git allows you to maintain a clean, linear history while also giving you the confidence to experiment, knowing you can always return to a previous stable state.
The Two-Step Workflow: Staging and Committing
The core Git workflow consists of two main actions that you'll perform from the Git pane in RStudio:
- Staging Changes (
git add): This is the act of selecting specific modifications you want to include in your next snapshot. Think of it as placing items into a shopping basket. You can add changes from one file, parts of another, and ignore others entirely. The collection of staged changes is known as the staging area or index. - Committing Changes (
git commit): This is the act of taking the snapshot. It permanently saves everything in the staging area to your project's history as a single commit. This action is always accompanied by a commit message, which is a description of what you changed and why. Continuing the analogy, this is like going through the checkout and getting a receipt that details your purchase.
This two-step process is what gives you fine-grained control over your project's history, allowing you to craft a series of logical, well-documented steps rather than one continuous, messy stream of changes.
The following video provides a clear, visual demonstration of this entire cycle within RStudio.
This video from the "Equitable Equations" channel provides a practical walkthrough of the stage-and-commit cycle in RStudio.
Please watch the segment from committing changes. The presenter demonstrates how modified files appear in the Git tab, how to stage them using the checkboxes, how to write a commit message, and how to view the project's history.
Your First Commit: A Practical Walkthrough
Now it's time to put this theory into practice. For this exercise, open the RStudio Project you created in the last lesson where you initialized a Git repository.
We will make a small change to the project's README.md file, and then stage and commit that change. A README.md file is a standard text file written in Markdown that typically contains a description of the project. It's often the first thing a collaborator (or your future self) will read.
Let's follow a guided walkthrough to make your first commit.
4 Version control with git and GitHub
This guide will walk you through the practical steps of making and committing your first change using the RStudio interface.
First, follow the instructions in the section Commit a README.md change. Open your README.md file (or create one if it doesn't exist via File > New File > Text File and save it as README.md), add a line of text like "This project analyzes clinical trial data.", and save it. Notice how the file now appears in your Git pane. Next, proceed to the section Commit the RStudio changes. This part shows you how to stage the change by ticking the box and then finalize the commit.
When you click "Commit", RStudio opens the "Review Changes" window. This is your command center for committing.
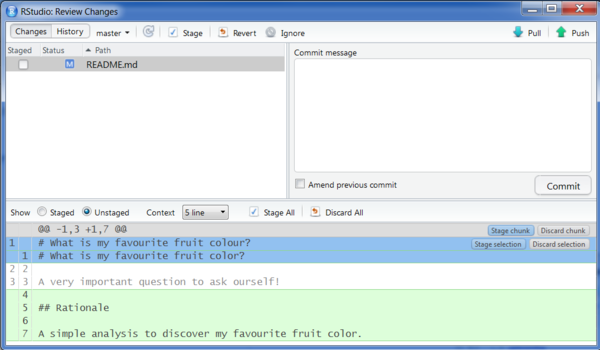
Here's a breakdown of this window:
- Staged Files (top left): Files whose changes will be included in this commit. You check the box in the main Git pane to stage a file.
- Commit Message (top right): The crucial description for your commit.
- Diff View (bottom): Shows the exact changes you've made. This is your chance to review your work before saving it permanently.
After writing your message and clicking "Commit", the file will disappear from the Git pane because there are no longer any tracked-but-uncommitted changes. You have successfully saved a snapshot to your project's history.
Writing Effective Commit Messages
A commit history is a story. Your commit messages are the narration. A history with messages like "updates" or "fixed stuff" is unhelpful. A history with clear, descriptive messages is an invaluable piece of documentation for collaboration and for reminding yourself of your thought process months later.
As you progress toward analyzing clinical research data, you will often collaborate with principal investigators, statisticians, and other researchers. A clear Git history is a professional courtesy and a powerful tool for explaining the evolution of an analysis.
4 Version control with git and GitHub
This short section offers excellent, timeless advice on how to write commit messages that are genuinely useful.
Please read the "Aside" titled What should I write in my commit message?. Pay close attention to the convention of using the imperative mood (e.g., "Add," "Fix," "Refactor") for the subject line.
To summarize the key rules for good commit messages:
- Use the imperative mood: Write "Add feature for patient subgroups" instead of "Added feature..." or "Adding feature...". Think of the message as completing the sentence "If applied, this commit will...".
- Separate subject from body: Write a concise subject line of 50 characters or less. If more explanation is needed, leave a blank line and write a more detailed paragraph in the body.
- Explain the what and why, not the how: The code itself shows how a change was made. The commit message should explain what the change is (e.g., "Update plot labels for clarity") and why it was necessary (e.g., "Previous labels were ambiguous in the context of Figure 2.").
Conclusion
In this lesson, you have mastered the fundamental rhythm of version control: the stage-and-commit cycle. You now understand not just the mechanics of this process within RStudio, but also the importance of creating a clean, logical project history through atomic, well-documented commits.
Key Takeaways:
- A commit is a permanent, annotated snapshot of your project's state.
- The version control workflow is a two-step process: staging selects which changes to include, and committing saves them to the history.
- This process allows you to group related changes into logical, understandable units.
- The Git pane and Commit window in RStudio are your primary tools for this workflow.
- Writing clear, descriptive commit messages is essential for creating a useful and professional project history.
Preview of the Next Lesson:
So far, your entire project history exists only on your local machine. While this is great for personal use, the true power of Git is unlocked when you share and back up your work. In the next lesson, we will bridge the gap between your computer and the cloud. You will learn how to create a remote repository on GitHub and push your local commits to it, making your project accessible from anywhere and ready for collaboration.