Introduction
In our previous lessons, you've established a solid local foundation for version control. You initialized a Git repository within your RStudio Project and mastered the fundamental cycle of staging and committing changes. Your project now has a recorded history, but it exists only on your personal machine. To unlock the full potential of Git for backup, sharing, and collaboration—all essential for producing industry-ready and reproducible research—we need to connect your local work to the cloud.
This lesson focuses on creating a remote repository on GitHub and linking it to your local RStudio project. You'll learn how to create a central, online home for your project and perform your first "push," which uploads your local commit history to GitHub. This step bridges the gap between your computer and the wider world, making your analysis secure, accessible, and ready for collaboration.
Local vs. Remote: The Big Picture
So far, you've been working exclusively in your local repository. Think of this as the master copy of your project stored on your own computer's hard drive. A remote repository is a version of your project that is hosted on an external server. GitHub is the most popular service for hosting such repositories.
Connecting your local repository to a remote one on GitHub provides several critical benefits:
- Backup: If something happens to your computer, your entire project history is safely stored on GitHub.
- Access: You can access your project from any computer with an internet connection.
- Collaboration: It provides a central point where you and other researchers can share changes and merge your work.
Git allows you to define connections to one or more remote repositories. By convention, the primary remote repository for a project is given the nickname origin. Once this connection is established, you can use two key commands to synchronize your work:
git push: Sends your local, committed changes to the remote repository.git pull: Fetches changes from the remote repository to your local machine.
In this lesson, we will set up the origin remote and perform our first push.
The "GitHub Last" Workflow: From Local to Remote
Since you already have a local R project with a Git history, we will follow a "GitHub Last" workflow. This process involves two main stages:
- Creating a new, empty repository on GitHub to serve as the destination for your project.
- Configuring your local repository to recognize this remote destination and pushing your existing commits to it.
We will first walk through the manual process to ensure you understand each component. Later, we'll look at a more automated, R-centric shortcut.
Step 1: Create an Empty Repository on GitHub
Your first task is to create a new, empty "receptacle" on GitHub. It is critical that this repository is created empty. Do not initialize it with a README, .gitignore, or license file, because your local project already has its own commit history, and creating new files on GitHub at this stage would lead to conflicts.
This guide provides a clear walkthrough of the creation process.
Chapter 16 Existing project, GitHub first
This chapter from the "Happy Git and GitHub for the useR" guide details how to create a new repository on GitHub. We will use these instructions for the first part of our workflow.
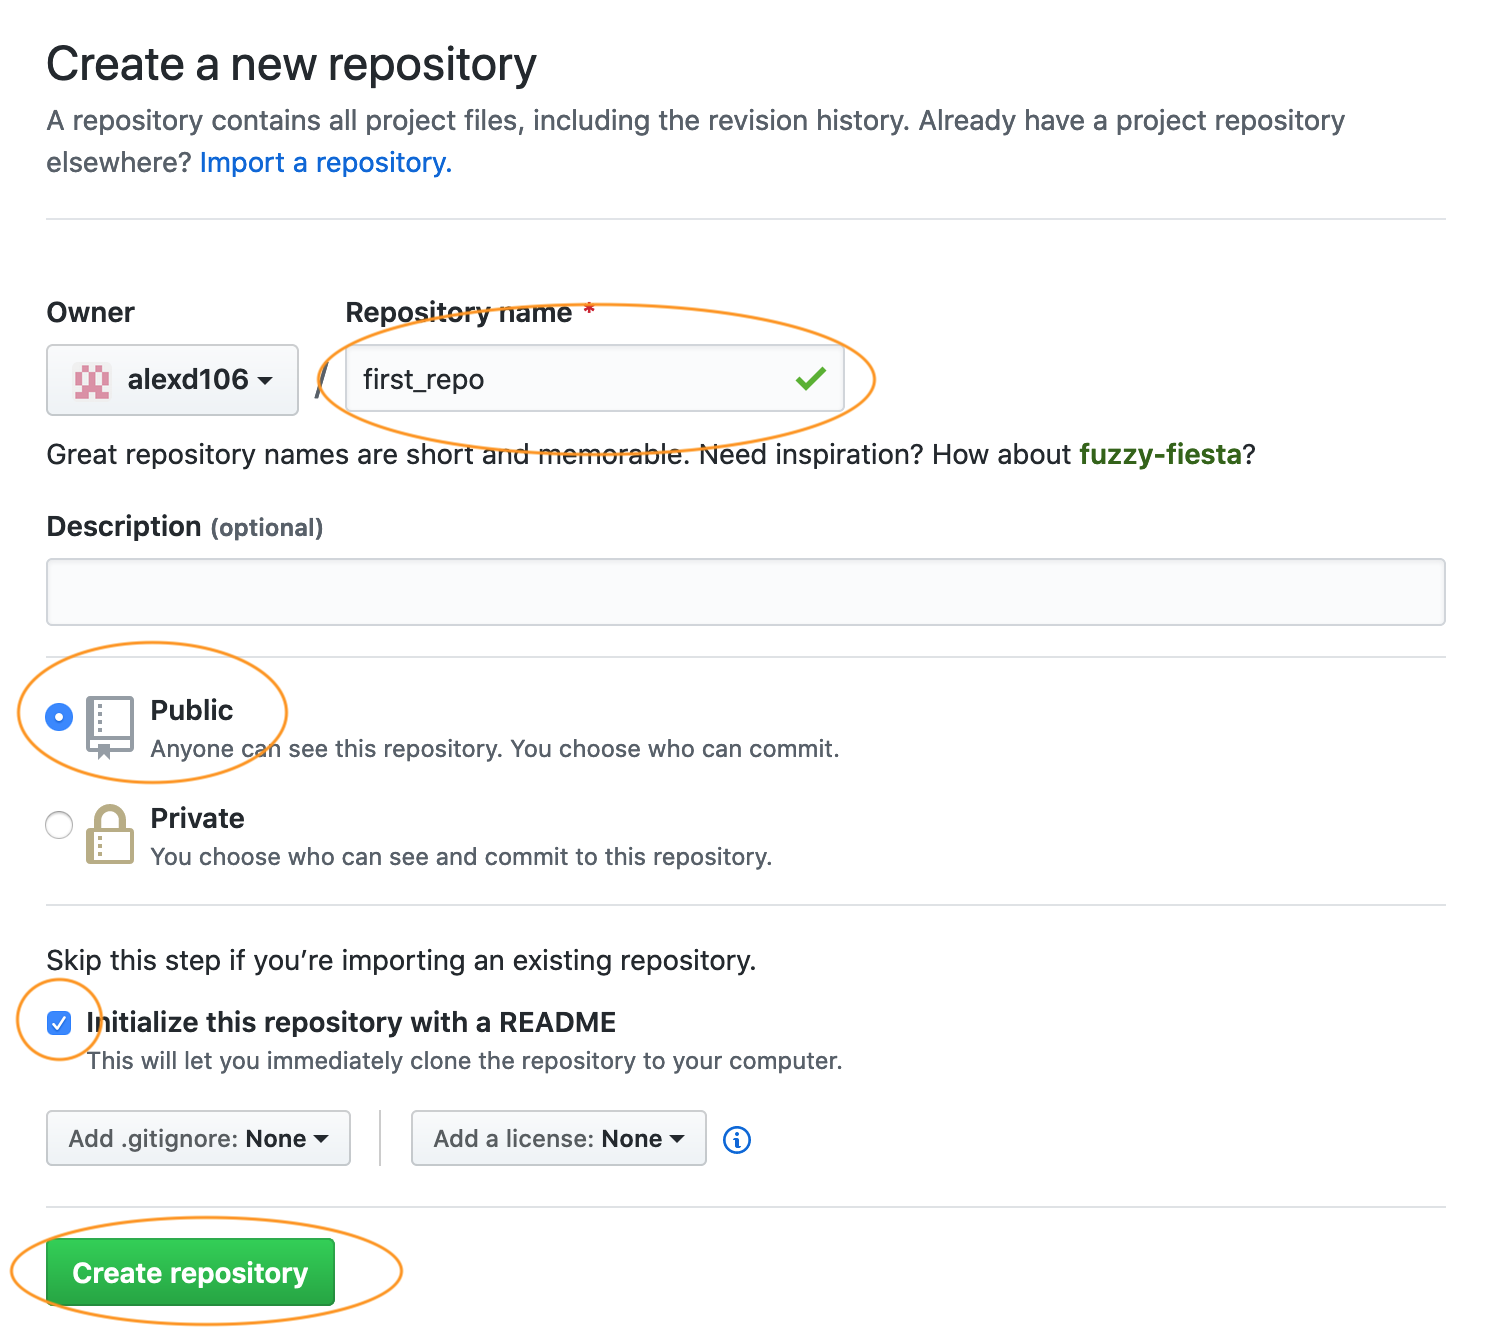
Follow the steps in the section Make a repo on GitHub. As you fill out the form, remember these key points: Repository name: Use the same name as your RStudio Project directory for consistency (e.g., clinical-trial-analysis). Public: Keep your repository public for now. Initialize: Crucially, do not check any boxes to add a README, .gitignore, or license. Your repository must be empty.
The image below shows what the "Create a new repository" page on GitHub looks like, with the important fields highlighted.
After clicking "Create repository", GitHub will take you to a page with a URL and some setup instructions. We will use these in the next step.
Step 2: Connect Local to Remote and Push
Now that your empty remote repository exists on GitHub, it's time to connect your local project to it and upload your history. The following video provides a concise demonstration of this process using the Terminal in RStudio.
Connecting an existing RStudio project to git and GitHub (CC145)
This video from the Riffomonas Project channel clearly demonstrates the "GitHub Last" workflow.
Please watch the segment from creating the repository to the first push. The presenter first creates the repository on GitHub (as you just did) and then copies the commands provided by GitHub into the RStudio Terminal to link the local repository and push the commits.
Let's recap the steps shown in the video:
- On the GitHub page for your newly created repository, find the section titled "...or push an existing repository from the command line".
- Click the copy icon to copy the three lines of code provided. These commands tell Git to:
git remote add origin <URL>: Add a new remote namedoriginat the specified URL.git branch -M main: Ensure your default branch is namedmain(a modern standard).git push -u origin main: Push yourmainbranch to the remoteoriginand set it up to track changes (-u).
- In RStudio, navigate to the Terminal tab (next to the Console). If you don't see it, you can open it via
Tools > Terminal > New Terminal. - Paste the copied commands into the terminal and press Enter.
After the commands finish running, you have successfully linked your project and pushed your history!
To confirm this, refresh your repository's page on GitHub. You should now see all your project files and the commit history you created locally. In RStudio's Git pane, you will also see an origin/main entry, indicating that your local main branch is now tracking the remote main branch.
The "Pro" Shortcut: Using usethis
Understanding the manual process of creating a repo and connecting it via the terminal is invaluable. However, for day-to-day R work, there is a more integrated and efficient method that aligns with your goal of learning advanced workflows. The usethis package provides a function that handles this entire process for you.
Chapter 17 Existing project, GitHub last
The usethis package is designed to automate common project setup tasks. This section introduces the function for connecting your project to GitHub.
Please read the section Create and connect a GitHub repo with usethis. This section describes the usethis::use_github() function.
As you read, usethis::use_github() does all the heavy lifting in one step:
- It communicates with the GitHub API to create a new repository under your account.
- It automatically configures that new repository as the
originremote for your current RStudio Project. - It performs the initial push.
- It even opens the new GitHub repository page in your web browser for you.
To use this, you would simply open your RStudio Project, ensure all your changes are committed, and then run usethis::use_github() in the console. This function relies on a Personal Access Token (PAT) for authentication, which you should have configured in a previous lesson. This single command replaces all the manual steps of visiting the GitHub website and using the terminal. It's a perfect example of the "extravagant build" on top of a solid foundation.
An Alternative: The "GitHub First" Workflow
While we used the "GitHub Last" approach today, it's worth knowing about the alternative: "GitHub First". In this workflow, you would:
- Create a new repository on GitHub first, this time initializing it with a README file.
- In RStudio, create a new project by "cloning" this existing remote repository. You do this via
File > New Project > Version Control > Gitand pasting the repository URL.
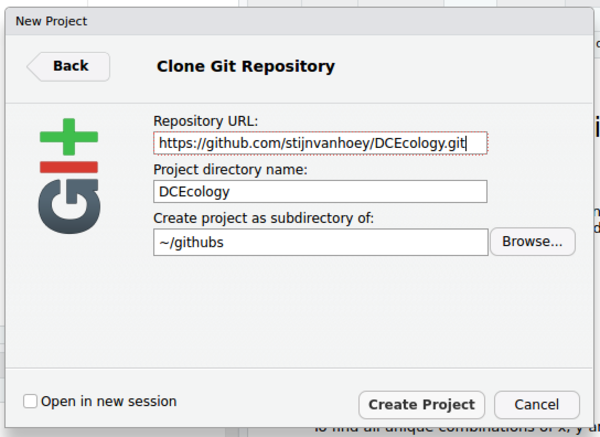
This approach is very common when you are starting a project from scratch or joining a project that already exists on GitHub.
Conclusion
You have now successfully bridged your local R project with the cloud, a cornerstone of modern, reproducible data analysis. You've created a remote backup and laid the groundwork for future collaboration.
Key Takeaways:
- A remote repository on a service like GitHub acts as a central backup and collaborative hub for your project. The default remote is named
origin. - The "GitHub Last" workflow is used when you have an existing local Git project that you want to put online.
- This workflow involves creating an empty repository on GitHub and then using
git remote addandgit pushin the terminal to connect and upload your history. - The
usethis::use_github()function provides a powerful and efficient R-native alternative to perform this entire process with a single command.
Preview of the Next Lesson:
Your local and remote repositories are now linked. The next step is to manage them day-to-day. In our next lesson, we will dive deeper into the push and pull commands, learning how to keep your local and remote repositories synchronized as you continue to develop your analysis.