Introduction
In our last lesson, you successfully connected your local RStudio project to a remote repository on GitHub, completing the crucial step of putting your version-controlled project in the cloud. You now have a secure backup and a central hub for your work. The next step is to master the daily process of keeping your local and remote repositories synchronized.
This lesson focuses on the two most fundamental commands for managing this synchronization: push and pull. You will learn how to send your local, committed changes up to GitHub (push) and how to download changes from GitHub to your local machine (pull). Mastering this two-way communication is the key to an effective version control workflow, ensuring your work is always backed up and preparing you for future collaborative projects.
The Synchronization Loop: Push and Pull
Now that your local repository and the remote repository on GitHub (known as origin) are linked, they operate as two distinct but connected copies of your project. The goal is to keep them in sync.
- Pushing: When you
push, you are sending your committed changes from your local machine up to the remote repository on GitHub. This is how you back up your work and share it with others. - Pulling: When you
pull, you are fetching any changes that exist on the remote repository down to your local machine. This is how you update your local copy with work done by collaborators or work you did on another computer.
The relationship can be visualized as a conversation between your local computer and GitHub.

This cycle of pulling and pushing forms the backbone of your version control routine. A standard best practice, even when working alone, is to start any work session by pulling and end it by pushing.
Pushing Changes: From Local to Remote
Let's walk through the most common workflow: making a change locally and sending it to GitHub. This process always follows the commit -> push sequence. First, you record a snapshot of your changes with a commit (as you learned previously), and then you send that collection of commits to the remote.
The process within RStudio is seamless:
- Modify a file in your project, such as an R script or a
README.mdfile. - Save the file.
- Open the Git pane in RStudio (usually in the top-right). You will see your modified file listed.
- Stage the file by checking the box next to its name.
- Click Commit. This opens the "Review Changes" window.
- Write a descriptive commit message.
- Click the Commit button to save the changes to your local repository.
- Finally, click the green Push button to send your new commit(s) to GitHub.
The "Review Changes" window is your command center for this operation.
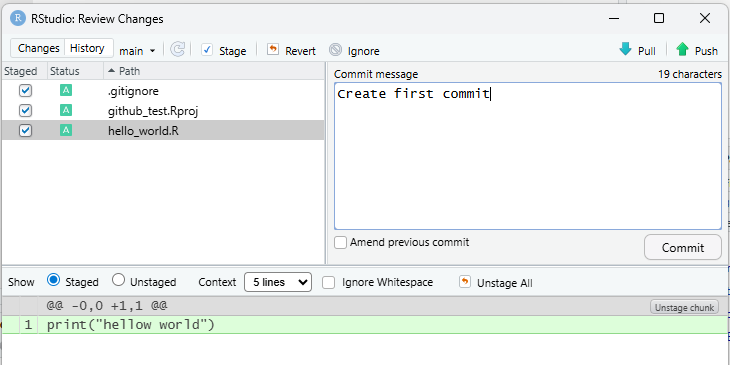
The following video provides an excellent walkthrough of this entire cycle, emphasizing the knit -> commit -> push pattern that is particularly relevant for creating reproducible reports in R.
Cloning a GitHub Repository into RStudio
This video from the LucyStats channel clearly demonstrates the process of making local changes, committing them, and pushing them to GitHub, all within RStudio. Notice the clear distinction between a local commit and the final push that updates the remote repository.
Watch the entire video to see the workflow in action. The first complete cycle is shown from the first commit and push. The presenter then reinforces the pattern with a second example, which is great for solidifying your understanding, from the second change to the end.
Pulling Changes: Syncing from Remote
Pulling is the opposite of pushing. You use it to update your local repository with changes from the remote. Why would the remote have changes that you don't have locally?
- You made a quick edit using the GitHub web interface (e.g., fixing a typo in your
README). - You are working on the project from two different computers.
- A collaborator pushed their own changes.
Let's practice the first scenario, as it's a common one even for solo developers.
First, you'll make a change directly on GitHub. Then, you'll pull that change into your local RStudio project.
4 Version control with git and GitHub
This NCEAS guide includes a hands-on exercise for pulling changes from GitHub, which perfectly simulates the scenario of updating your local project after a remote edit.
Please follow the two steps in the "Challenge" at the end of section 4.5. First, edit your README file directly on the GitHub website. After committing the change there, return to RStudio and pull the changes into your local project. You can do this by clicking the blue "Pull" button in the Git pane.
After you pull, you will see the contents of your local README.md file update to match the version on GitHub. RStudio's Git pane will now show that your local and remote branches are in sync.
The Golden Rule: Pull Before You Push
A crucial habit for a smooth workflow is to pull before you start working and before you push.
If changes have been made on the remote repository since your last pull, Git will require you to integrate those remote changes into your local repository before it allows you to push your new work. Attempting to push without pulling first will result in an error. This is a safety feature that prevents you from accidentally overwriting history.
By starting every work session with a pull, you ensure your local copy is up-to-date. By pulling again just before you push (if you've been working for a long time), you can cleanly incorporate any changes that may have occurred in the meantime. This leads to the ideal workflow:
- Start your session:
Pullto get the latest version. - Do your work: Make changes, save files, and
committhem locally at logical checkpoints. - End your session:
Pullone last time, thenPushyour commits to share your work and back it up.
Conclusion
You have now mastered the complete, fundamental cycle of version control with Git and GitHub. You can confidently move your work between your local machine and the cloud, ensuring your project history is safe, backed-up, and synchronized.
Key Takeaways:
git pushsends your local, committed changes to the remote repository on GitHub.git pullfetches changes from the remote repository and updates your local copy.- The standard workflow within RStudio is to make changes,
stagethem,committhem locally, and thenpushthem to the remote. - The "golden rule" is to
pullbefore you start working and before you push, to ensure your local repository is up-to-date and to avoid conflicts.
Preview of the Next Lesson:
With your project management and version control skills now in place, you have a robust framework for conducting reproducible analyses. In the next module, we will pivot back to the core of your goal: statistical analysis. We'll start by building the theoretical foundations of statistical inference, exploring concepts like null and alternative hypotheses, p-values, and significance testing. This will provide the "solid foundation" for the practical statistical tests you'll learn to perform in R.