Introduction
In our last lesson, we explored the crucial why behind version control, establishing how tools like Git and GitHub are essential for creating reproducible, collaborative, and professional data analysis projects. You learned that version control provides a systematic way to track changes, preventing the chaos of manual file management and forming the bedrock of a transparent scientific workflow.
Now it's time to move from theory to practice. This lesson is a hands-on guide to setting up your digital workshop. We will walk through the one-time configuration process required to get these powerful tools working together on your machine. Our goal is to configure Git within your RStudio environment and securely connect it to a GitHub account. By the end of this lesson, you will have a complete, authenticated toolchain, ready to start tracking your first project.
The Setup Checklist
To integrate Git, RStudio, and GitHub, we need to complete four main steps. This process only needs to be done once, and then you'll be set for all future projects.
- Create a GitHub Account: This will be your online hub for storing and sharing projects.
- Install and Configure Git: This is the version control engine that runs locally on your computer.
- Introduce RStudio to Git: We'll ensure RStudio knows where to find your Git installation.
- Connect RStudio to GitHub: We'll create a secure link so you can transfer your work between your computer and your online GitHub account.
Let's work through each step methodically.
Step 1: Create a GitHub Account
If you don't already have one, your first task is to sign up for a free account on GitHub. This account will serve as your public portfolio and the central remote location for your projects.
- Go to github.com and sign up.
- Choose a professional username. A common convention is some combination of your first and last name (e.g.,
firstname-lastnameorf-lastname). - Since your goal is to work in clinical research, consider using a personal email address that you plan to maintain long-term, rather than a student email that might expire.
The following video clip quickly walks through the sign-up process.
Using git and GitHub in R Studio
This short clip from Lisa Lendway's tutorial on "Using git and GitHub in R Studio" shows the GitHub sign-up page and gives advice on choosing an email address.
Watch from the beginning of the video until this point for a quick overview of the sign-up process.
Step 2: Install and Configure Git
Installing Git
Next, you need to install Git, the software that runs on your computer. It's possible Git is already installed on your system. The article "Git and GitHub in RStudio" provides a clear guide on how to check for and install Git.
Git and GitHub in RStudio – learn-r
This resource will guide you through verifying your Git installation and installing it if necessary. It also covers the initial configuration.
First, follow the instructions in the article under the section "Getting started". This will show you how to check if Git is already installed using RStudio's Global Options. If it's not found, follow their link to the installation instructions for your operating system. Remember to restart RStudio after the installation is complete.
Configuring Git with Your Identity
Once Git is installed, you must tell it who you are. Every time you save a snapshot (a commit), Git will tag it with your name and email. This is crucial for tracking who made which changes. While you can do this from the terminal, the usethis R package provides a more convenient, R-native way to handle this and other Git-related tasks.
First, install and load the usethis package if you haven't already:
install.packages("usethis")
library(usethis)
Now, we'll use a function from this package to set up your details.
How to Use Git/GitHub with R - R for the Rest of Us
This article from "R for the Rest of Us" champions the use of the usethis package for a smoother Git/RStudio experience. We will use its recommended method for configuration.
Please read the subsection "Configure Git". Follow the instructions to run usethis::edit_git_config(). This will open a text file. Add the [user] block with your name and email as shown, ensuring the email is the same one you used for your GitHub account. Save and close the file.
Step 3: Tell RStudio Where to Find Git
After installing Git and restarting RStudio, you should confirm that RStudio has automatically detected it.
Navigate to Tools > Global Options... and select the Git/SVN tab. The "Git executable" field should now have a path to the Git program you installed.

If this field is blank, you may need to click "Browse..." and manually locate the Git executable file on your computer.
Step 4: Connect RStudio to GitHub with a Personal Access Token (PAT)
The final step is to establish a secure connection between RStudio on your computer and your GitHub account online. In the past, you could use your GitHub password for this. For security reasons, GitHub now requires a Personal Access Token (PAT).
A PAT is essentially a long, complex password that you generate on GitHub and give to RStudio. It's more secure because you can grant it specific permissions (e.g., only allow it to access your repositories) and revoke it at any time without changing your main GitHub password.
Once again, the usethis package makes this process remarkably simple.
How to Use Git/GitHub with R - R for the Rest of Us
This section of the article details the modern, recommended workflow for connecting RStudio and GitHub using a Personal Access Token (PAT).
Please follow the instructions in the sections "Create a Personal Access Token" and "Store Personal Access Token". Here is a summary of the steps you will take: Run usethis::create_github_token() in the R console. This will take you to the correct page on GitHub to generate a new token. You can leave the default settings. Give your token a descriptive name in the "Note" field (e.g., "RStudio on my laptop"). Click "Generate token". CRITICAL: GitHub will show you the token only once. Immediately copy the token to your clipboard. Do not close this browser tab until you have completed the next step. Run gitcreds::gitcreds_set() in the R console. This function (from the gitcreds package, which works with usethis) will prompt you to paste your PAT. Paste the token you just copied and press Enter.
When you are prompted to enter credentials, you will see a dialog box. This is where you paste your Personal Access Token.
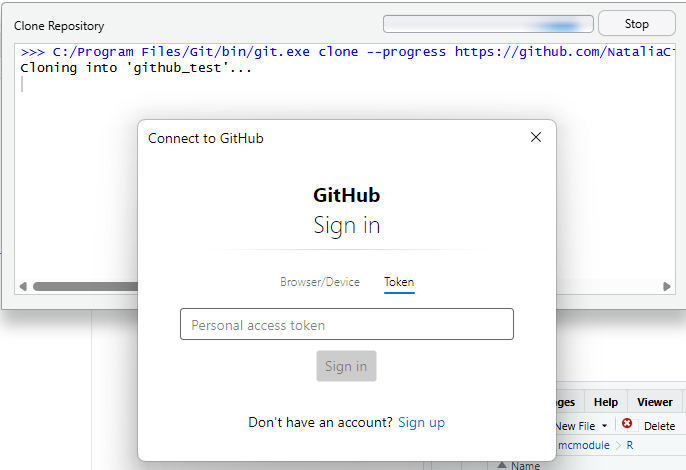
To confirm everything is working, you can run the following function from usethis:
usethis::git_sitrep() # git situation report
This will print a report on your Git and GitHub configuration. Look for a line that says GitHub user: followed by your username. This confirms a successful connection!
Conclusion
Congratulations! You have successfully completed the essential one-time setup for using Git and GitHub with RStudio. While it involved several steps, this configuration provides a secure and robust foundation for all your future version-controlled projects.
Key Takeaways:
- You need both a GitHub account (the online hub) and Git (the local software) installed on your machine.
- You must configure Git with your name and email so your work is properly attributed.
- The
usethispackage simplifies many configuration tasks, such asedit_git_config()for setting your user details. - Secure authentication between RStudio and GitHub is handled by a Personal Access Token (PAT), not your password.
- The
usethis::create_github_token()andgitcreds::gitcreds_set()functions provide a streamlined workflow for generating and storing your PAT.
Preview of the Next Lesson:
With your toolchain fully configured, you are now ready to put it to use. In the next lesson, you will learn how to initialize a Git repository within a new or existing RStudio Project. We will take our first snapshot—our first commit—and begin the process of tracking the history of an analysis project.