Hello! Welcome back to your course on R programming.
Introduction
In our previous lesson, we set up your digital laboratory: you installed R and RStudio and took a tour of the RStudio interface. You learned about the four main panes—Source, Console, Environment, and the multi-purpose bottom-right pane—that will be your command center for data analysis.
Today, we'll bring that command center to life. This lesson is all about executing R code. You will learn the two fundamental ways to run commands:
- Interactively in the Console.
- Reproducibly from an R Script file.
Understanding the distinction between these two methods is your first step toward building the robust, shareable, and reproducible analyses that are essential in clinical and academic research. The Console is your scratchpad for quick tests, while the Script is your permanent lab notebook.
The Console: Your Interactive Scratchpad
The Console (typically in the bottom-left pane) is your direct line to the R engine. Any command you type here is executed immediately when you press Enter. It's perfect for quick calculations, checking a value, or trying out a function.
Let's try it.
- Click inside the Console pane. You should see a
>symbol and a blinking cursor. - Type the following command and press
Enter:
2 + 2
R immediately evaluates the expression and prints the result:
[1] 4
(Don't worry about the [1] for now; it's just R's way of indexing the output.)
Now try a few more simple calculations directly in the console:
100 / 53 * (4 + 2)
The console is fast and responsive, which makes it great for exploration. However, it has a major drawback for serious analysis: commands typed in the console are not saved as part of your project. While they are stored in the 'History' tab for your current session, they don't form a reproducible script. For any analysis you want to save and potentially rerun or share, you need a script file.
The R Script: Your Permanent Lab Notebook
The Source Editor (top-left) is where you will write and save your R scripts. A script is a simple text file (with a .R extension) that holds your code. This is where you will build your analyses.
Creating and Running Your First Script
Let's create a script.
- Go to
File > New File > R Script. A new tab named "Untitled1" will open in your Source Editor. - In this new script, type the same calculation we did before:
2 + 2
Notice that when you press Enter, nothing happens in the console. You've simply moved to the next line in your text editor. To execute code from the script, you have to explicitly tell RStudio to run it.
This video from The Global Health Network gives a quick demonstration of the difference between running code in the script versus the console.
Introduction to R for Epidemiology - Session 1
Watch this short clip to see a demonstration of executing code from the Source pane (the script) and directly in the Console pane.
About 17 minutes in, watch executing R code. Pay close attention to how running code from the script sends it to the console, and how the narrator explains the key difference: the script saves your code, while the console does not.
How to Execute Code from a Script
As you saw in the video, you need to send the commands from your script to the console. There are several ways to do this. The following document from Posit, the creators of RStudio, is the definitive guide on this topic.
Executing code – RStudio User Guide - Posit Docs
Please read this guide to learn the primary ways to execute code from a source file in RStudio.
Read the first section titled 'Source files', specifically focusing on code execution methods. It details three essential techniques: executing a single line, executing multiple lines, and sourcing the entire document. Focus on the keyboard shortcuts, as they will make you much more efficient.
Let's practice the methods from the guide. In your Untitled1 script, add a few more lines of code:
# This is my first R script!

5 * 8
10 - 3
(Any line beginning with a # is a comment. R ignores it, but it's crucial for explaining your code to others and to your future self.)
Now, try the following:
- Run one line at a time: Place your cursor on the
5 * 8line and pressCtrl + Enter(orCmd + Enteron Mac). The command and its output appear in the console, and your cursor moves to the next line. Do this again for10 - 3. - Run a selection: Highlight both
5 * 8and10 - 3with your mouse, then pressCtrl + Enter. Both lines are executed. - Save your script: Go to
File > Saveand name your scriptmy_first_script.R. It's a best practice to use descriptive names and avoid spaces.
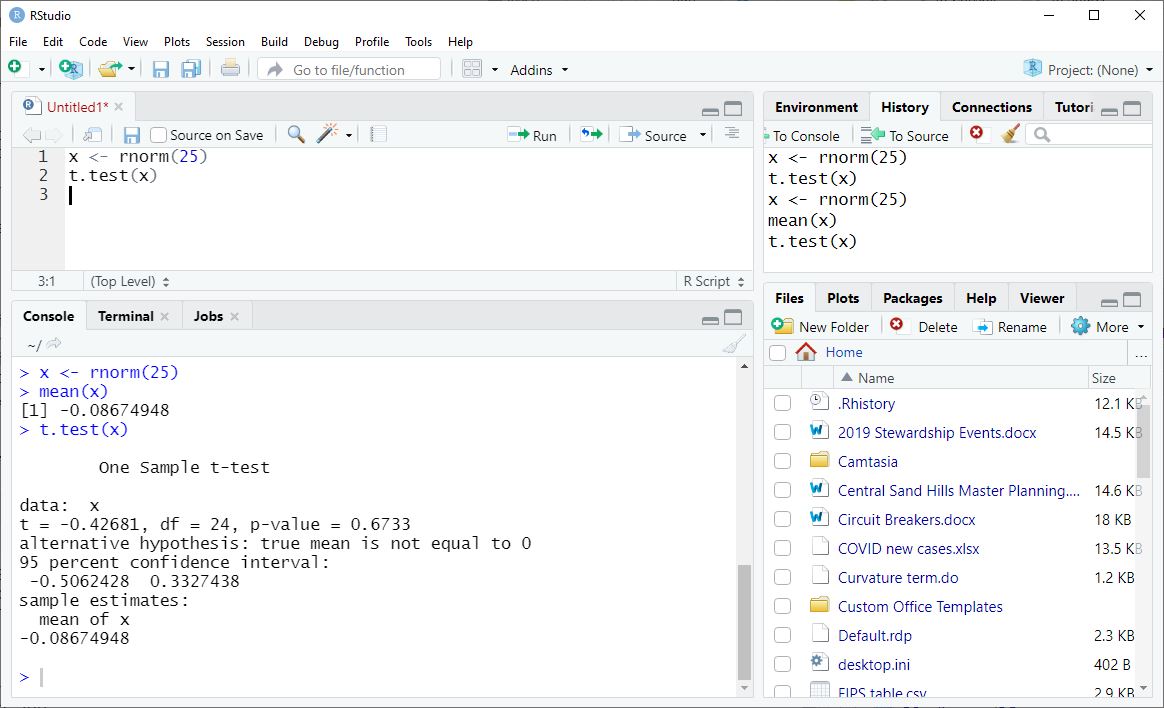
The image below illustrates this workflow perfectly. Code is written in the script (top-left), and when you run it, the command is sent to the console (bottom-left) where the output is displayed.
The key principle is summarized well in this final short video clip.
RStudio for the Total Beginner
This clip from HRanalytics101.com provides a final, clear recap of when to use the source panel versus the console.
About three minutes in, watch for a concise summary of the different purposes of the script and the console.
To summarize:
- Use the R Script to write code you want to save, reuse, and share. This is your permanent record.
- Use the Console for quick, interactive tests where you don't need to save the commands. This is your temporary scratchpad.
For all your coursework and future research projects, nearly all of your code should be written in R scripts.
A Look at a Typical Script Structure
You've learned the mechanics of running code. Now, let's look at how those commands might be structured in a simple, real-world script. The following video walks through a basic analysis script. You aren't expected to understand what every function does yet—we'll cover that in later lessons. Instead, focus on the workflow and the structure.
Introduction to R for Epidemiology - Session 1
This video walks through a simple but complete R script. Pay attention to its organization: the header, comments, loading packages, and then running the analysis code line by line.
About 33 minutes in, watch the script walkthrough. Observe how the presenter: Uses comments (#) to create a header and explain the code. Loads a 'package' (a collection of tools) at the start. Executes code line-by-line using Ctrl+Enter to inspect the data and perform analysis steps. Observes the output from each step in the console.
This example gives you a feel for how a typical analysis script is built: a descriptive header, loading necessary tools, and then a step-by-step series of commands that transform and analyze data, with comments explaining the logic along the way. This organized, commented approach is exactly what you should aim for in your own work.
Conclusion
Well done! You can now write and execute R code, marking your official start as an R programmer.
Key Takeaways:
- You can execute commands interactively in the Console for quick tests and calculations.
- You can write, save, and execute code from an R Script file for permanent and reproducible work.
- The primary way to run code from a script is with the keyboard shortcut
Ctrl + Enter(orCmd + Enter), which runs the current line or selection. - Writing your analysis in a script is the standard practice for creating research that is transparent, reproducible, and shareable.
Preview of the Next Lesson:
Now that you can write and run code in a script, our next step is to organize our work. A single analysis can involve multiple scripts, data files, and plots. In the next lesson, you will learn how to use RStudio Projects to keep all the files for a specific analysis together in a self-contained, portable, and organized workspace.