Hello! Welcome to your first lesson in R programming. Let's get started on your journey to becoming a skilled data analyst.
Introduction
Today, we'll build the essential foundation for all your future work in R. Our goal is to install the necessary software and become familiar with your primary tool: RStudio. By the end of this lesson, you will have successfully installed both R and RStudio and learned to navigate the RStudio interface, understanding the purpose of its main components.
This is the first and most critical step. Just as a researcher needs a well-organized lab, a data analyst needs a well-configured programming environment. The tools we set up today are the standard in academic research and industry, and mastering them is your first step toward producing high-quality, reproducible data analysis for clinical research.
What are R and RStudio?
Before we begin the installation, it's important to understand the two pieces of software we'll be using and how they relate to each other.
- R is the programming language itself. Think of it as a powerful, specialized engine. It has all the statistical and data manipulation capabilities you'll need, but using it on its own can feel a bit raw and technical.
- RStudio is an Integrated Development Environment (IDE). Think of it as the modern, user-friendly dashboard and control system built around the R engine. It provides a structured environment with code editors, file browsers, visualization windows, and many other helpful features that make writing R code and managing your projects much more efficient.
You can't use RStudio without R, so we will always install R first, and then RStudio.
Installing Your Tools
The installation process is straightforward. We will install R first, followed by RStudio. The video below provides a clear, step-by-step walkthrough for a Windows machine, but the process is very similar for macOS.
Installing R and R Studio | R for Data Analytics Series
This video from Alex The Analyst will guide you through the installation process. Please watch the first three minutes to install both R and RStudio.
Follow the instructions in the video to download and install both R and RStudio. Watch from the beginning to just before the three-minute mark to install R. Continue watching for the next minute to install RStudio. You can accept the default settings during both installations.
If you prefer a detailed text-based guide or are using a Mac and want specific instructions, the following resource is an excellent alternative. It provides detailed, step-by-step instructions with screenshots for both Windows and macOS.
Chapter 2 Getting Started and Installing Your Tools - Bookdown
This chapter from 'Reproducible Medical Research with R' provides comprehensive installation guides.
Read the sections that correspond to your operating system: For Windows users: Read Section 2.5 for Windows R installation and Section 2.7.1 for Windows RStudio installation. For macOS users: Read Section 2.6 for macOS R installation and Section 2.7.3 for macOS RStudio installation. Follow the instructions carefully to install R first, then RStudio.
Once you have completed the installation, open RStudio. It should start up and automatically connect to your R installation. Now, let's explore the environment.
Navigating the RStudio Interface
When you first open RStudio, you'll see three panes. To get the standard four-pane view that we'll be working with, go to the menu and select File > New File > R Script.
Your screen should now look something like this, with four distinct quadrants.
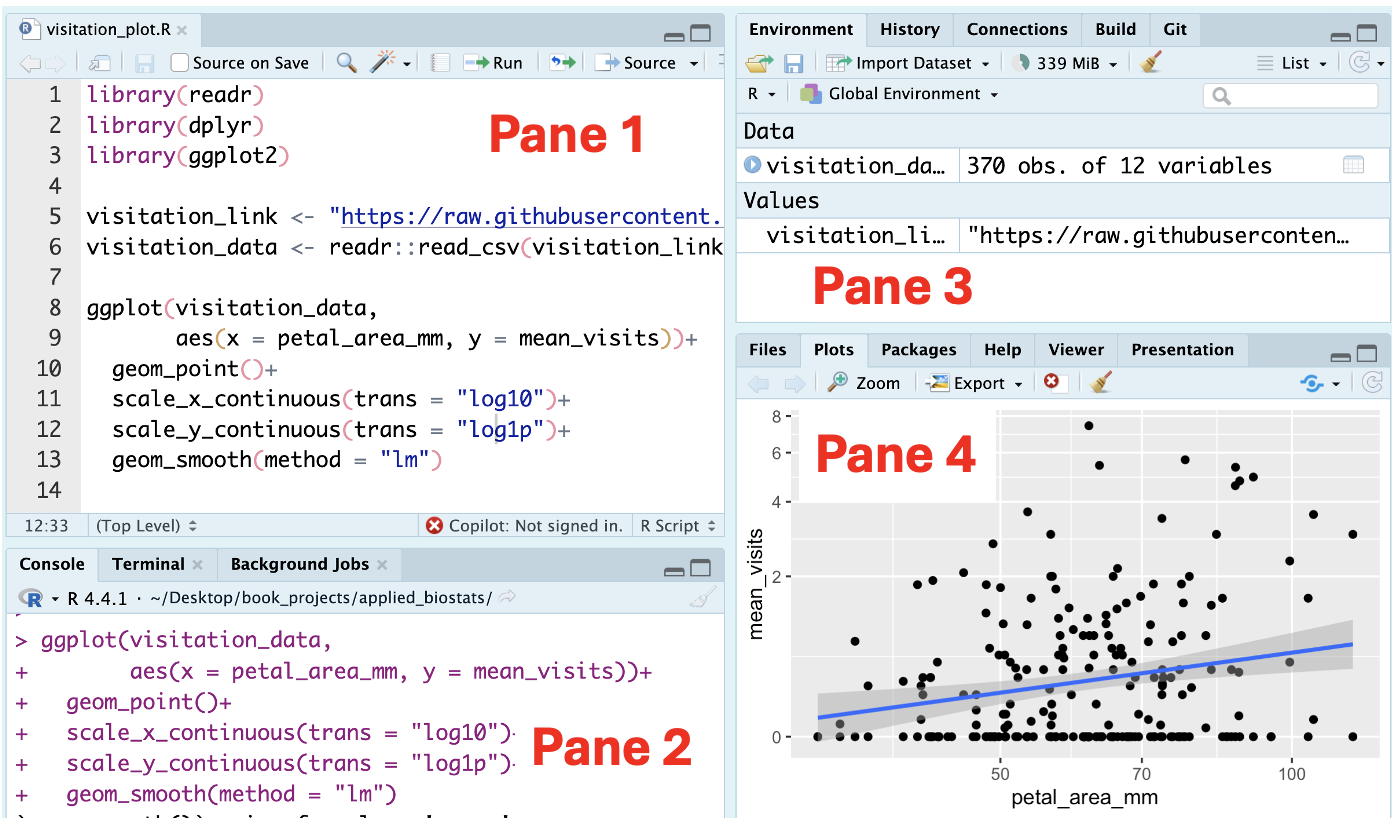
Each pane has a specific purpose. Understanding their roles is key to working efficiently. This next video provides a fantastic tour of the RStudio layout.
RStudio for the Total Beginner
This video from HRanalytics101.com gives a clear and concise tour of the four panes in RStudio. As you watch, pay close attention to the function of each pane.
Watch the video from the beginning. It will walk you through: The Source and Console panes The Environment pane The Files, Plots, Packages, and Help pane tabs
Let's consolidate what you've just seen. Here is a summary of the four panes and their functions:
-
Source Editor (Top-Left):
- This is a text editor where you write and save your R scripts (
.Rfiles). - Think of it as your notebook. Code written here is saved and can be run again later, which is essential for reproducible research. You'll do most of your work here.
- This is a text editor where you write and save your R scripts (
-
Console (Bottom-Left):
- This is where R code is actually executed.
- You can type commands directly into the console for quick tests, but they won't be saved in your script. When you run code from the Source Editor, it is sent to the console, and the output appears here.
-
Environment & History (Top-Right):
- Environment Tab: This is one of the most useful panes. It displays all the objects (like datasets and variables) that you have created in your current R session.
- History Tab: This tab keeps a record of all the commands you've run.
-
Files, Plots, Packages, & Help (Bottom-Right):
- Files Tab: A file browser that shows the contents of your project's working directory.
- Plots Tab: When you create a visualization (like a chart or graph), it will appear here.
- Packages Tab: This shows all the R packages installed on your system. Packages are collections of functions and data that extend R's capabilities.
- Help Tab: Allows you to look up documentation for R functions and packages.
Setting Yourself Up for Success
To ensure your analyses are reproducible—a cornerstone of good scientific practice—it's crucial to start each session with a clean slate. RStudio has a default setting that saves your entire workspace when you quit and reloads it the next time you open it. This can lead to unexpected errors and results that are hard to trace.
Let's disable this feature now. This is a one-time change that will save you from future headaches.
- In the RStudio top menu, go to
Tools > Global Options.... - In the
Generalsection, find the dropdown menu for "Save workspace to .RData on exit". - Change this setting to "Never".
- While you are here, also uncheck the box that says "Restore .RData into workspace at startup".
RStudio Global Options configured for a reproducible workflow. Set 'Save workspace' to 'Never' and uncheck 'Restore .RData'.
By making this change, you are adopting a professional workflow that forces your analysis to be self-contained within your scripts. This is vital for the kind of robust and verifiable work required in clinical research.
Conclusion
Congratulations on completing your first lesson! You have taken a significant step today.
Key Takeaways:
- You now understand the difference between R (the language engine) and RStudio (the user interface).
- You have successfully installed both tools on your computer.
- You can identify and describe the purpose of the four main panes in the RStudio IDE: Source, Console, Environment, and the Files/Plots/Packages/Help pane.
- You have configured RStudio for a more reproducible workflow, a best practice in data analysis.
Preview of the Next Lesson:
Now that your environment is set up and you know your way around, you're ready to start programming. In the next lesson, we will dive into writing and executing your first lines of R code, both in the console and from a script file.