Introduction
Welcome back! In our last lesson, we took a tour of the Tableau workspace, learning to identify the key areas like the Data Pane, shelves, and cards. You now have a map of the workshop. Today, we'll learn how to bring your materials—your data—into that workshop.
This lesson focuses on the learning outcome: Connect Tableau to file-based data sources (Excel, CSV). This is the foundational first step of any analysis project. By the end of this lesson, you'll be able to confidently connect Tableau to the two most common types of data files you'll encounter as an analyst.
We'll start by looking at the "Connect" screen, then walk through the specific steps for both CSV and Excel files. We'll also see what happens right after you connect, including how Tableau interprets your data.
The "Connect to Data" Screen
When you first open Tableau, before you even see the worksheet, you're greeted by the start screen. The most important section here is the Connect pane on the left.

The two options we're interested in today are:
- Microsoft Excel: For connecting to
.xlsor.xlsxfiles. - Text file: For connecting to files like
.csv(Comma-Separated Values) or.tsv(Tab-Separated Values).
Since you plan to use the free Tableau Public service, it's important to know that the process is slightly different. Instead of a dedicated desktop application start screen, you'll often connect to data through your web browser.
Let's look at the official documentation that explains this.
Creators: Connect to Data on the Web
This guide from Tableau's official help documentation explains how to connect to files specifically within Tableau Public. It's a quick but important read.
Read the short section titled 'Connect to files'. Notice the 'Upload from Computer' option, as this is what you will use most often in Tableau Public. It also helpfully notes the maximum file size.
Connecting to a CSV File
A CSV file is one of the simplest and most common data formats. It's just a plain text file where values are separated by commas. Let's see how to connect to one.
The following video provides a thorough walkthrough, from finding a sample dataset online to connecting it in Tableau.
How to Connect to Different Data Sources in Tableau: A beginner's guide
This video from Data with Tableau Tim demonstrates the full process of connecting to a CSV file. It's a great practical example.
Watch from 00:40 to 09:45. Pay close attention to these key moments: 01:10: Selecting 'Text file' to begin the connection. 05:55: The 'Connection Interface' that appears after you select the file. 07:20: Dragging the file into the data modeling window to see the data preview.
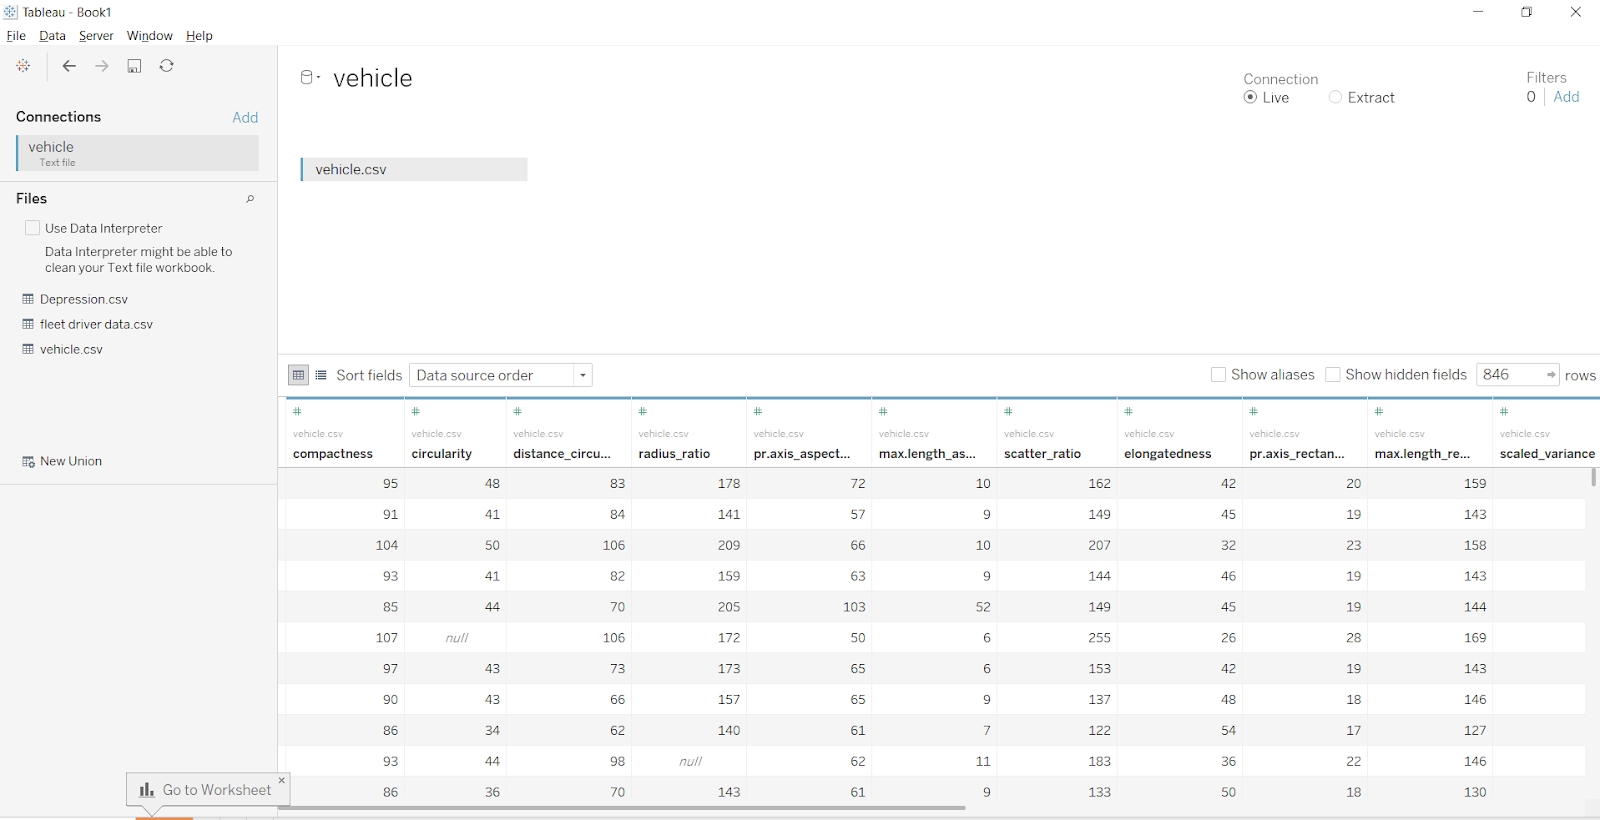
After you drag your table into the main canvas, Tableau shows you the Data Source page. Here, you get a preview of your data in a grid, which should look familiar.
Connecting to an Excel File
Connecting to an Excel file is very similar, but there's an extra consideration: an Excel workbook can contain multiple sheets. Tableau will let you choose which sheet (or sheets) you want to use.
Given your experience with Excel, you'll find this process intuitive. It's like telling Tableau which tab in your spreadsheet contains the data you want to analyze.
Let's return to the video guide to see this in action. The demonstrator uses the "Sample - Superstore" file, which you explored in our last lesson.
How to Connect to Different Data Sources in Tableau: A beginner's guide
This segment shows how to connect to an Excel file and how Tableau handles multiple sheets within a single workbook.
Watch from 14:31 to 22:18. Focus on: 15:00: How to add a new data connection from within a workbook. 18:15: How Tableau lists the available sheets from the Excel file ('Orders', 'People', 'Returns'). 22:00: Dragging the 'Orders' sheet into the canvas to load the data.
A Quick Note on "Tableau-Friendly" Excel Files
While Tableau is powerful, it works best with data that is structured in a simple, tabular format. Things you might do in Excel to make a report more "human-readable"—like merged cells, multi-row headers, or added notes—can confuse Tableau.
The following reading explains these common pitfalls and provides excellent advice on how to prepare your Excel data before connecting. This is a key part of the "why" behind data preparation.
This article from DataCamp details best practices for structuring your Excel files for a smooth import into Tableau. Understanding these tips will save you a lot of trouble later.
Read the sections 'Establishing basic data connections' and 'Structural limitations and workarounds'. Pay special attention to the tips for making your Excel data 'Tableau-friendly,' such as ensuring a single-header row and avoiding merged cells.
Checking Your Data: Metadata and Data Types
Once your data is loaded onto the Data Source page, Tableau automatically inspects each column and assigns a data type. This information about your data (e.g., this column is a number, this one is a date) is called metadata.
It's crucial to check that Tableau has guessed correctly. For example, if a column of dates is misinterpreted as text (a "string"), you won't be able to perform time-based analysis.
The video below shows you how to check and change these data types right on the Data Source page.
How to Connect to Different Data Sources in Tableau: A beginner's guide
This final video segment explains metadata and shows you how to manage the data types Tableau assigns to your fields.
Watch from 09:45 to 13:47. Note the icons above each column header (# for number, Abc for string) and see how easy it is to click the icon to change the data type (e.g., from 'String' to 'Date').
Your Turn: Hands-On Practice
Now it's time to put theory into practice.
- Find Data: Go to the Tableau Public sample data page and download any CSV dataset that interests you (e.g., "World Bank Indicators").
- Connect to CSV:
- Open Tableau Public.
- On the start page, select Text File (or "Upload from Computer" if you're using the web interface).
- Navigate to and select the CSV file you just downloaded.
- Once on the Data Source page, look at the column headers. Hover over the icons (like 'Abc' or '#') to see the data types. Do they look correct?
- Connect to Excel:
- Now, let's add a second data source. Click the small "Add" button next to "Connections" at the top-left, or click the "New Data Source" icon in the toolbar (a cylinder with a plus sign).
- Select Microsoft Excel.
- Navigate to your
My Tableau Repository/Datasourcesfolder and connect to the Sample - Superstore file. (You should have this from the previous lesson's exploration). - You will now see the
Orders,People, andReturnssheets listed. Drag the Orders sheet onto the canvas. - Examine the data types for this new connection. Notice how
Order Datehas a calendar icon andSaleshas a '#' icon.
This exercise solidifies the core workflow: connect, inspect, and prepare for analysis.
Conclusion
Great work! You've successfully navigated the first and most critical step in the Tableau workflow: getting your data into the application.
Key Takeaways:
- You connect to data from the Connect pane on the start screen or via file upload in Tableau Public.
- Use Text File for
.csvfiles and Microsoft Excel for.xlsxfiles. - For Excel files with multiple sheets, you can drag the specific sheet you need onto the canvas.
- After connecting, always check the data types (metadata) on the Data Source page to ensure Tableau has interpreted your columns correctly.
Preview of the Next Lesson:
Now that you know how to connect, we'll explore the types of connections. In the next lesson, we will distinguish between live connections and data extracts. This is a crucial concept for managing performance and data freshness in your workbooks.