Hello! Welcome to the next lesson in our exploration of asynchronous processing.
In the last few lessons, we've built up a strong theoretical foundation for asynchronous task queues. We've defined the core components (producer, broker, worker), explored why idempotency is crucial, and learned how to build resilient tasks using intelligent retry strategies like exponential backoff.
Now, it's time to put all that theory into practice. This lesson is a hands-on workshop where we will achieve a core backend development task: setting up Celery with Redis to offload a long-running job from a Django view. By the end of this lesson, you will have a working system that demonstrates the power of asynchronous processing and a deeper understanding of how the components you've learned about fit together.
The Big Picture: Our Goal
Before we dive into the code, let's look at the architecture we're about to build. A user makes a request to our Django application. Instead of handling a time-consuming task within the request-response cycle and making the user wait, the Django view will immediately hand off the task to a message broker (Redis). A separate Celery worker process will then pick up the task from the broker and execute it in the background.
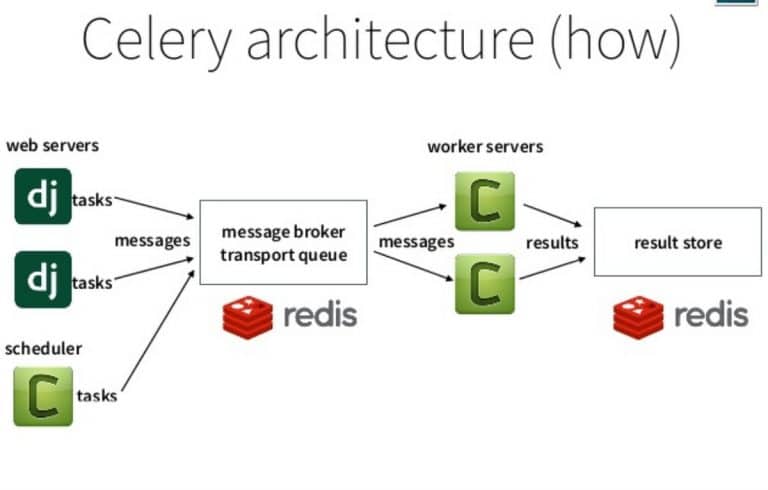
This pattern is fundamental to building responsive and scalable web applications. Let's get started.
Part 1: Project Setup and Configuration
We'll be following a clear, step-by-step process. The video below provides an excellent end-to-end walkthrough of this setup. I recommend you watch it as you follow the steps outlined here. We'll also reference a blog post for easy access to code snippets.
How to set up Celery and Redis - Django Background Tasks - Part 2
This video by Andreas Jud is a complete guide to setting up Celery with Redis for a Django project. It covers installation, configuration, task creation, and execution.
You can watch this video in segments as we go through the steps. For now, you can start with the sections on installation and initial configuration (02:13 - 08:44). We will cover task creation and calling it from a view next.
For written instructions and code you can copy, this blog post from Sevalla is a great companion.
Handling long running tasks in Django apps
This article provides a step-by-step tutorial that mirrors the video's content, making it a great reference for code snippets and configuration details.
Refer to the sections 'Install Redis' and 'Install Celery' for the initial commands and configuration code.
Step 1: Install the Broker (Redis)
As we've discussed, Celery needs a message broker to hold tasks. Redis is a popular choice because it's fast, lightweight, and easy to set up.
- If you're using a Mac with Homebrew, you can install Redis with
brew install redis. - If you're using Docker (recommended for consistency), you can start a Redis container with:
docker run -d -p 6379:6379 redis - On Linux, you can use your package manager, e.g.,
sudo apt-get install redis-server. - On Windows, it's best to use Redis via the Windows Subsystem for Linux (WSL), as Celery's default worker mode is not compatible with Windows.
Step 2: Install Python Dependencies
In your project's virtual environment, install Celery and the Python client for Redis:
pip install celery redis
Step 3: Configure Celery in Django
Now we need to tell Django how to communicate with Celery and Redis. This involves two main steps:
-
Update
settings.py: Add theCELERY_BROKER_URLsetting. This tells Celery where our Redis broker is running.# settings.py # ... other settings # Celery Configuration CELERY_BROKER_URL = 'redis://localhost:6379/0'The
/0at the end specifies Redis database number 0, which is the default. -
Create
celery.py: In your main Django project directory (the one containingsettings.py), create a new file namedcelery.py. This file will define our Celery application instance.# myproject/celery.py import os from celery import Celery # Set the default Django settings module for the 'celery' program. os.environ.setdefault('DJANGO_SETTINGS_MODULE', 'myproject.settings') app = Celery('myproject') # Using a string here means the worker doesn't have to serialize # the configuration object to child processes. # - namespace='CELERY' means all celery-related configuration keys # should have a `CELERY_` prefix. app.config_from_object('django.conf:settings', namespace='CELERY') # Load task modules from all registered Django app configs. app.autodiscover_tasks()Make sure to replace
'myproject'with the actual name of your Django project. -
Import the app in
__init__.py: To ensure the Celery app is loaded when Django starts, you need to import it in the__init__.pyfile located in the same directory as yoursettings.py.# myproject/__init__.py # This will make sure the app is always imported when # Django starts so that shared_task will use this app. from .celery import app as celery_app __all__ = ('celery_app',)
Your project is now configured to use Celery!
Part 2: Creating and Triggering a Task
Now for the fun part: defining a task and offloading its execution from a view.
Step 1: Define the Task
In one of your Django apps (e.g., yourapp), create a new file called tasks.py. Here, we'll define a function that simulates a long-running process and decorate it with @shared_task.
# yourapp/tasks.py

import time
from celery import shared_task

@shared_task
def simulate_long_running_task(duration_seconds):
    """
    Simulates a task that takes a while to complete.
    """
    print(f"Starting long task for {duration_seconds} seconds...")
    time.sleep(duration_seconds)
    print("Long task finished.")
    return f"Task completed after {duration_seconds} seconds."
The @shared_task decorator lets you create tasks without having to import the Celery app instance directly, which is great for reusable apps.
Step 2: Trigger the Task from a View
Now, modify a view in yourapp/views.py to call this task. Instead of running the time.sleep() directly, we'll use the .delay() method on our task function.
# yourapp/views.py

from django.http import JsonResponse
from .tasks import simulate_long_running_task

def start_task_view(request):
    """
    A view to trigger our long-running task.
    """


    # Offload the task to Celery
    task = simulate_long_running_task.delay(10) # Simulates a 10-second task


    # Return a response immediately
    return JsonResponse({
        "message": "Your task has been submitted!",
        "task_id": task.id # Celery returns an AsyncResult object with a task ID
    })
The .delay() method is a convenient shortcut for Celery's more general .apply_async() method. When you call it, Celery immediately serializes the function name and its arguments (10) into a message and sends it to the Redis broker. The view then returns a JsonResponse instantly, without waiting for the 10-second sleep to finish.
A Critical Detail: Serialization
Notice we're passing a simple integer (10) to our task. This is crucial. You can only pass arguments to Celery tasks that can be serialized (converted to a format like JSON). Simple data types like strings, numbers, lists, and dictionaries are fine. Passing complex objects like Django model instances or file handles will fail. A common pattern is to pass the primary key (ID) of an object and have the task re-fetch the object from the database.
Part 3: Running the System and Seeing it Work
You now have three main components that need to run concurrently in separate terminal windows:
-
The Redis Broker: If you're using a local install, run
redis-server. If you're using Docker, it should already be running. -
The Django Web Server:
python manage.py runserver -
The Celery Worker:
celery -A myproject worker -l infoReplace
myprojectwith your project name. The-Aflag points to your Celery application instance.If you are on Windows and not using WSL, you need to use the solo worker pool:
celery -A myproject worker -l info -P solo
Now, navigate to the URL connected to your start_task_view. You should get an immediate JSON response in your browser. Then, look at your Celery worker's terminal. You will see logs indicating that the worker received the task, started executing it, and finished after 10 seconds. You've successfully offloaded a long-running task!
How to set up Celery and Redis - Django Background Tasks - Part 2
Let's watch the final part of the video, where the worker is started and a common serialization error is debugged. This is an important practical step.
Watch from 10:41 to the end. Pay close attention to the celery worker command and the process of identifying and fixing the 'not JSON serializable' error, which reinforces the importance of passing simple data types to tasks.
Part 4: Under the Hood - What's Happening in Redis?
You've built a working system, which is great. But your goal is to understand things at the deepest level. So, what is actually happening inside Redis when you call .delay()?
When a task is submitted, Celery pushes a message onto a Redis List. A Celery worker then performs a blocking pop command (like BRPOP) on this list to wait for and retrieve new tasks.
Let's see this in action. You can use the Redis Command Line Interface (redis-cli) to inspect the broker.
Redis as a Message Broker: Deep Dive
This article provides a fantastic deep dive into how Celery uses Redis as a broker. We'll use it to inspect the underlying data structures.
Read the section 'Understanding Redis Internals in the Context of Celery'. This will show you exactly what keys Celery creates in Redis and how tasks are stored in a list before being processed. You can try the KEYS * and LRANGE celery 0 -1 commands in redis-cli yourself while a task is queued.
Here’s a summary of what you'll find:
- A List as the Queue: Celery creates a Redis list (by default named
celery) that acts as the task queue. New task messages are added withLPUSH. - Workers
BRPOP: Workers use a blocking pop command to efficiently wait for and pull tasks from the right end of this list. - Result Metadata: If you configure a result backend, Celery will store the status and result of each task in a separate Redis key (often a String), typically named
celery-task-meta-<task_id>. This is how you can check if a task succeeded and what it returned.
By inspecting Redis directly, you demystify the process and see that the "magic" of a message broker is built on top of fundamental data structures.
Conclusion
Congratulations! You have successfully configured a Django project with Celery and Redis to handle background tasks. This is a fundamental pattern for any production backend service.
Key Takeaways:
- A task queue system consists of a producer (your Django view), a broker (Redis), and a consumer (the Celery worker).
- Configuration involves linking these three components via
settings.pyand acelery.pyapplication file. - Tasks are defined as simple Python functions with the
@shared_taskdecorator. - Tasks are triggered asynchronously from a view using
.delay(), which returns a response to the user immediately. - Under the hood, Celery uses a Redis List to queue task messages for workers.
Preview of the Next Lesson
In this lesson, we built the machinery for running tasks in the background. In our next and final lesson for this module, we will focus on designing a reliable background job that is idempotent and handles transient failures gracefully. We will synthesize everything we've learned about idempotency, retry strategies, and dead-letter queues to design a single, robust, production-ready task from start to finish.