Hello! Welcome to the first lesson in our fourth module, "Web Servers and Application Runtimes."
In the previous module, we explored the operating system, the environment where your backend code runs. We finished by using tools like ps and htop to see how the OS manages processes and resources. Now, we move one layer up the stack to understand how an application actually begins to communicate over the network.
Today's lesson is foundational. Our goal is to build a minimal TCP server in Python using the socket module. This exercise is crucial because it demystifies what complex tools like Nginx or Gunicorn do at their core. By writing a server from scratch, you'll gain a "root level" understanding of how a backend application listens for and responds to network requests, directly aligning with your goal of understanding the "why" behind the tools you use.
1. Sockets: The Foundation of Network Communication
Before we write any code, let's solidify our understanding of what a socket is. In the simplest terms, a socket is an endpoint for communication. When two programs on a network need to talk, they each create a socket and establish a connection between them.
Your Python code doesn't directly control the network card. Instead, it uses the socket module to make requests to the Operating System. The OS, in turn, manages the low-level details of sending and receiving data through the physical hardware.
This diagram illustrates the relationship perfectly:

When we build a TCP server, we follow a specific sequence of steps to establish a connection, exchange data, and then close it.
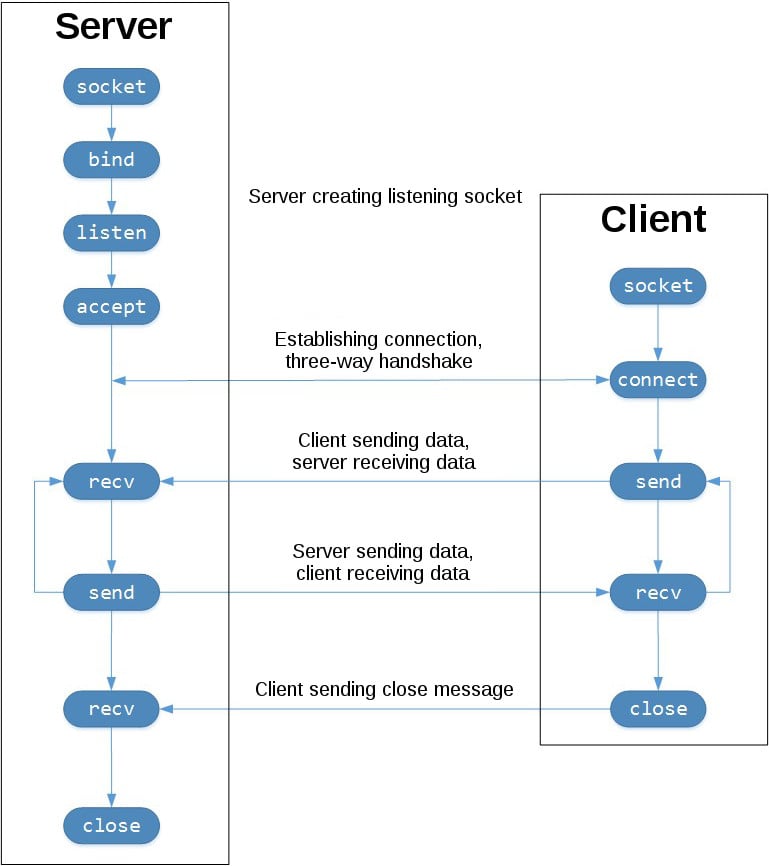
This flow is our roadmap for the code we are about to write.
2. The Core API: Python's socket Module
Python's socket module gives us direct access to the underlying OS socket functionality. The main functions we'll use are:
socket.socket(): Creates a new socket..bind((host, port)): Associates the socket with a specific IP address and port number..listen(): Puts the socket into server mode, making it listen for incoming connections..accept(): Blocks execution and waits for a client to connect. Returns a new socket for communicating with that client..connect((host, port)): Used by a client to connect to a listening server socket..send(bytes): Transmits data..recv(buffer_size): Receives data..close(): Releases the socket resource.
3. Building an Echo Server and Client
Let's apply these concepts by building a classic "echo" server. This server will accept a connection from a client, receive any message the client sends, and simply send it back.
I recommend you create two files, server.py and client.py, and follow along with the code below.
The Server: server.py
This code sets up a socket, binds it to an address, listens for a connection, and then echoes back any data it receives.
# server.py
import socket

HOST = "127.0.0.1"  # Standard loopback interface address (localhost)
PORT = 65432        # Port to listen on (non-privileged ports are > 1023)


# 1. Create a socket
# AF_INET specifies the IPv4 address family.
# SOCK_STREAM specifies the TCP protocol.
with socket.socket(socket.AF_INET, socket.SOCK_STREAM) as s:


    # 2. Bind the socket to the address
    s.bind((HOST, PORT))
    print(f"Server bound to {HOST}:{PORT}")


    # 3. Listen for incoming connections
    s.listen()
    print("Server is listening for connections...")


    # 4. Accept a connection
    # This is a blocking call. It waits until a client connects.
    # It returns a new socket object `conn` for this specific connection,
    # and the client's address `addr`.
    conn, addr = s.accept()
    with conn:
        print(f"Connected by {addr}")
        while True:


            # 5. Receive data from the client
            # The 1024 is the buffer size: the max amount of data to be received at once.
            data = conn.recv(1024)
            if not data:


                # If recv() returns an empty bytes object, the client has closed the connection.
                break

            print(f"Received from client: {data.decode('utf-8')}")


            # 6. Send (echo) the data back to the client
            # Data must be sent as bytes, so we encode the string.
            conn.sendall(data)

print("Connection closed.")
The Client: client.py
This client connects to our server, sends a message, and prints the server's response.
# client.py
import socket

HOST = "127.0.0.1"  # The server's hostname or IP address
PORT = 65432        # The port used by the server

with socket.socket(socket.AF_INET, socket.SOCK_STREAM) as s:


    # 1. Connect to the server
    s.connect((HOST, PORT))


    # 2. Send a message
    message = "Hello, server!"
    s.sendall(message.encode('utf-8'))
    print(f"Sent to server: {message}")


    # 3. Receive the echo back from the server
    data = s.recv(1024)

print(f"Received from server: {data.decode('utf-8')}")
4. Running Your First Server
Now, let's see it in action.
- Open two separate terminal windows.
- In the first terminal, run the server:
You will see the server start and then "hang" while it's listening. This is expected, as it's blocked on thepython server.pys.accept()call. - In the second terminal, run the client:
python client.py
When you run the client, you should see output in both terminals:
- Client Terminal: It will print that it sent "Hello, server!" and then received the same message back. The script will then exit.
- Server Terminal: It will print that it accepted a connection, received the message, and then the connection will close (because the client script finished and its
withblock closed the socket).
To get a more detailed, line-by-line walkthrough of creating both the server and client, the following video is an excellent resource.
Python Sockets Simply Explained
The video 'Python Sockets Simply Explained' by NeuralNine provides a very clear, step-by-step guide to writing this exact type of server and client. It's great for reinforcing the code we just wrote.
Watch the following two segments: Server Creation (22:30 - 33:40): This part walks through creating the server.py file, explaining each method (bind, listen, accept, etc.) as it's typed. Client Creation (33:40 - 39:03): This part shows how to write the client.py file to test the server, focusing on the connect and send methods.
5. Under the Hood: Sockets and the Operating System
You've now successfully built a working server! But to satisfy your goal of a deep understanding, let's connect this Python code back to the OS concepts from our last module.
When you call socket.socket(), Python isn't performing the networking itself. It's making a system call to the OS kernel, asking it to create a communication endpoint. The OS returns a file descriptor—a unique integer that your process uses to refer to that socket, just like it would for an open file. Every subsequent call (.bind(), .listen(), .send(), .recv()) uses that file descriptor to tell the OS what to do with that specific socket.
This video segment explains this abstraction layer very well.
How Sockets Actually Work – From Your Browser to the Backend ⚙️
The video 'How Sockets Actually Work' from ByteMonk explains the crucial link between your application code, the socket object, and the operating system's kernel.
Please watch from 03:06 to 05:42. Focus on how the Python socket object is just a 'handle' or 'ticket' (a file descriptor) provided by the OS. Notice how the methods like .connect() and .send() are translated into system calls that instruct the OS kernel to manage the low-level networking tasks.
This is the magic link: a socket is just another resource, like memory or CPU time, that the OS provides to your running process. When you used htop in the last lesson, you were watching processes that were holding open resources like these sockets.
Conclusion
In this lesson, you bridged the gap between the operating system and a network application. By building a simple TCP server, you've implemented the fundamental pattern that underlies all web communication.
Key Takeaways:
- A socket is a communication endpoint managed by the operating system. Python's
socketmodule is an API to request and control these endpoints. - A TCP server follows a
socket -> bind -> listen -> acceptsequence. Theaccept()call is crucial as it blocks until a client connects and returns a new socket dedicated to that connection. - The listening socket's only job is to accept new connections, while communication happens on the new socket returned by
accept(). - All data sent over a network must be in bytes. In Python, this means you must
.encode()strings before sending and.decode()bytes after receiving.
Preview of the Next Lesson:
Our simple server has a major limitation: it can only handle one client at a time and then it shuts down. To handle multiple clients simultaneously and efficiently, real-world systems use more sophisticated tools. In the next lesson, we will explore the roles of a web server (like Nginx) and an application server (like Gunicorn). You'll learn why we separate these concerns and how they work together to run a robust, production-ready backend service.