Introduction
Welcome back! In the last lesson, you conducted a head-to-head comparison of Gumroad and Payhip, analyzing their fee structures, payout schedules, and feature sets to make a preliminary choice for your sales platform. That decision was a critical strategic step.
Today, we move from strategy to execution. This lesson is all about bringing your brand to life on your chosen platform. You will be working towards this learning outcome: Apply your brand identity to your storefront and configure payment processing settings.
We'll treat this process systematically. You'll take the brand assets you developed in Module 3—your logo, color palette, and brand voice—and use them to create a professional, cohesive storefront. We will then connect the necessary payment processors so that when you make your first sale, the money has a place to go.
This lesson is structured in parallel paths. Whether you chose Gumroad or Payhip, you'll find a dedicated walkthrough to guide you through the setup.
1. The Storefront Branding Checklist
You've expressed a preference for systematic, rule-based frameworks, which is an excellent mindset for maintaining brand consistency. Before we dive into either platform, let's establish a simple checklist based on the brand identity work you've already completed. This will be our guide for the setup process.
A strong brand is built on consistency across all touchpoints, and your storefront is one of the most important.
The Ultimate Guide to Creating A Branding Checklist
To formalize this idea, let's look at an article from Discovery Design that explains the components of a visual identity. You don't need to read the whole article, but it's a great resource for understanding how these elements work together.
Briefly read the sections 'Nail Down Your Visual Identity' and 'Own Your Brand Tone of Voice and Messaging'. This will reinforce the elements we are about to apply.
Based on that reading and your previous work, here is our branding checklist for your storefront:
- Store Name & Username: Your brand name, used for the URL and store title.
- Logo: Your wordmark from Module 3.
- Bio/About Section: A short description using your defined brand story and tone of voice.
- Brand Colors: Applying your primary and accent colors to the store's background and highlight elements (like buttons and links).
- Typography: Selecting fonts that match or complement your brand's font choices (if the platform allows).
Have your one-page brand guide from Module 3 ready. We will now apply this checklist to your chosen platform.
2. Platform Setup: Choose Your Path
Follow the guide for the platform you selected in the previous lesson.
Path A: Setting Up Your Gumroad Storefront
Gumroad is known for its simplicity, and you'll see that in the setup process. The customization options are limited, which forces a focus on the essentials.
How to Use Gumroad in 2026: Step-by-Step Setup, Uploading & Selling Digital Products
This video from Shopioso provides a clean, step-by-step walkthrough of the Gumroad setup process. We'll use it to guide our branding and payment configuration.
Watch the following two segments: Profile Customization (2:47 - 4:49): Pay close attention to how the changes on the left panel (logo, bio, colors) are reflected in the live preview on the right. Payment Setup (4:49 - 6:26): Observe the steps for verifying your identity and connecting a payout method.
Let's walk through the setup using our branding checklist.
Step 1: Apply Your Brand Identity
Navigate to the Settings > Profile tab in your Gumroad dashboard. This is where you'll do all your visual branding.
- Username & Name: Set your username (this becomes your URL, e.g.,
yourbrand.gumroad.com) and your store name. - Bio: Copy in the concise brand story or "About" text you developed.
- Logo: Upload the final wordmark file you created in Illustrator.
- Fonts: Gumroad offers a few font choices. Select the one that best aligns with the feel of your brand guide.
- Colors: This is a key step.
- Set the Background color.
- Set the Highlight color. Use your primary accent color from your brand guide for this. This color will be used for buttons and links, making it a crucial part of the user experience.

After you've updated these fields, click "Update settings" and use the preview button to see your live storefront.
Step 2: Configure Payment Settings
Now, navigate to the Settings > Payments tab. This is where you tell Gumroad how to pay you.
- Verification: You'll first need to verify your identity. This is a standard anti-fraud measure. You'll select your country and likely need to provide identification. This process must be completed before you can be paid.
- Payout Method: You can choose to be paid out via direct bank deposit or PayPal. Given your current student status, PayPal is often the most straightforward option. Connecting a bank account may have age-related requirements depending on your bank.
- Payout Schedule: Gumroad pays out weekly on Fridays, after a 7-day holding period for each transaction. You can set a minimum payout threshold (e.g., only get paid once your balance reaches $50) to minimize transaction fees on your end, but the default is $10.
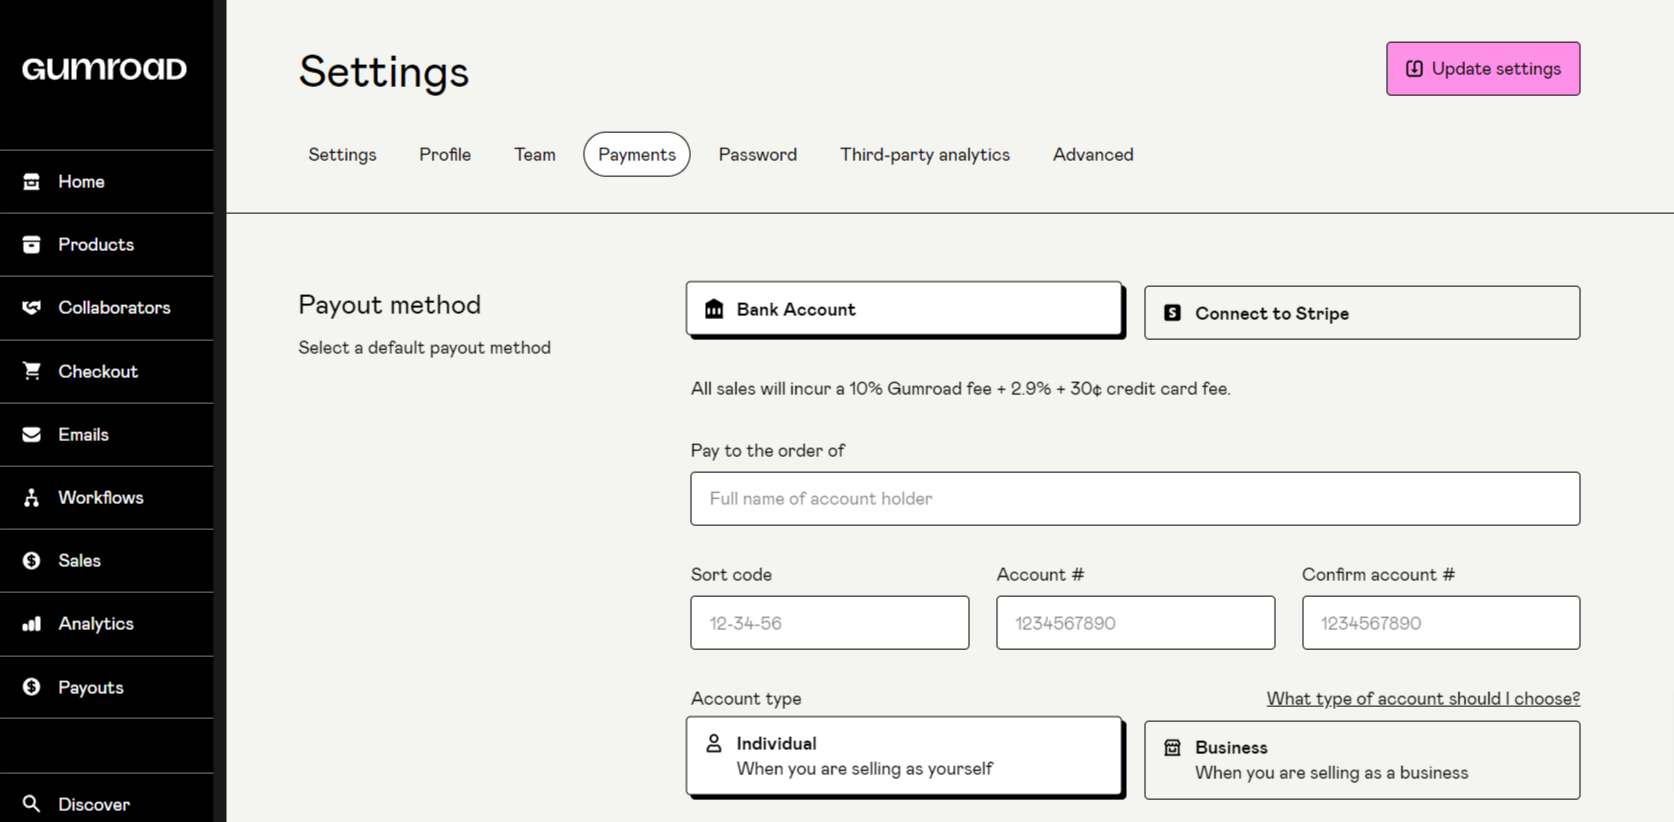
Once you've connected your payout method and your identity is verified, you are officially ready to accept money.
Path B: Setting Up Your Payhip Storefront
Payhip offers a more robust set of customization tools, allowing you to create a storefront that more closely aligns with a traditional website.
Complete Payhip Tutorial 2025 - Start Selling Today!
Aurelius Tjin's 'Complete Payhip Tutorial' is a thorough guide to the platform. We'll focus on the initial account setup and the powerful store builder.
Please watch these two essential segments: Account & Payment Setup (5:54 - 7:31): Focus on how to connect Stripe and PayPal, and how to set your store's default currency. Store Builder Customization (22:50 - 25:54): See how you can use the store builder to add a logo, change themes, and customize the layout, colors, and fonts.
Let's follow our checklist to build out your Payhip store.
Step 1: Configure Account and Payment Settings
First, navigate to your Account > Settings.
- Account Basics: Set your store name and desired username (which will form your URL, e.g.,
payhip.com/yourbrand). - Payment Details: Go to the "Payment Details" tab. This is the most critical step. You must connect either a PayPal account or a Stripe account to get paid. You can connect both to give customers a choice at checkout. For your situation, starting with PayPal is likely the simplest path.
- Currency & Statement: Set your default currency (e.g., USD) and the "Statement Description." This is the text your customers will see on their credit card statements (e.g., "YOURBRAND"). This is important for reducing confusion and potential chargebacks.
Step 2: Apply Your Brand Identity
Now, go to Store > Launch Store Builder. This is where you'll customize the look and feel.
- Header & Logo: Click on the "Header" section. Here you can switch from a text title to your uploaded Logo file.
- Themes & Styles: The most powerful feature here is the ability to change the entire store style. Click Change Store Style > Themes. You can preview different themes to find a minimalist layout that works for you.
- Colors & Fonts: Within "Change Store Style," you can fine-tune the Colors to match your brand guide's hex codes and select Fonts that align with your brand's typography.
- About Section: You can add or edit an "About Me" section to include your brand story and bio.
- Favicon: Under "Change Store Style", you can upload a favicon—the small icon that appears in the browser tab. You can create a simplified version of your logo for this (e.g., just the first letter or a simple mark) in Illustrator and export it as a 32x32 pixel PNG.
Payhip's builder gives you much more control than Gumroad's, so take some time to ensure the layout, colors, and fonts are all consistent with your brand guide.
3. Your Task: Build and Configure Your Storefront (20 minutes)
It's time to put this into practice. Open a new tab and log in to the platform you've chosen. Using your brand guide from Module 3 and the checklist from this lesson, complete the following:
- Create Your Account: If you haven't already, sign up.
- Configure Account Settings: Set your store name and username.
- Apply Visual Branding:
- Upload your logo/wordmark.
- Enter your bio/brand story in the appropriate section.
- Apply your brand's color palette to the background, text, and highlight/accent elements.
- Select the closest matching fonts available.
- Configure Payment Processing:
- Navigate to the payment settings section.
- Connect your PayPal account.
- Complete any identity verification steps required.
- Review: Publish your changes and view your live storefront. It may feel empty without products, but it should look and feel like your brand.
This is a foundational step. You are building the digital "place" where your business will live.
Conclusion
Congratulations! You have now transitioned your brand from a set of abstract guidelines in Figma into a tangible, public-facing storefront. You've also set up the financial plumbing required to operate as a business. This is a significant milestone.
Key Takeaways:
- Brand Consistency is Key: Applying your logo, colors, and fonts consistently creates a professional and trustworthy impression from the moment a potential customer lands on your page.
- Systematic Setup: Using a checklist ensures you don't miss crucial branding or configuration steps.
- Payments are Paramount: A beautiful store is useless if you can't get paid. Configuring and verifying your payment processor is a non-negotiable step before launch.
- Platform Differences: You've now experienced the different customization philosophies of Gumroad (simplicity) and Payhip (flexibility) firsthand.
Preview of the Next Lesson
Your storefront is now ready to be stocked. But before we list your main product, we need a way to attract an audience and build interest. In the next lesson, we will tackle the first step of your marketing funnel: you will design and package a lead magnet that provides value and complements your main product offering. This will be the first "product" you list on your new storefront.